Image by Kai Yan, Joseph Wong, Some Rights Reserved
The thing which makes Git powerful as a version control system is its flexibility, and the many ways exposed by the Git API to get things done. Of course, this is also what can make Git challenging to learn and use. There are so many options available that it can be difficult to know how to approach a specific problem. On top of that, the Command Line Interface (CLI) for Git, and the underlying API employ a syntax which is . . . inconsistent at times, and definitely not intuitive for the uninitiated.
This article is targeted at those newer to Git, who may be trying to find their way through some of the more advanced features for the first time. I’ve created a more condensed Quick Reference to Git’s Interactive Patch Staging for those who don’t need that narrative or pictures, and just want to refresh themselves on the syntax and/or options associated with this feature of git.
Skip the damn narrative and pictures, take me to the quick version
If you are just getting started with Git, you might find Getting Started With Git and a Basic Git Command Line Reference helpful in conjunction wit this article. Both were aimed at Windows users stepping into Git and the Bash CLI for the first time, but the concepts and commands discussed are mostly universal.
- Don’t put Significant but Unrelated Changes in the Same Commit
- Use Interactive Staging with Partial Files for Separate Individual Patch Commits
- The git add -p Syntax
- Table of Options for Interactive Staging with git add –p
- Staging a Bugfix Patch for Commit
- Committing the Staged Patch(es)
- Stage and Commit New Feature Code
- Merging the Bug Fix into Master
Don’t Put Several Significant but Unrelated Changes in the Same Commit
If we were all perfect we would always be on top of things, and (for example) do a bug fix in one commit, and add new code in a different commit. But as we all know, in real life it doesn’t actually work out that way sometimes (most of the time, if you are me!). On occasion, we perform a number of changes in the same code file, and then, after laboring to get it right for hours, we realize we have introduced unrelated changes, to different parts of the file, which should really be in separate commits.
Our Contrived Example
Consider the following contrived, but illustrative situation (the examples here are in C#, but this exercise could apply to any platform). We open our latest project on branch master and review a file, ComplicatedExistingClass, which looks like this to start with:
Original Code File for ComplicatedExistingClass:
using System;
using System.Collections.Generic;
using System.Linq;
using System.Text;
using System.Threading.Tasks;
namespace GitAddPartialFile
{
    public class ComplicatedExistingClass
    {
        public int ComplexCalculation(int numberOne, int numberTwo)
        {
            int sum = 0;
            // Some complex code which also contains a bug . . .
            sum = numberOne + numberTwo + 1;
            return sum;
        }
    }
}
We get to work, adding a new method. We start by checking out a feature branch (because we always do that, right? Create a feature branch to work on?):
Check Out a New Feature Branch:
$ git checkout -b newfeature
We then add our new method, which requires the addition of a couple new using statements at the top of the code file (yes, I KNOW System.Data and System.Data.OleDb are not actually used here, just mixing it up a bit – work with me), and of course, our new method:
Our Code File with New Method:
using System;
using System.Collections.Generic;
using System.Linq;
using System.Text;
using System.Threading.Tasks;
using System.Data;
using System.Data.OleDb;
namespace GitAddPartialFile
{
    public class ComplicatedExistingClass
    {
        public int ComplexCalculation(int numberOne, int numberTwo)
        {
            int sum = 0;
            // Many lines of complex code which also contains a bug . . .
            sum = numberOne + numberTwo + 1;
            return sum;
        }
        public IEnumerable<int> DoSomethingWithNumbers(int[] numbers)
        {
            var output = new List<int>();
            foreach (int i in numbers)
            {
                int result = this.ComplexCalculation(i, numbers.Count());
                output.Add(result);
            }
            return output;
        }
    }
}
While testing out our complicated new method, which also calls the original ComplexCalculation method, we notice there is a bug in the original method. The bug fix is quite complex, requiring us to modify several lines of code after we discern just what it is that is wrong:
Modified Code File, including Arduous Bug Fix:
using System;
using System.Collections.Generic;
using System.Linq;
using System.Text;
using System.Threading.Tasks;
using System.Data;
using System.Data.OleDb;
namespace GitAddPartialFile
{
    public class ComplicatedExistingClass
    {
        public int ComplexCalculation(int numberOne, int numberTwo)
        {
            int sum = 0;
            // Many lines of complex code which no longer contain any bugs
            // but took hours to figure out . . .
            sum = numberOne + numberTwo;
            return sum;
        }
        public IEnumerable<int> DoSomethingWithNumbers(int[] numbers)
        {
            var output = new List<int>();
            foreach (int i in numbers)
            {
                int result = this.ComplexCalculation(i, numbers.Count());
                output.Add(result);
            }
            return output;
        }
    }
}
We’re Ready to Commit, but . . .
Only now do we come up for air long enough to realize we should have done the bug fix separately from adding our new method. For one, we might not be done with our feature yet, but the bug fix is critical and should be able to be merged back into master immediately. Also, it simply makes sense that a bug fix in the existing code base should be a singular commit, separate from adding new code. What to do?
What we would like to do is create a commit for the bug fix first, separate from our newly added feature code. Here is how.
Use Interactive Staging with Partial Files for Separate, Individual Patch Commits
Git to the rescue. We can use the Git command git add –p to do this interactively, and stage our code in patches. With git add –p, we selectively add chunks of a file (or files) from our working tree to the staging area, enabling us to select discreet chunks of changed code and build separate commits with pieces of a file or files. The command syntax is as follows:
Git Add –P Syntax:
$ git add -p [optionalFileName]
In the above, the file name is optional, but most likely you will want to specify the file, as otherwise the next step will walk you through all files within the working tree with changes since the last commit.
Once we type this command and hit enter, git jumps into an interactive mode, allowing us to decide which file chucks we wish to add to the next commit. In the case of our example project, we would type the command like this:
Staging Patches from our Existing File for Commit:
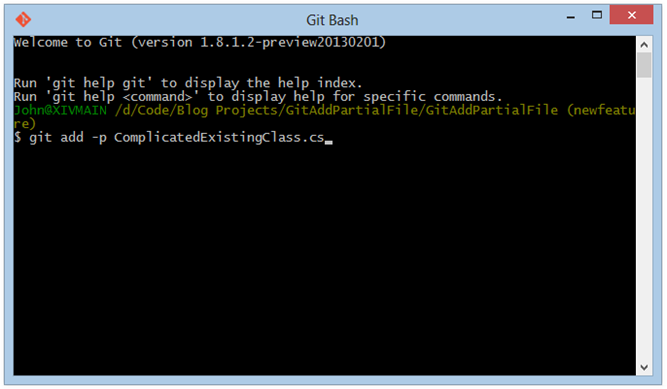
$ git add -p ComplicatedExistingClass.cs
Our terminal window looks like this before we hit enter:
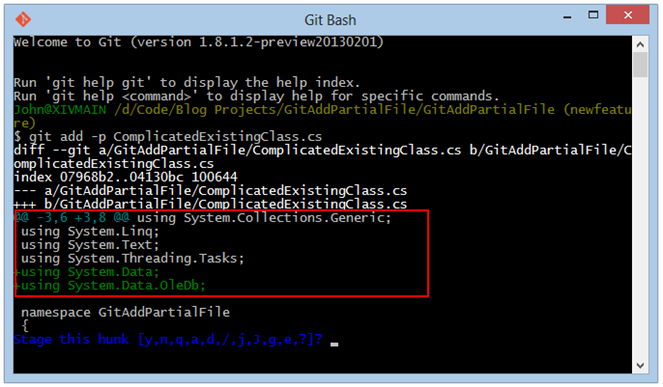
Once we hit the enter key, we see this rather busy window:
See the stuff called out in the red box? this represents the first chunk of changed code git has identified in the file. The changes are shown in green, and surrounding (unmodified) code is shown in white for context. Also notice the text in blue at the bottom of the window, with a prompt waiting for us to tell git what to do. Following are the options available to us with respect to the code chunk in the box. Typing one of the options and hitting enter will do one of the following, depending upon the option selected:
Options for Interactive Patch Staging:
Interactive Patch Staging Options:
y |
Stage the current code chuck for the next commit |
n |
Do not stage the current code chunk for the next commit |
a |
Stage the current chunk, and all remaining chunks in the current file |
d |
Do not stage current chuck, or any remaining chunks in the current file |
g |
Select the next code chuck to review |
/ |
Search for a code chuck matching the given regex |
j |
Leave undecided, see next undecided chunk |
k |
Leave undecided, see next code chunk |
K |
Leave undecided, see previous undecided code chunk |
s |
Split the current code chunk into smaller chunks |
e |
Manually edit the current code chunk |
? |
Print help |
Staging Just the Bug Fix For Commit
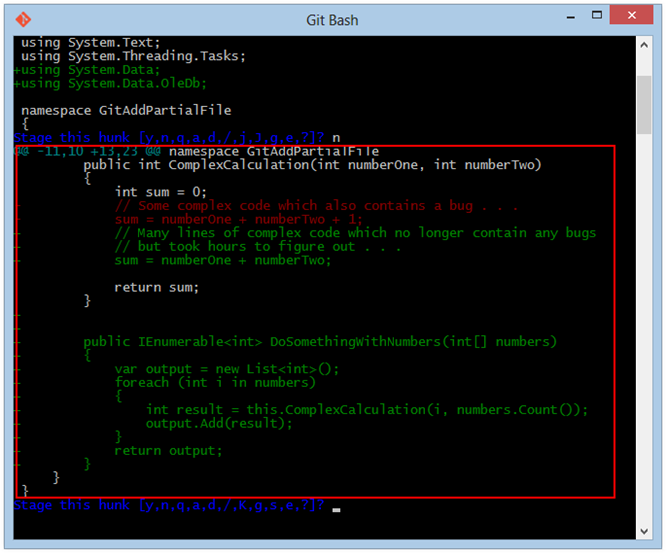
In our example case here, the code chunk above is related to our new method (work with me here, it’s contrived, remember?), so we we don’t want to add this chunk to the next commit. Hit n, then Enter:
Do Not Stage Current Code Chunk and Move to the Next Code Chunk:
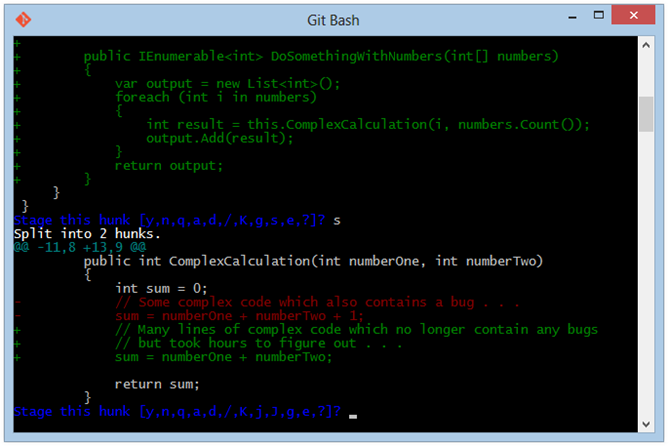
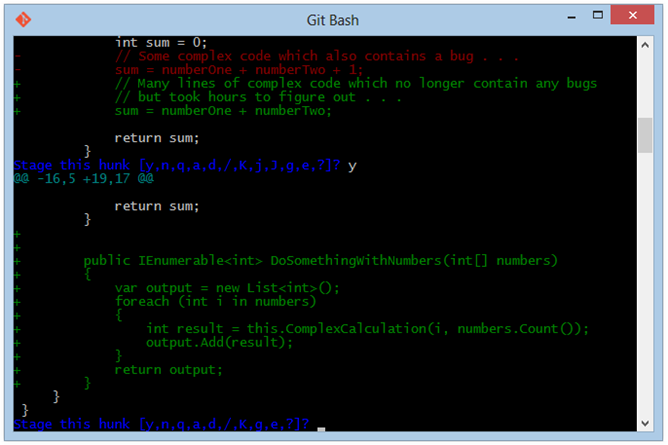
Whoa. Ok, NOW we see the bug fix code we were looking for, but we also see our newly added method. We want to isolate the bug fix code. In this case, we need to select the s option from the menu, splitting the above chunk into smaller pieces. This results in a code chunk including our bug fix, and only our bug fix:
Split Current Code Chunk and Isolate Bug Fix:
Now we have what we want to include in our next commit. Obviously, we choose the y option so that this chunk is staged for commit. Git then moves to the next code chunk:
Choose Bug Fix for Next Commit:
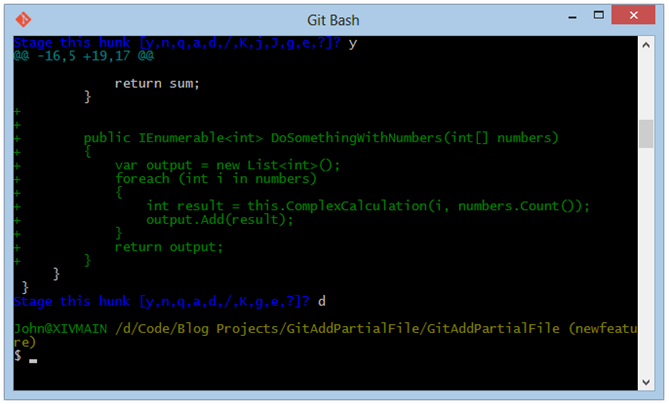
What we now see in the terminal window is the rest of the code for our new feature. We don’t want this in our bug fix commit. Also, because our entire bug fix has just been staged for commit by selecting the y option, we can tell git not to stage the current code chunk, or any remaining code chunks. We do this by selecting the d option:
Exit and Return to Terminal Command Prompt
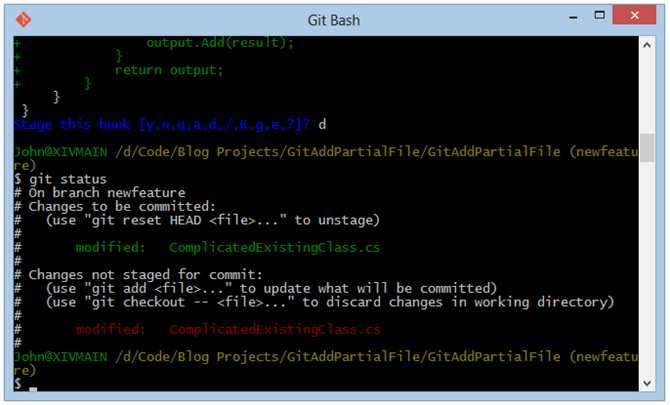
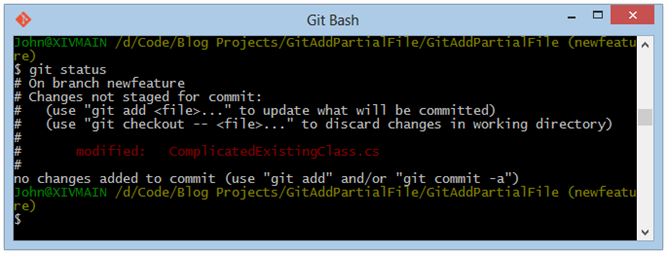
Now we are ready to commit our bug fix. If we run git status, we see something interesting:
Git Status After Staging Partial Code Patch for Bug Fix:
In the image above, the item under “changes to be committed” in green is our ComplicatedExistingClass.cs file. But also, we see a similar item under “Changes not staged for commit.” This is because we have staged some of our changes within that file for commit, and left some un-staged.
Committing the Staged Patches from the File:
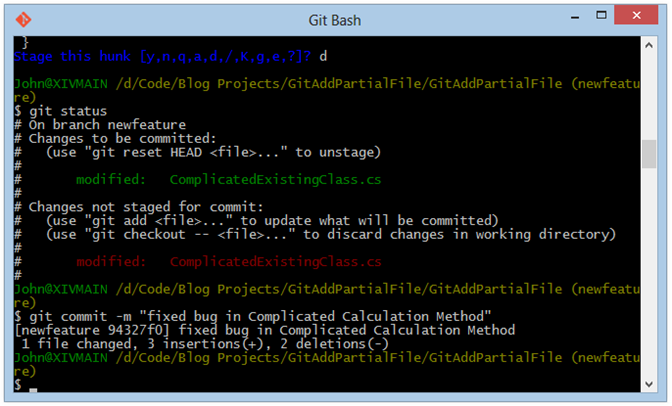
From here, we can commit the bug fix:
$ git commit -m "Fixed bug in Complicated Calculation Method"
Commit the Bug Fix:
If we run git status again, we see that there are no changes staged for commit, and a single item modified but un-staged – the rest of our changes representing the addition of our new method:
Git Status After Committing Bug Fix:
Stage and Commit the New Feature Code
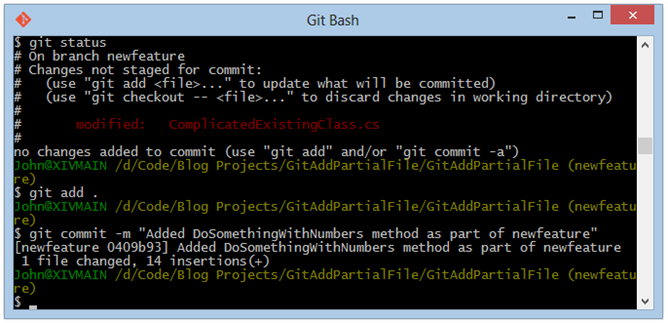
Now that we have our bug fix committed, we can (in this case) go ahead and stage the rest of the changes for as usual, and then commit, since they represent our complete work adding the new method:
Stage New Feature Changes:
$ git add .
Then Commit:
$ git commit -m "Added DoSomethingWithNumbers method as part of newfeature"
Our terminal window:
Stage and Commit the New Feature Code:
Review Commit History with git log
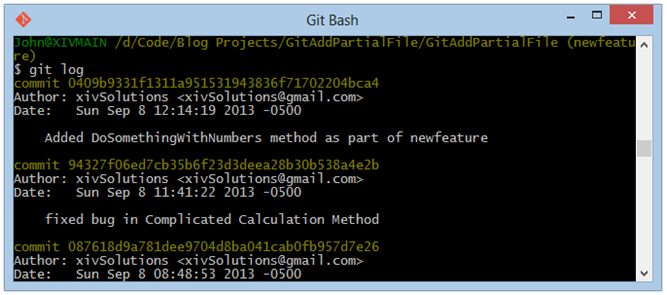
Now, if we use git log to review our commit history, we see our nicely broken out commits as if the bug fix, and the new feature code had happened sequentially instead of in parallel:
Git Log After Committing Bug Fix and Feature Code Separately:
Merge the Bug Fix into Master
Additionally, we could, if we so desired, merge the bug fix back into master while keeping our feature-related changes on the feature branch. We do this by switching to master, then merging the bug fix commit using its SHA-1 identifier (the first 6-8 characters will do here):
Checkout Master Branch:
$ git checkout master
Merge Bug Fix Commit (#94327f06 . . .)
$ git merge 94327f06
Our terminal window:
Wrapping Up
We have taken a very basic look at using Git Interactive Patch Staging to make order out of chaos, so to speak. This feature is handy because in real life, our actual workflow does not always parallel the idealized flow we want to record as our project’s history. Git is a powerful tool, but requires use and practice to master and become comfortable with. Check out the additional resources below for more of my own stuff, and others.
Additional Resources
- Git: Combine and Organize Messy Commits Using Interactive Rebase
- Managing Nested Libraries Using the GIT Subtree Merge Workflow
- Git Subtree Merge –The Quick Version
- Basic Git Command Line Reference for Windows Users
- Deploying an Azure Website from Source Control
- Pro Git, the online version of the book by Scott Chacon

Comments