Image by CityGypsy11 | (Creative Commons)
This post describes a rather specific use of Git’s rebase command. Rebase is a powerful and complex topic which I am not fully covering here. I will attempt a more thorough look at rebase in general in an upcoming post. If you are newer to Git, as I am, you might want to refer to a few of my previous posts covering some of the basics:
- Basic Git Command Line Reference
- Getting Started with Git for the Windows Developer
- Getting Started with Git for the Windows Developer Part II – Get Acquainted with Bash
- Getting Started with Git for the Windows Developer Part III – Working with Files Using Bash
- Managing Nested Libraries Using the Git Subtree Merge Workflow
- Git: Interactively Stage Portions of a Single Changed File for Commit Using git add -p
A handy feature of Git is the ability to use the interactive rebase command to combine, re-organize, and otherwise clean up a messy commit history once development of a feature or bug fix is complete. I am a firm believer in the practice of “commit early, commit often” approach. However, this can leave untold number of commits which, when merged back into mainline development, clutter up a repository.
How often do you end up creating a commit which consists of some modified whitespace after cleaning up a code file, or a commit arising from updating some comments or renaming variables?
Oftentimes, when we complete a feature or fix, we can clearly see how (hindsight being, more often than not, 20/20)we would have liked the code to come together. In fact, for myself, I often wish I could just combine all of the relevant commits into one, which I could then merge back into master. For more complex features, or those which may have undergone substantial evolution during development, it can sometimes become clear how the commit history should have occurred, and not necessarily in the order of manner in which it actually did.
For reasons of maintenance, or particularly if we plan to push our code out to a public repository, it would be nice if we could straighten things up a little, and present a commit history to the world which will:
- Allow us to rollback changes in a manner which does not cripple our codebase.
- Make sense to those who might need to maintain or perhaps branch from our repository.
- Not leave us looking like disorganized idiots (“Did you really commit the deletion of a single empty line?”).
Interactive rebase gives us a way to write that history.
A Simple Example
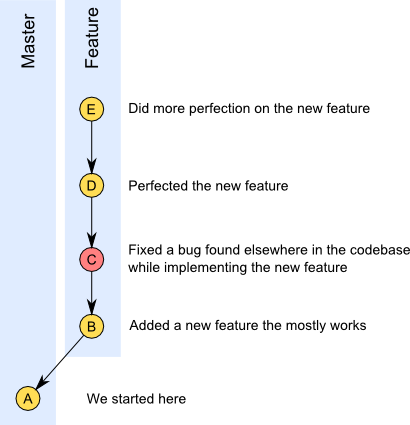
I will start with an overly simple example. Assume a straightforward git repository consisting of a master branch. In order to add a new feature, you create a feature branch, names (appropriately, feature). On the new feature branch, you work up the basic functionality of the new feature, knowing you will be fine-tuning things shortly. However, you commit the work to this point.
While developing the primary feature code, you noticed a bug in another part of the codebase, perhaps impacting the development of your new feature. You quickly spot a solution, fix the bug, and commit.
Once that is done, you fine-tune the new feature code until it is right where you want it. After committing those changes, you decide to do some cleanup. You remove unnecessary whitespace, rename some methods for clarity, and other housekeeping tasks. After committing this last batch of changes, you are ready to merge your work into master.
Except . . . the new feature, in this case, is not overly complex, and you sure wish you could merge it into master as a single commit. Also, that bug fix should remain separate, as that should be applied to master separately from the new feature. That way, if for whatever reason the new feature needs to be rolled back, it can be done so independently of the bug fix. As of right now, the state of your repo is something like this:
Repo After Feature Development
If we were to perform a standard merge at this point, our repo would look like this:
Repo State After Hypothetical Standard Merge:

As I stated, this is a rather simplified example. But you can see where we might want to combine our feature development (commits C, D, and E) into a single commit before merging to our master branch, while leaving our bug fix (commit C) on its own.
Use Git’s Interactive Rebase Feature to Re-Write History
I created a (very contrived) sample project with a main application on master, and a feature branch. After writing some trivial code to illustrate the commit history we are using in our example, I ran Gitk, which now looks like this:
The Feature Branch Shown in Gitk:

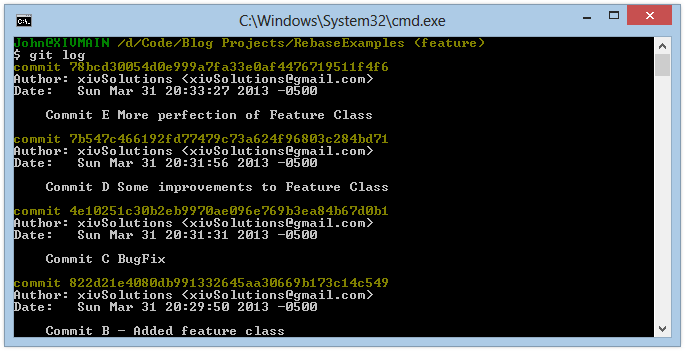
Similarly, the git log command, run from within our feature branch, shows us this:
Git Log Contents for Feature Branch:
If we want to re-write the commit history here such that commits B, D, and E are combined into a single new commit, we can tell git to run an interactive rebase which will allow us to provide direction to git with respect to how we would like it to handle each of the commits involved in the rebase.
What we are actually going to do here, consistent with how rebase works, is rewrite one or more commits in the same branch onto the parent commit we specify in the command below. Because we will be using the interactive flag, we will be allowed to reorder the commits we have selected for the operation, as well as provide some other direction as to how we want git to handle the process.
The Command Syntax is like this:
$ git rebase -i HEAD~n
In the above, n represents the number of commits we would like to edit. However, it is important to note that this actually points to the parent of commit n as the rebase target. So, having examined the state of my feature branch, I can see that I would like clean up commits B thru E. I want to combine Commits B, D and E into s single commit, and leave commit C as a stand-alone (the bug fix).
Here is what I will type into the command shell:
$ git rebase -i HEAD~4
9/12/2013 UPDATE: Interactive rebase uses the editor set up in your .gitconfig file as the default. Here, I am using Sublime Text 2, my preferred text editor (Notepad++ is a close second). Setting up Sublime Text as the default editor in Git is a minor excercise, but not necessarily intuitive. Check the linked article for more information.
After I type that in and hit enter, my editor widow opens, and looks like this:
The Editor Window After Entering the Interactive Rebase Command:

In this case, the first four lines which start with “pick” represent the commits I have chosen to edit. Note the order in which they appear. When we are finished editing, git will process our revised commits from top to bottom. This is significant because we can re-order them if we so choose. Also note the comments below. We are given some options here which we can apply to the editing process. If we replace the pick keyword with one of these flags for any specific commit, that operation will be performed on that commit.
Of particular interest to us in this case is the squash or s flag. When we replace pick with squash, we tell git to combine that commit with the previous one (remember the processing order, top to bottom). Remember what we want to do in this rather contrived example – we want to combine commits B, D, and E into one. However, the current processing order doesn’t allow us to do this, because our bug fix is sandwiched between commits B and D.
So first we will need to change the processing order by moving some commits around. In the editor, we can easily Cut/Paste the top two lines to look like this instead:
Changing the Commit Processing Order in the Editor:

Now, git will process our edited commits as ordered above, starting with C, then B, then D, then E. Next, we tell git to squash commits D and E by replacing the pick flag with s or squash, so that they both roll up into the previous commit (Commit B, in this case):
Change the Commit Processing Flags in the Editor:

Now, having made the changes above, SAVE THE EDITOR CONTENTS (I often forget this step!) and close the editor window. Your command line window will return while Git processes the commits, and then the editor reappears. Git now wants you to sort out the commit messages, so that the newly created commit history will make sense.
In our example case, the first thing that we see is this:
Making Sense of the Commit History and Messages in the Editor:

We can see that the three commit messages in question are from our original commits B, D, and E, related to our new feature. We can clear all of these (and the comments included with them) and type a new, more meaningful commit message. Note that any line prefixed with a hash symbol (“#”) will be ignored:
Modifying the Commit Message for the Combined Feature Commit in the Editor:

Now, SAVE THE EDITOR CONTENT AGAIN and close the editor window. The command line window now looks like this:
Command Window After Successful Interactive Rebase:

If we run git log now, we see the following:
Git Log After Successful Interactive Rebase:

If we run Gitk, we see this:

As we can see, in the above, we now have a single commit representing the implementation of our new feature, and the original bug fix (previously, commit C) where previously there were four distinct commits. We have re-written history, in preparation for a sensible merge into our master branch.
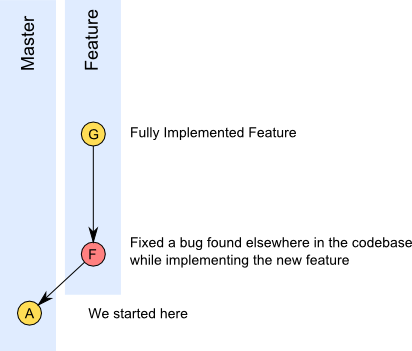
Notice that our bug fix commit (previously commit C) now has a different hash identifier than previously, and the combined commit is brand-new as well. This is important, because again, HISTORY HAS BEEN CHANGED. The implication here is that if the previous history has been pushed to a public repository (or otherwise cloned, perhaps locally) the history of the feature branch will no longer be the same. In other words, we might as well think of Commit C as a new commit F, and the combined commit as a new commit G.
IMPORTANT: This should not be performed on commits which have been pushed to a public repository, if other committers are working with your code!!! It is generally best to reserve this technique for code in your local working tree, before publishing.
Graphically, our repository now looks like THIS:
Repo After Interactive Rebase:
But, What About Merge Conflicts During the Interactive Rebase?
As often as not, you will run into merge conflicts during this process. I contrived the example above specifically to illustrate the ability to combine commits, and studiously made sure conflicts would not occur here.
In cases where there are conflicts, Git will stop the rebase process, and demand that you fix any conflicts before resuming. Once you have resolved any conflicts, type git rebase –continue in the command window, and the process will resume. We’ll take a look at conflict resolution in another post.
Additional Resources
- Pro Git (Expert’s Voice in Software Development)
– The dead tree or Kindle version
- Pro Git – Online Version
- Basic Git Command Line Reference
- Getting Started with Git for the Windows Developer
- Getting Started with Git for the Windows Developer Part II – Get Acquainted with Bash
- Getting Started with Git for the Windows Developer Part III – Working with Files Using Bash
- Managing Nested Libraries Using the Git Subtree Merge Workflow
- Git: Interactively Stage Portions of a Single Changed File for Commit Using git add -p

Comments
 John Atten
AuthorYou are SO correct on the typo! Thanks for pointing that out. Also, of course, thanks for reading and taking the time to comment! I will correct the typo shortly.
 Chris
Chris
AuthorThank you for putting together this walkthrough of a simple but really useful tool for those of us a little on the OCD side about our repository.
Also, I think I caught a minor typo:
"As I stated, this is a rather simplified example. But you can see where we might want to combine our feature development (commits [b]C[/b], D, and E) into a single commit before merging to our master branch, while leaving our bug fix (commit C) on its own."