TL;DR – Setting up automatic deployment to Windows Azure Websites from your source control repository is just about painless. While the free Windows Azure Websites offering is not without it’s shortcomings, and the “pay-as-you-go” model remains a little spendy for most do-it-yourselfers, the Azure websites platform brings a lot to the table. Automatic deployment from source control is very high on that list.
The Windows Azure platform has come a long, long way in the past year. While Azure is far from the only “Infrastructure-As-A-Service” platform out there, it does present a compelling feature set, and the Azure team has demonstrated an aggressive deployment cycle in pushing improvements out the door. Also, pricing for so-called “cloud services” in general have been steadily falling, making platforms such as Windows Azure, Amazon Web Services, and Linode more and more compelling.
One of the most interesting features offered by Azure of interest to the larger community are Azure Websites. Azure provides an easy to use interface for hosting one or more sites, at a variety of service levels, from a free entry level package to dedicated instance hosting.
More than One Way to Skin a Cat
There are any number of ways to manage deployments to Windows Azure Websites. This is only one. There are also numerous integration tools for Visual Studio, and for really quick and dirty solutions, check out the recently released Webmatrix 3 Preview. How you deploy will depend on your needs, and possibly your technical abilities.
Personally, whether I’m working in Visual Studio, Webmatrix, or simple text files, I find the automatic deployment from my remote source control repo the most attractive.
Deployment to Azure from Source Control
The Azure team has made it very simple to set up an Azure website, and in fact, to do so directly from source control. You can automatically publish changes to your Azure-hosted site simply by pushing to the master branch of your repo on various source control service providers, or simply from your local repository on your machine.
In this post, we’ll walk through the basics of deploying a website to Azure directly from Github, and then see how when we push changes to master on our Github repository, the changes are automatically published to our live site.
Getting Started
To follow along, you will need:
- A Github Account
- A Windows Azure account (you can start with the 90 day free trial, but you can always have up to 10 websites for free. You will need a credit card to create an Azure account, but it won’t be charged).
- Git for Windows installed on your machine. If you are new to Git, you can find enough basic information to follow along here in my previous post Getting Started with Git for the Windows Developer.
For our example, I will use a very basic site I have sitting around, consisting of an index.html file, a CSS file, and an a Jpeg image (this just happens to be a small practice project I had sitting around, so I used it).
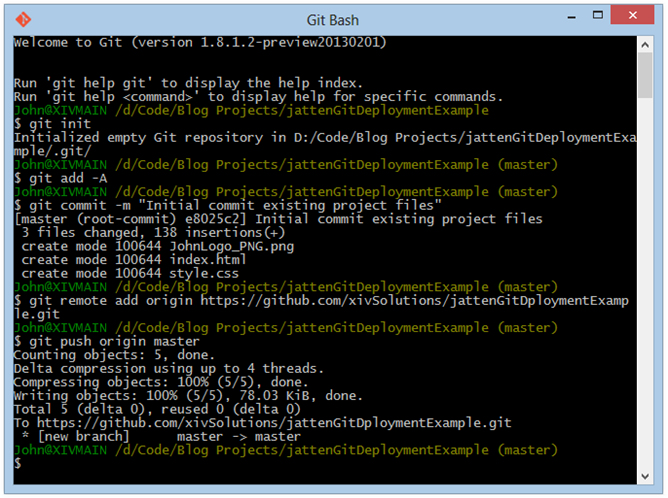
First, I will initialize a new local repository for the site, and commit all the files. Then, after creating a corresponding remote repo on my Github account, I push the content up to the new remote:
Create a Git Repository and Push to Remote:
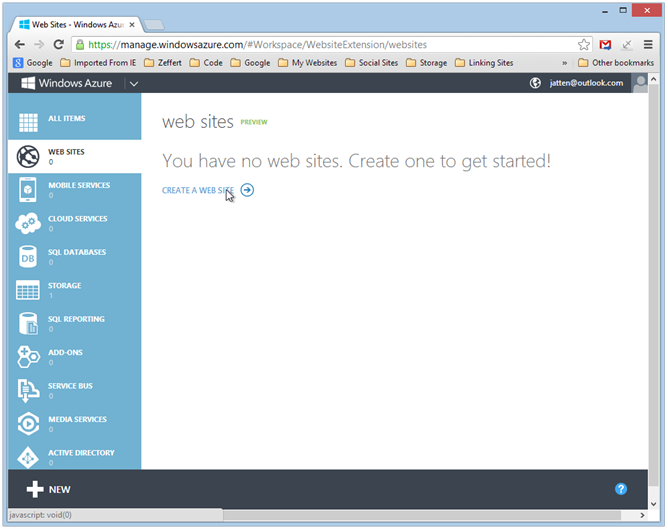
Now that your site files have been pushed to the Github remote, log into your Azure account, navigate to the Websites” tab, and click the Create A Website link:
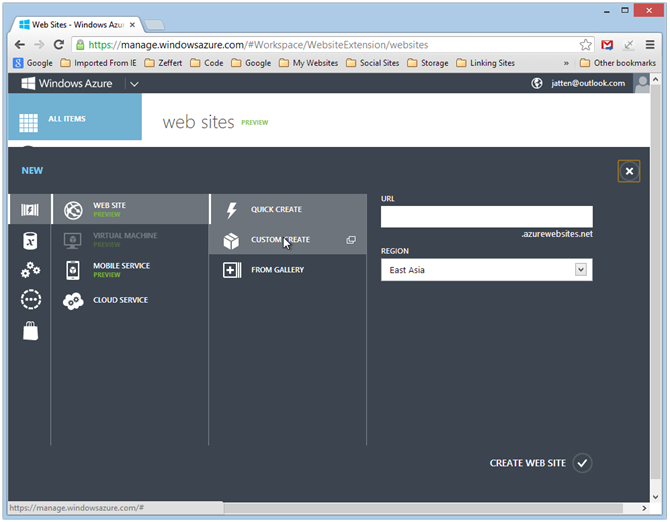
From here, your should be looking at something like the picture below. Click on the “Custom Create” link:
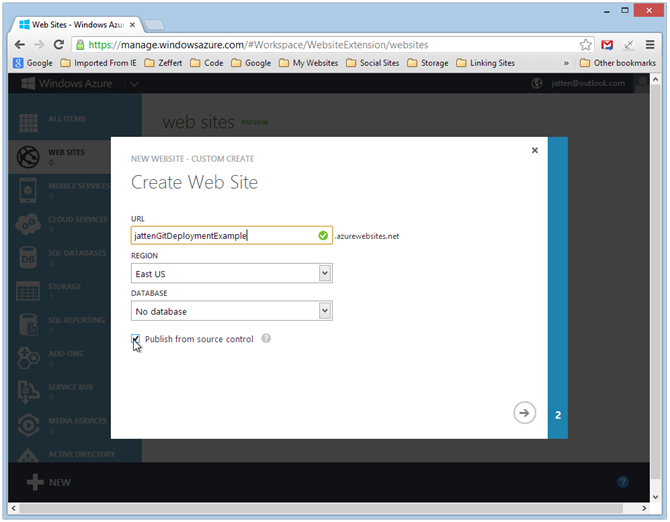
From here, you will see some options, as below. You will need to provide a URL for your Azure site. Note that the free websites do not allow custom domain names. You can pick any name you want, (so long as it is not already taken) but it will be a sub-domain within .azurewebsites.net. In my case, I entered jattenGitDeploymentExample, and the full URL for my site will be jattenGitDeploymentExample.azurewebsites.net. Not the greatest URL, but it will do for our example.
You will also need to pick a geographical region in which your site will be hosted. This represents the primary datacenter location where your files will live. The most likely choice would be the one closes to where you live.
We don’t need a database for this simple exercise. Last, make sure the “Publish from source control” box is checked. Then click the right-pointing arrow at the bottom of the screen.
Setting Up Deployment Options for a Windows Azure Website:
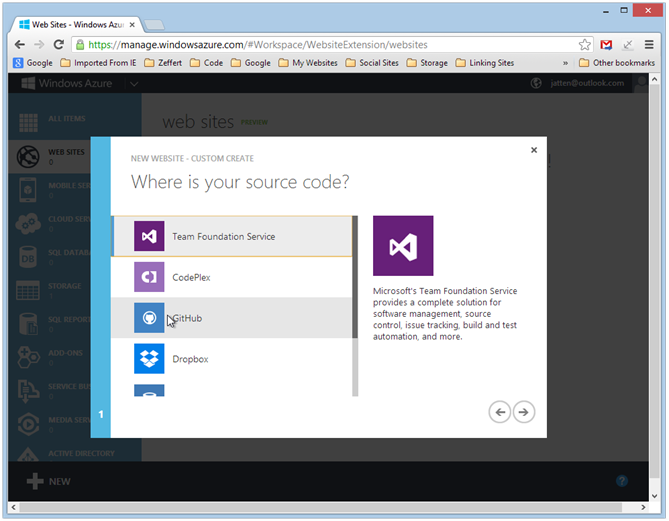
Next, you need to tell Azure where your repo is. Notice there are a number of available options. In other words, while we are using Github for this example, you could just as easily publish from any of the other listed options, including ( but not visible in the picture here) your local machine.
Select Your Source Code Provider:
If you are not signed in to Github on your local machine, you will be prompted to do so, and taken to your account sign-in at Github in a separate browser window. Once you have signed in to Github, return to the Azure window and select Github again.
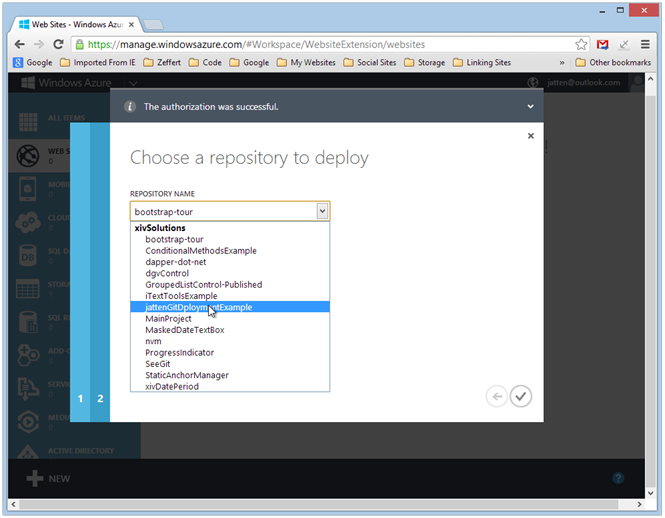
Once you select your source control location and click the right-pointing arrow again, the next window asks you which repository you want to publish. Select the repo for the site we just pushed up to master. Also, you can specify a different branch. Here, we are going to stick with master. However, you could just as easily create a special branch (named” production” for example). Just remember, whenever you push changes to the branch specified here, the result will be published to your site:
Select the Remote Repository to Hook Into:
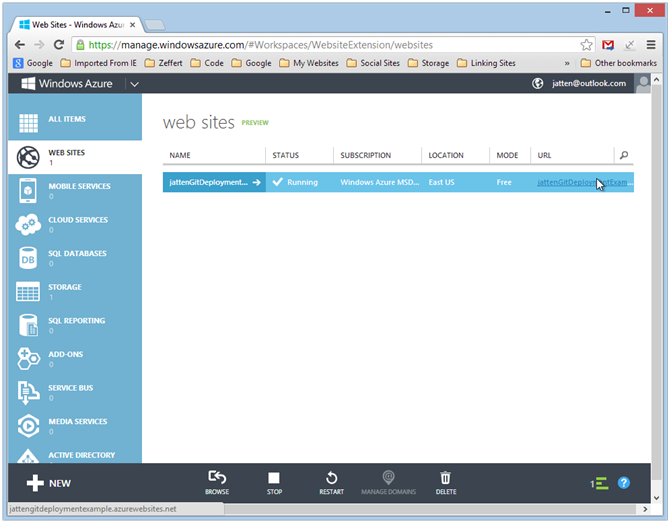
Once you click the check icon in the lower right corner, Azure will hook into your Github repository and deploy your site. This might take a few seconds. When provisioning and deployment are complete, you should see this:
The Site is Deployed and Live:
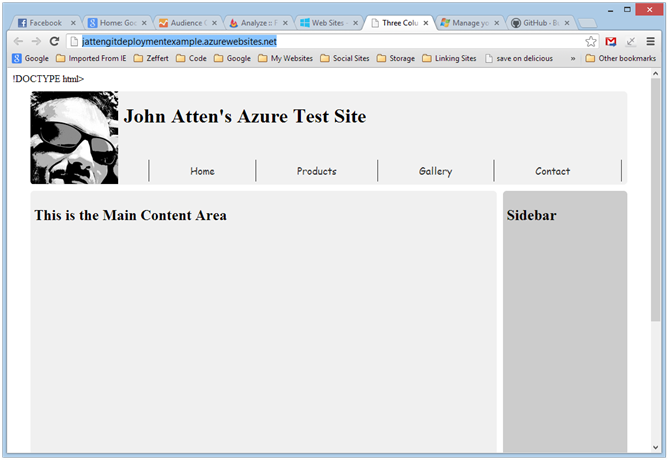
Clicking on the link in the URL column will open your site in a new browser tab. Congratulations, your site is now deployed, direct from your Github repository. More importantly, your site is now hooked into branch master, and when changes are pushed or merged to that branch, those changes will be automatically deployed to your Azure site.
Opening the Example Site:
Now, if we look in the image above, we can see that there is some problem with my HTML – apparently I am missing the opening bracket on the <!DOCTYPE html> tag. Also, I want to add some text to my main content area.
In doing this, we’ll take a quick look at how changes are automatically deployed when we push to the remote repo on Github.
Pushing Changesets to Automatically Deploy
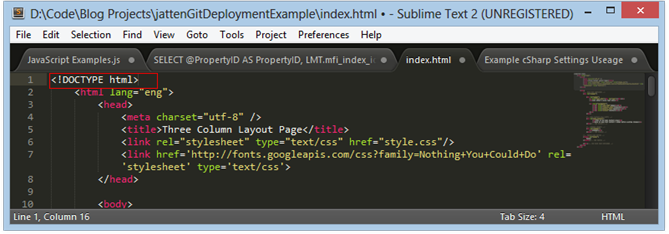
First, I want to fix that problematic DOCTYPE tag. I’ll open the file, and correct it in my text editor:
Fixing the Broken <!DOCTYPE html> Tag:
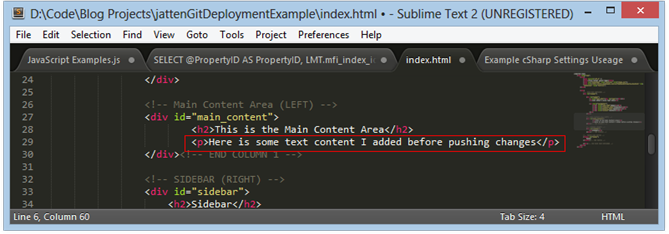
Then I will add some text content to the main content area:
Adding Text Content:
Now, I save my changes, then open my Bash window. Checking status, I can see my changes are ready to be stages and committed. So I do that, and then push to origin master:
Commit and Push to Remote: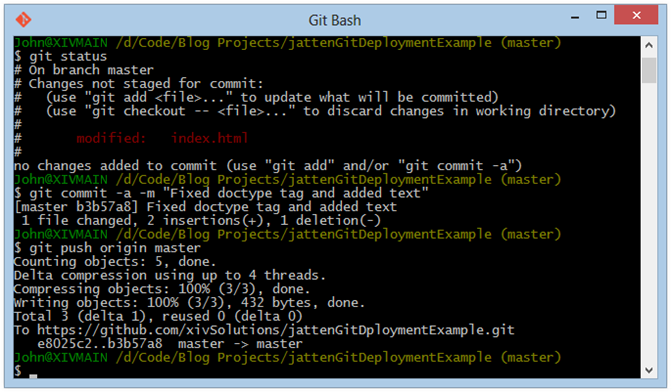
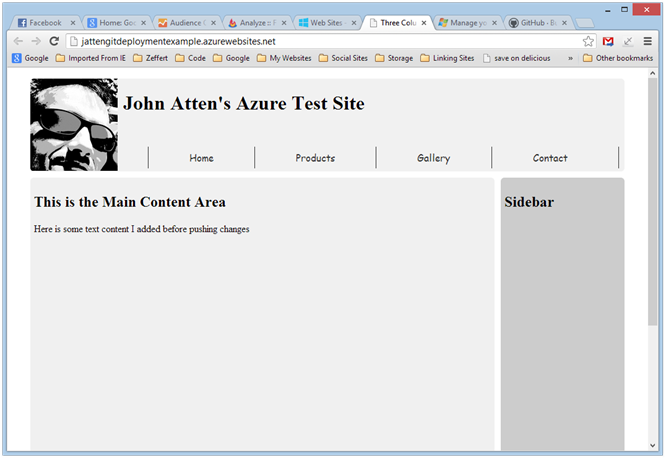
That done, I hit “Reload” (or hit the F5 key) on my browser window where my site is currently open:
Reload the Site in the Browser Window:
Voila! My changes have been deployed, simply by pushing to the master branch of my Github repository. The broken <!DOCTYPE html> tag has been fixed, and the new text appears in the Main Content area.
Viewing Deployment History in the Azure Portal
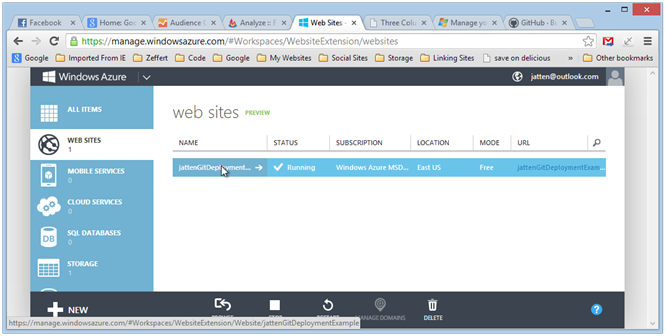
Once your site is deployed, Azure keeps a record of the deployment history. If you click on your website in the websites list of the Azure portal:
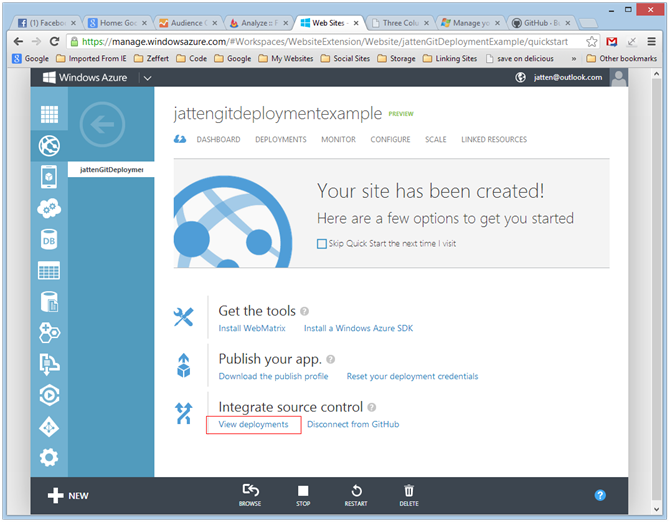
You will be taken to THIS window. Click on the deployment history link:
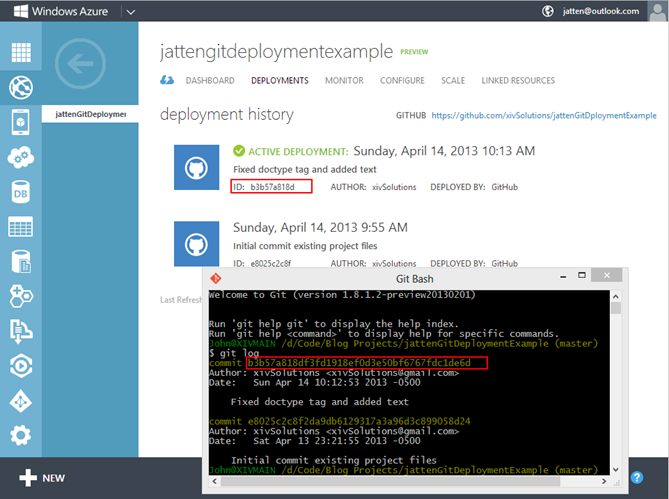
Notice, the active deployment is your most recent commit. In fact, if you look closely, you will see that the deployment ID shown just to the left of the blue Github icon matches the commit hash from your repository:
Automatic Deployment to Windows Azure Websites is a slick feature of the Windows Azure platform. While Azure has come a long way, it is clearly just getting started. Hopefully, costs will continue to come down such that deploying one or more sites to this platform matches comparable shared and dedicated hosting plans.
Additional Resources
- Get Started with Windows Azure
- Git for Windows
- Getting Started with Git for the Windows Developer
- Developing Cloud Applications with Windows Azure Storage
- Webmatrix 3: Integrated Git and Deployment to Azure
Comments