Installing and configuring PostgreSQL on a Linux box is either simple, because you are a Linux and/or Postgres expert, or not so simple, because you are new(er) to Linux, Postgres, or both. Over the past year, I have resided firmly in the latter camp. I am a huge fan of the Postgres database platform, and I have been slowly but steadily trying to improve my Linux chops.
If you are an experienced Linux user, or a PostgreSQL DBA, this is not the post for you, although your feedback and constructive criticism are most welcome – if you see something amiss, please do let m eknow in the comments, or via email.
I should note here that, where practical, I do as much as I can on Linux from the terminal. While the desktop/GUI is handy for some tasks, I am doing my level best to become proficient with the terminal in Linux. I strongly recommend doing the same. Which is how we’re going to do things here.
The installation process for Postgres on Ubuntu or Linux Mint is, like many things in the Linux world, less than intuitive for new users. As much for my own sake as anyone else’s, I’m going to walk through the steps to getting Postgres installed and configured on a Linux box.
- Installation Steps for PostgreSQL on Linux Mint or Ubuntu
- Add the Postgres Package Source for Your Linux Release
- Update, Upgrade, and Install Postgres
- Configuring Postgres for Use
- Log In Using Psql and Create a Test Database
- Configure PG Admin 3 for Local Connections
- Postgres Configuration Options – Database Files and Directory Location
- Specify a Different Directory for the Database Cluster Files
- Additional Resources and Items of Interest
Why Postgres?
PostgreSQL is a fantastic database platform. Postgres is open source, cross-platform, free, and offers an amazing feature set which, in my mind, exceeds those of its principle peers in the relational database space.
Postgres offers all of the (mostly) standards-compliant SQL/relational database feature you would expect, plus a host of exciting and innovative features. Highlights include a JSON datatype (and also JSONB!), an array datatype, and the new HStore type, which essentially allows the specification of a column as containing a list of key/value pairs. We’ll take a tour of PostgreSQL in another post, but first, let’s get the thing installed and running.
Installation Steps for PostgreSQL on Linux Mint or Ubuntu
At the moment, my preferred Linux distro is Linux Mint 17 (“Quiana”) with the Cinnamon desktop. This is a long-term support release of the Linux Mint distro, very stable, and an excellent place to start. If you do not have a dedicated Linux machine, it is simple enough to spin up a VM using Virtual Box.
As of this writing, the most recent version of PostgreSQL is version 9.4, which brought with it some very cool features such as full JSONB support. However, the 9.4 release is not available directly using the Advanced Packaging Tool (APT) or the Linux Mint/Ubuntu Software Manager.
Fortunately, the PostgreSQL Global Development Group (PGDB) maintain an APT repository of PostgreSQL packages for Debian and Ubuntu-derived Linux distros.
Before we can install Postgres, we need to add the package source for the distro we are using. In my case, I am using Linux Mint 17, which is derived from, and compatible with, the Ubuntu 14.04 (“Trusty Tahar”) release. We’ll see why this matters in a moment.
Add the Postgres Package Source for Your Linux Release
We need to create a sources file reflecting the proper Postgres source for our particular distro. In my case, as noted above, we need the source compatible with the “Trusty” release of Ubuntu. So we can do this from the terminal to add the file (make sure you use sudo in all of the following steps):
Add the PGDB APT Source file From the Terminal:
~ $ sudo touch /etc/apt/sources.list.d/pgdg.list
Now that the file exists, open in your editor of choice (we’ll use gedit here):
Open the pgdg.list File in gedit (use sudo):
~ $ sudo gedit /etc/apt/sources.list.d/pgdg.list
then add the following line in gedit and save (where I used “trusty” below, use the name of your release for Ubuntu, or the corresponding Ubuntu release if you you are using Linux Mint):
Add the Postgres Package Repository and Specify Your Distro Release:
deb http://apt.postgresql.org/pub/repos/apt/ trusty-pgdg main
Save, and close gedit.
Alternately, we can achieve all of the above in one shot from the terminal like so (take note of the placement of single and double quotes here…):
Add the Package Source in one multi-line Terminal Command:
~ $ sudo sh -c \
'echo "deb http://apt.postgresql.org/pub/repos/apt/ trusty-pgdg main" > \
/etc/apt/sources.list.d/pgdg.list'
Add the Postgres Package Repository Key
Next, add the package repository key:
Add the Postgres Package Repository Key:
~ $ sudo apt-get install wget ca-certificates
~ $ wget --quiet -O - https://www.postgresql.org/media/keys/ACCC4CF8.asc | sudo apt-key add -
Update, Upgrade, and Install Postgres
Then, we need to update our package sources:
Update Package Sources:
~ $ sudo apt-get update
Once that’s done, we need to upgrade packages to the latest versions:
Upgrade Packages:
~ $ sudo apt-get upgrade
Note, this can be a long process. Also, you may be prompted at several points to make some choices about configuration items. Specifically, you may informed that this that or the other configuration file has been changed, and asked if you want to keep your original version, or replace with the package maintainer’s version. Select “Y” to accept the package maintainer’s version in these cases.
When the upgrade process finishes, we are ready to install Postgres (we’ll also include pgadmin3):
Install Postgres:
~ $ sudo apt-get install postgresql-9.4 pgadmin3
This shouldn’t take long (especially compared to the installation times for certain other GUI – installer-based database platforms. I’m looking at you, SQL Server). Once the installation completes, we’re ready to configure our new database.
Configuring Postgres for Use
We’ve now installed both PostgreSQL and the database management utility Pg Admin 3. Next, we should understand a few things about how PostgreSQL works, out of the box.
The Postgres User
When PostgreSQL was installed, a system user account named postgres was created. with a matching user account in Postgres. By default, the postgres user account is not configured with a password, so it is not possible to log into the server using the postgres user account without first creating a password for it. This postgres account has an all-access pass on your postgres database server, permission-wise. The postgres user account is analogous to the sa account in SQL Server. For security reasons, it is recommended that a password not be created for the postgres account.
The Postgres Database
PostgresSql is installed with a default database named…wait for it… postgres. From the PostgreSQL documentation:
Creating a database cluster consists of creating the directories in which the database data will live, generating the shared catalog tables (tables that belong to the whole cluster rather than to any particular database), and creating the “template1” and “postgres” databases . . .
. . . The postgres database is a default database meant for use by users, utilities and third party applications.
For the most part, we use the postgres database for admin purposes, and create new databases on the PostgreSQL server to suit our needs.
The psql Command Line Utility
PostgreSQL includes psql, a command line utility for managing your databases and server. While a GUI-based utility such as pgadmin3 is often easier to use in the day-to-day, the command line utilty psql is also handy. Psql offers complete control of your Postgres system from the terminal, including the ability to execute SQL queries.
Also, we need to use psql to perform our initial configuration, and to create an initial database super user.
Create a Super User Account
Since we will not be creating a password for the postgres user account, we need a super-user account in order to work with our database in the day-to-day.
To do this, we will gain access to the postgres account through your system root user, and then use that postgres account to create a new super-user account on your Postgres installation which can be regulated more effectively. As an example, from my own machine (comments denoted by ##):
Access the Postgres User Through Root:
## switch user to root:
xivsolutions@mint-vm ~ $ su -
Password:
## switch user to postgres:
mint-vm ~ # su - postgres
postgres@mint-vm ~ $
As we can see, we now have a prompt for the postgres user. We can now log in to the default postgres database and, using psql, create a super user account for ourselves:
To get into the psql command line utility, we type the following:
Enter the psql Command Line Utility:
postgres@mint-vm ~ $ psql
Now, from the psql prompt, enter the following. Note the name you specify for your super-user account should match the system user account you plan to use to manage your Postgres Installation (use your own user account name in place of youruseraccount here):
Create a New Super User from the psql Prompt:
postgres=# CREATE USER youruseraccount
postgres-# WITH SUPERUSER CREATEDB CREATEROLE
postgres-# PASSWORD 'userAccountPassword';
Notice in the above we can enter multiple lines of SQL. The SQL is not executed until we enter a semi-colon followed by enter. Which means, the semi-colon matters!
Now, we can exit psql, exit the postgres user, and exit root like so:
Return to your normal user account:
postgres=# \q
postgres@mint-vm ~ $ exit
logout
mint-vm ~ # exit
logout
xivsolutions@mint-vm ~ $
With that, we should now be able to log in using psql and make sure everything is wired up correctly.
Log In Using Psql and Create a Test Database
Now, just to make sure everything is working correctly, let’s log in with psql using our new super user account and create a quick test database:
Log-In Using the New Super-User Account:
xivsolutions@mint-vm ~ $ psql postgres
psql (9.4.1)
Type "help" for help.
postgres=#
Note in the above, we specified the postgres default database when we logged in, since there aren’ tyet any other databases to connect to. We’ll use the default postgres as our admin platform, create a new database, and then connect to the new database to test things out.
So, let’s create a database to play with (once again, make sure to end the SQL statement with a semi-colon!):
Create a Test Database Using Psql:
postgres=# CREATE DATABASE test_db WITH OWNER xivsolutions;
Now that we have our own database to mess with, use the \connect command to switch psql to that:
Switch the Active Psql Connection to the new Test Database:
postgres=# \connect test_db;
You are now connected to database "test_db" as user "xivsolutions".
test_db=#
Now, let’s whip up a quick and dirty table, insert some data, and query:
Create Table, Insert Data, and Select Query Using Psql:
test_db=# CREATE TABLE products (id SERIAL PRIMARY KEY, name TEXT);
test_db=# INSERT INTO products (name) VALUES ('Brass Widgets');
INSERT 0 1
test_db=# SELECT * FROM products;
 id |     name
----+---------------
  1 | Brass Widgets
(1 row)
This is a quick example of what can be done from the psql command line. psql is a powerful tool, and is very much worth exploring. While GUI-based tools like PG Admin 3 and others certainly can be helpful, gaining a certain level of comfort working with Postgres from the terminal will save you time in many cases.
That said, let’s configure PG Admin 3, so we can have our cake and eat it too.
Configure PG Admin 3 for Local Connections
PG Admin 3 is a free, open source GUI database management tool for Postgres. While the GUI itself is not as polished as some, all the essentials are there. We already installed PG Admin 3 when we installed Postgres itself, so let’s take a look.
First off, open PG Admin 3from the terminal:
Open PG Admini 3:
xivsolutions@mint-17 ~ $ pgadmin3
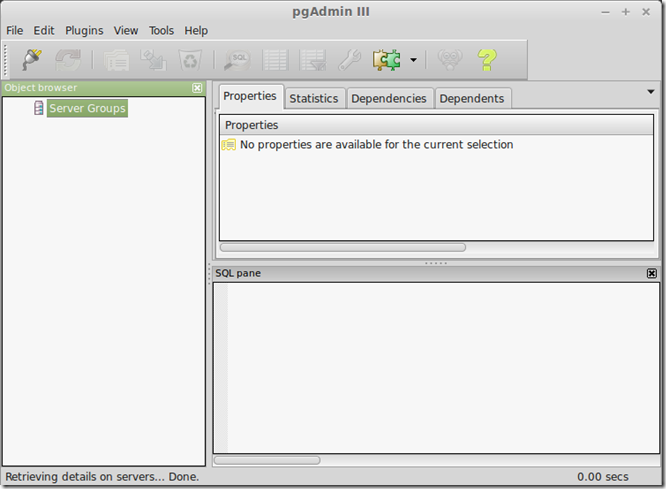
You will probably see something like this:
The PG Admin 3 GUI After Opening:
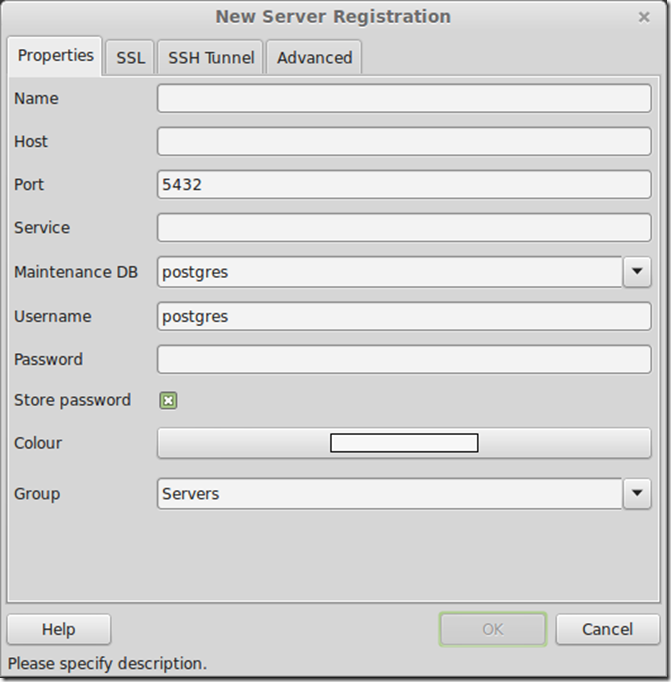
Before we can do much of anything here, we need to add our new database server. Since we are working on our local machine, we’ll go ahead and add a local server, which points to localhost. Use File –> Add Server… to open the Server Registration Dialog, and you should see something like the following:
Register your Postgres Server with PG Admin 3:
Note the default values you see in the above may differ slightly on your machine. We’re going to provide a name by which our local server will be known, specify the host, and make sure that the User Name matches our new Super User name (which in most cases should match our system user name, although this is not a requirement).
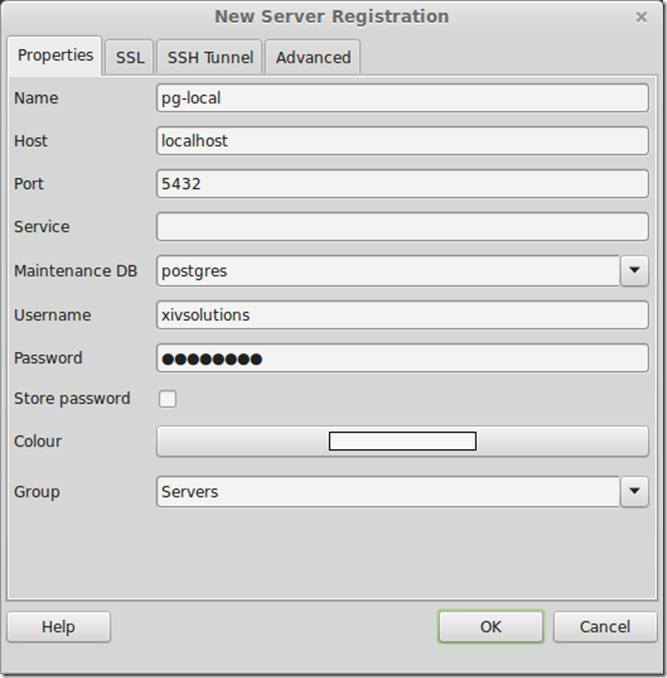
As an example, on my machine, I set things up like so:
Enter PG Admin Server Registration Items for Local Postgres Database:
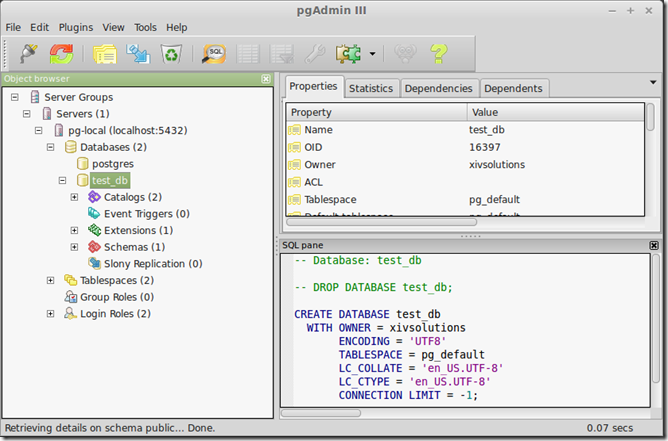
In the above note that I deselected the “Store Password” option. In general, storing of Postgres user passwords is not recommended, although you may consider your circumstances and proceed accordingly. For example, if you are setting up a local development installation on your laptop, you may choose to store the password anyway. Next, hit “OK” and voila – our existing Postgres database server is available in PG Admin 3:
Postgres Database Server Registered in PG Admin 3:
Now you can use PG Admin 3 to create new databases, tables, query, and all the other tasks you might expect. While the GUI experience is not as polished as some commercially available alternatives, you will find that PG Admin 3 is highly functional, and can handle most of your database administration needs quite well.
Postgres Configuration Options – Database Files and Directory Location
When we performed our installation and configuration above, we basically allowed Postgres to use its own sensible defaults for most things. Most of the time, if you are setting up Postgres on your own machine, for development or just to mess around, these are sufficient. However, understanding some of the basic configuration options, how and where these are set, can be most helpful.
When Apt installs Postgres, it creates a few directories by default:
/etc/postgresql/9.4/main – Primary PostgreSQL configuration files are located here. This directory is owned by root, so you will need to elevate your privileges to edit files in here. Of particular interest to us are two files:
pg_hba.conf– Configuration parameters for client authentication and access is specified in this file.postgresql.conf– Configuration parameters for important file locations, logging, resource usage, and a host of other database configuration items are set here. For our purposes, most of the defaults will do for now. However, the file locations may be of interest, as we’ll see in a moment.
/var/lib/postgresql/9.4/main – Default location for the database cluster and associated files. Above, when we initialized our database, we were working with database files in this location.
Specify a Different Directory for the Database Cluster Files
For a variety of reasons we may wish to specify a different directory for our database files. We may want to keep them more easily accessible, or we might have set up our system with a separate partition for data files. In any case, if we want to use a location other than the default for our database cluster, we can.
The Postgres cluster directory must be owned by the postgres user, so we need to create the directory, and then assign ownership to postgres.
For our example, we’ll create a /database directory in our file system root, and within that a pg subdirectory:
Create a New Directory for Postgres Data:
$ sudo mkdir –p /database/pg
$ sudo chown -R postgres /database
In the above, the –p flag tells bash to make sure any leading directories are created on the way to the final directory. The –R flag used with chown tells chown to work recursively, and apply the ownership change to any nested directories or files.
Now we need to initialize the new database cluster in the new directory. Note, if you are already running an existing postgres instance, it is best to stop the server before moving the data directory:
Stop Existing Postgres Instance:
$ sudo service postgresql stop
Once again, we will need to get to our postgres user through root, and then initialize the new cluster (note – I’m showing the full terminal prompt here for clarity, so we can see which user privileges are used):
Initialize the New Postgres Cluster Using initdb:
xivsolutions@mint-vm / $ su -
mint-vm ~ # su - postgres
postgres@mint-vm ~ $ /usr/lib/postgresql/9.4/bin/initdb -D /database/pg
postgres@mint-vm ~ $ exit
mint-vm ~ # exit
xivsolutions@mint-vm / $
Don’t forget to exit from the postgres user, and then also exit root as shown.
Next, we need to edit the postgresql.conf file and point the data_directory variable to the new cluster location. We can open the file with elevated privileges in gedit like so:
Open the postgresql.conf File with Elevated Privileges in Gedit:
$ sudo gedit /etc/postgresql/9.4/main/postgresql.conf
Scroll down in the file to the file locations section, comment out the existing entry for data_directory (using the ‘#’ character), and add a new entry pointing to our new directory like so:
Replace the data_directory Parameter to Point at the New Directory Location:
#------------------------------------------------------------------------------
# FILE LOCATIONS
#------------------------------------------------------------------------------
# The default values of these variables are driven from the -D command-line
# option or PGDATA environment variable, represented here as ConfigDir.
# Add a '#' to the beginning of the line below:
# data_directory = '/var/lib/postgresql/9.4/main'    # use data in another directory
# THIS IS OUR NEW DIRECTORY PARAMETER:
data_directory = '/database/pg'
# Blah blah more configuration stuff . . .
Save and exit Gedit, then re-start the postgres server:
Restart the Postgres Server:
$ sudo service postgresql restart
NOTE: If you forgot to stop an existing instance of Postgres before moving the data directory (or for other potential reasons), you may receive an error indicating that “the pid file is invalid, and to manually kill the stale server process.” If this happens, you can manually kill the process with the following:
Manually Kill a Stale Postgresql Server Process:
sudo pkill -u postgres
Before restarting the server, it is important to make certain all Postgres processes have, in fact, stopped. Make sure that the shell command ps returns no results when used as follows:
Ensure All Postgres Processes have been Killed:
ps -u postgres
Then go ahead and restart postgres as per previous.
You should now be running Postgres in the new location. Note that any existing database files did not move as part of this process, so you will need to follow the previous steps for creating a new super user, etc.
In upcoming posts, we’ll take a look at some of the stand-out features of this database.
Additional Resources and Items of Interest
If you are just digging in to PostgreSQL, Linux, or both, see some of these excellent resources for additional information:
- Numerous Posts by Rob Conery ( @RobConery )
- Top 10 Reasons I Like Postgres Over SQL Server by Rob Sulllivan ( @DataChomp )
- Craig Kiersten’s Popular Postgres Posts
- The PostgreSQL Documentation
Some OSS projects I’m privileged to be involved with using PostgreSQL:
- MassiveJS – Not an ORM, but a data access and query tool targeting the PostgreSQL Platform
- Biggy – Also not an ORM, but an in-memory data-access tool for .NET with a Postgres Implementation
- A More Useful Port of the Chinook Database to Postgresql


Comments
 Maple Essig
Authorcool reading nice work thanks