Image by Wonderlane | Some Rights Reserved
The recent release of Visual Studio 2013 and ASP.NET MVC 5 brought significant changes to the Accounts management system (formerly ASP.NET Forms Membership). Also, there have been some minor changes in how we manage Entity Framework Code-First Migrations.
In this post we will review setting up the basic Identity accounts, pointing them at an external SQL Server (or whatever other database you choose) instance instead of the default (local) SQL Server CE or SQL Express database in App_Data and configuring Entity Framework Migrations so seed the database with initial data.
- Configuring the Database Connection
- Configuring Entity Framework Migrations and Seeding the Database
- Seeding the Database with an Initial User Records
- Extending the IdentityModel Class with Additional Properties
- Updating the Database to Reflect Modified Entity Classes
- Additional Resources and Items of Interest
- Extending Identity Accounts and Implementing Role-Based Authentication in ASP.NET MVC 5
The Basic Components of the ASP.NET Identity System
Out of the box, when you create an ASP.NET MVC 5 project using the default template in Visual Studio 2013, your get a basic, ready-to-run website with the elementary Identity and Account management classes already in place. In the current configuration, the default action is that, when you run the application fro the first time and register as a user, the database will be created as a SQL Server CE (.sfd) or SQL Express (.mdf) file in the App_Data folder in your project.
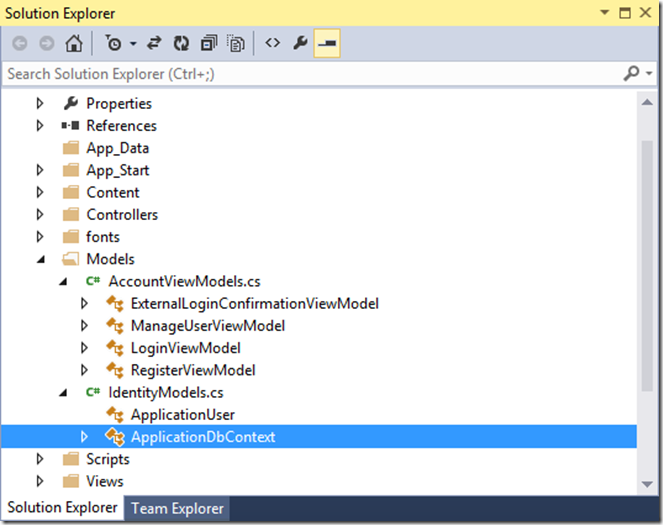
The Identity Account classes in the Default MVC 5 Project Solution Explorer:
In the above, the IdentityModel.cs file is where the essential Identity system components are defined. Opening that file in the code editor, we see two classes defined:
Code in the IdentityModel.cs Code File:
using Microsoft.AspNet.Identity.EntityFramework;
namespace DbMigrationExample.Models
{
    public class ApplicationUser : IdentityUser
    {
    }
    public class ApplicationDbContext : IdentityDbContext<ApplicationUser>
    {
        public ApplicationDbContext()
            : base("DefaultConnection")
        {
        }
    }
}
The ApplicationUser class, which inherits from a framework class IdentityUser. This is the basic identity unit for managing individual accounts in the ASP.NET MVC 5 Account system. This class is empty as defined in the default project code, and so brings with it only those properties exposed by the base class IdentityUser. However, we can extend the ApplicationUser class by adding our own properties, which will then be reflected in the generated database. More on this in a moment.
We also find here the class ApplicationDbContext. This is the Entity Framework context used to manage interaction between our application and the database where our Account data is persisted (which may, or may not be the same database that will be used by the rest of our application). Important to note that this class inherits not from DBContext (as is the usual case with EF), but instead from IdentityDbContext. In other words, ApplicationDbContext inherits from a pre-defined DB context defined as part of Microsoft.AspNet.Identity.EntityFramework which contains the “Code-First” base classes for the Identity system.
Between these two classes, the MVC framework has provided the basics for generating and consuming the complete Identity Account database. However, the basic classes are extensible, so we can tailor things to suit our needs.
Lastly, note the AccountViewModels.cs file. Here are defined the ViewModels which are actually used by the Views in our application, such that only that information needed to populate a view and perform whatever actions need to be performed is exposed to the public-facing web. View Models are not only an effective design component from an architectural standpoint, but also prevent exposing more data than necessary.
Configuring the Database Connection
As mentioned previously, the default MVC project will create a SQL CE or SQL Express in the project’s App_Data folder unless we tell it to do otherwise. All we really need to do is change the connection string used by the ApplicationDbContext, and point it at our target database.
The ApplicationDbContext class passes a connection string name to the base class in the constructor, namely “DefaultConnection.” If we open the Web.config file, we find that under the <connectionStrings> element there is a single node, in which the “DefaultConnection” string is added to the connection strings collection:
The Default Connection String in Web.config:
  <connectionStrings>
    <add name="DefaultConnection"
    connectionString="Data Source=(LocalDb)\v110;
    AttachDbFilename=|DataDirectory|
    \aspnet-DbMigrationExample-20131027114355.mdf;
    Initial Catalog=aspnet-DbMigrationExample-20131027114355;
    Integrated Security=True"
    providerName="System.Data.SqlClient" />
  </connectionStrings>
The easiest way to change our target database is to simply change the connection string details for “DefaultConnection” in Web.config. In this case, we will swap out the SQL CE connection for a SQL Server development database I have running on my development machine (obviously, you can point this at any database you wish, or simply leave it set to use the local SQL CE database):
Pointing “DefaultConnection” at a Local SQL Server Instance:
  <connectionStrings>
    <add name="DefaultConnection"
    connectionString="Data Source=XIVMAIN\XIVSQL;
    Initial Catalog=DbMigrationExample;Integrated Security=True"
    providerName="System.Data.SqlClient" />
  </connectionStrings>
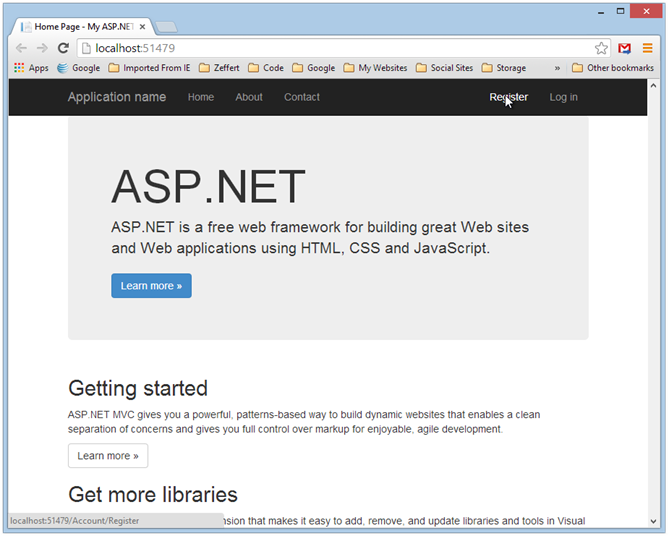
Now, if I run the application, I am greeted with the default home screen offered by the VS 2013 MVC project template:
The Home Page of the Default MVC Project Template:
From here, I click on the “register” link upper right:
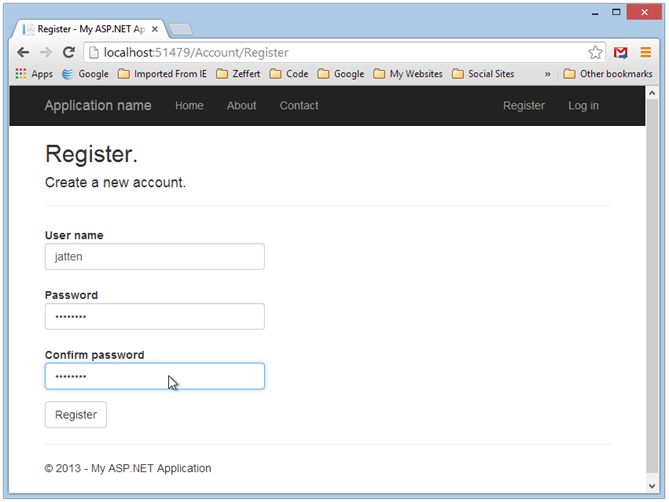
The Registration Page of the Default MVC Project Template:
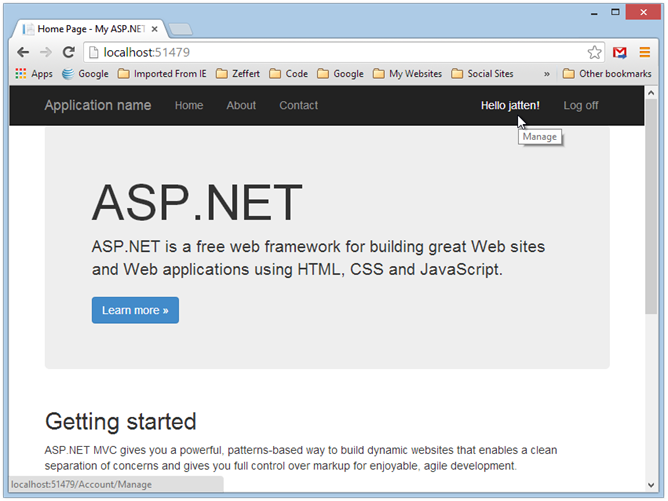
When I complete registration and hit the “Register” button, I am redirected back to the home page. However, we can see now, in the upper right corner, that I am, in fact, signed in as a registered user:
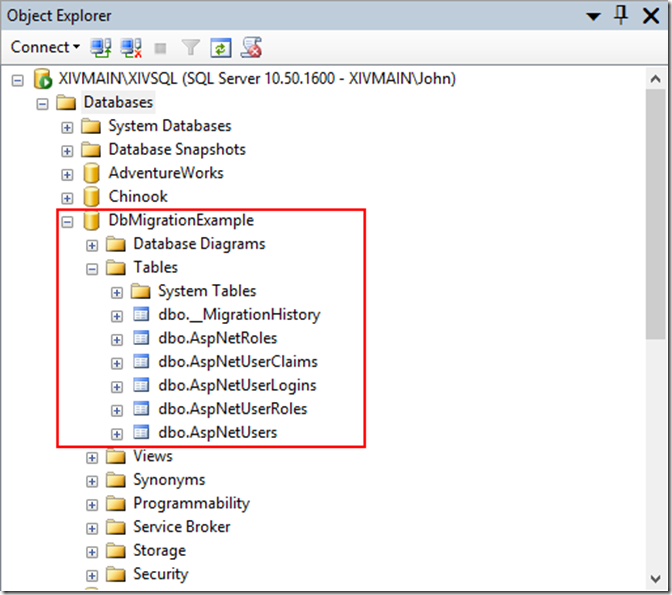
None of this is surprising. The reason we just went through that little exercise was to see the resulting database created once we registered. If I open SQL Server Management Studio (SSMS), I should find a new Database named DbMigrationExample:
The New SQL Server Database Viewed in SSMS:
Note the tables created here. Despite the fact that only ApplicationUser is defined in our application, all of the above are created as a result of the IdentityDbContext class from which ApplicationDbContext inherits.
The default project configuration only actually makes use of the data from dbo.AspNetUsers. However, you can see that a full range of identity management tables have been created, including those for role management, and external authorization (using Google/Facebook/Twitter accounts).
Configuring Entity Framework Migrations and Seeding the Database
As we develop, we may make changes to our classes which need to be reflected in the database. Also, quite often we would like to redeploy our development database either in a fresh state, or possibly with some initial data (or Seed data) present. As with previous version of Entity Framework and MVC, we can use EF Code First Migrations to do this.
Before proceeding, I am going to delete the SQL Server database created when I registered on the site and start fresh. If you did something similar, do the same.
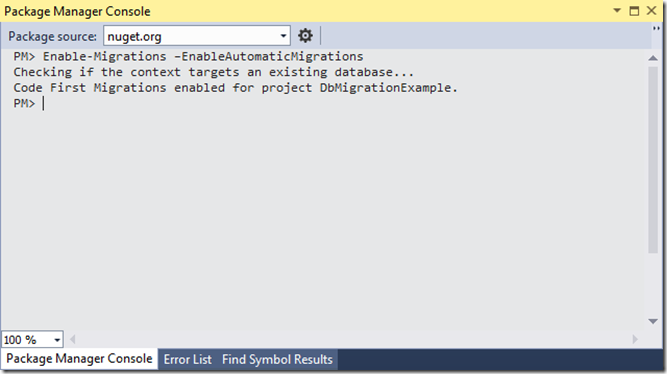
In order to start using Migrations with your project, go to the tools menu in Visual Studio, and select Library Package Manager => Package Manager Console. When the console opens at the bottom of the screen, we simply type:
PM> Enable-Migrations –EnableAutomaticMigrations
Once we hit enter, the console will be busy for a moment as the Migrations folder is configured in our project. When the task is complete, our console window should look like this:
Console After Enable-Migrations Command:
Seeding the Database with an Initial User Records
For various reasons we may want to deploy our database with some initial records in place . We may need tables for certain static values pre-populated, or we might simply want some test data to work with in development. In our current case, we will deploy the database with a couple of User records pre-populated for testing purposes.
Once we have run the Enable-Migrations command as above, there should be a Migrations folder at the root of our project. If we open Configuration.cs file in that folder, we see this:
Default Code in Migrations Configuration Class:
namespace DbMigrationExample.Migrations
{
    using System;
    using System.Data.Entity;
    using System.Data.Entity.Migrations;
    using System.Linq;

    internal sealed class Configuration
        : DbMigrationsConfiguration<DbMigrationExample.Models.ApplicationDbContext>
    {
        public Configuration()
        {
            AutomaticMigrationsEnabled = true;
        }

        protected override void Seed(
            DbMigrationExample.Models.ApplicationDbContext context)
        {
            //  This method will be called after migrating to the latest version.

            //  You can use the DbSet<T>.AddOrUpdate() helper extension method
            //  to avoid creating duplicate seed data. E.g.
            //
            //    context.People.AddOrUpdate(
            //      p => p.FullName,
            //      new Person { FullName = "Andrew Peters" },
            //      new Person { FullName = "Brice Lambson" },
            //      new Person { FullName = "Rowan Miller" }
            //    );
            //
        }
    }
}
We want to modify the Configuration class as follows so that our test user records are created whenever the Database is created. Note that we have added some using statements to the top of the file as well to being in the Microsoft.AspNet.Identity and Microsoft.AspNet.Identity.EntityFramework, namespaces, as well as the Models namespace from our own project:
Modified Code in Migrations Configuration Class:
using System;
using System.Data.Entity;
using System.Data.Entity.Migrations;
using System.Linq;
using Microsoft.AspNet.Identity;
using Microsoft.AspNet.Identity.EntityFramework;
using DbMigrationExample.Models;

namespace DbMigrationExample.Migrations
{
    internal sealed class Configuration
        : DbMigrationsConfiguration<DbMigrationExample.Models.ApplicationDbContext>
    {
        public Configuration()
        {
            AutomaticMigrationsEnabled = true;
        }

        protected override void Seed(ApplicationDbContext context)
        {
            var manager = new UserManager<ApplicationUser>(
                new UserStore<ApplicationUser>(
                    new ApplicationDbContext()));

            for (int i = 0; i < 4; i++)
            {
                var user = new ApplicationUser()
                {
                    UserName = string.Format("User{0}", i.ToString())
                };
                manager.Create(user, string.Format("Password{0}", i.ToString()));
            }
        }
    }
}
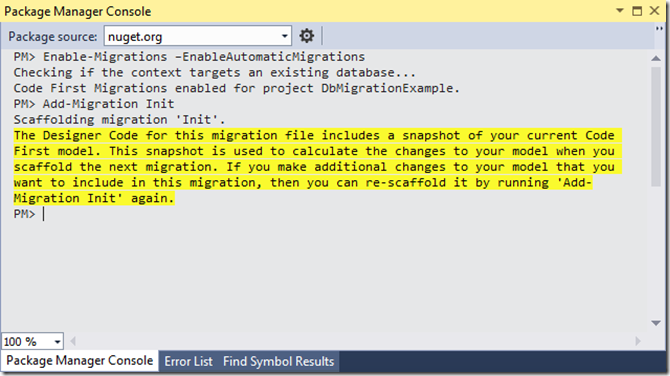
Now that we have added code to seed the user table, we run the following command from the console:
Enable-Migration Init Command:
Add-Migration Init
When the command is finished running (it can take a few seconds) our console window looks like this:
Console Output from Enable-Migration Init:
The previous Add-Migration Init command created the scaffolding code necessary to create the database, but to this point. If we look in the Migrations folder now, we will see a couple new files added containing that code. However, nothing we have done to this point has created or modified an actual database. All the preceding has been set up.
Create/Update the Seeded Database using the Update-Database Command
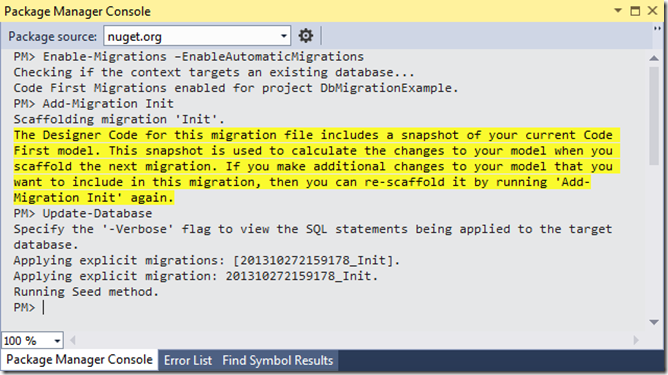
With all that done, run the following command from the console:
Update-Database
When the command finishes, your console should look like this:
Console Output from Update-Database:
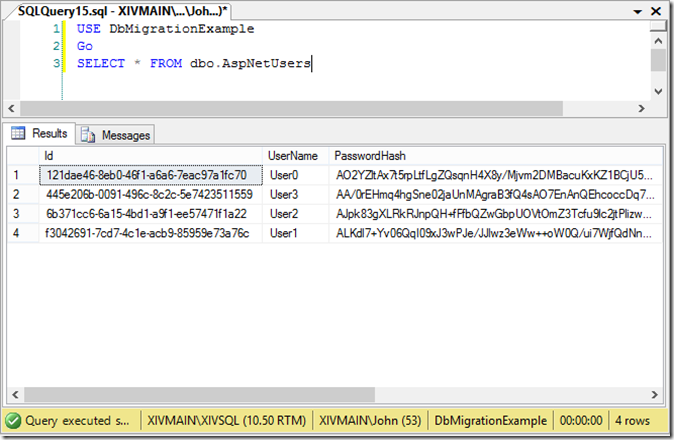
If all went well, we now see the database has been re-created with all the expected tables as before. Additionally, if we SELECT * FROM dbo.AspNetUsers we find that we now have four test users:
Query Result from dbo.AspNetUsers Table:
Now that we have a basic migration strategy in place, let’s take a look at extending the elementary ApplicationUser class to incorporate some additional data fields.
Extending the IdentityModel Class with Additional Properties
Under the ASP.NET new Identity Model, it is easier than before to extend the basic user representation to include arbitrary fields suitable for our application management. For example, Let’s assume we would like our user information to include an email address, as well as full first and last names. We can add properties for these items to the ApplicationUser class, and then update the Controllers, ViewModels, and Views which rely on Application user for registration and such.
First, let’s go back to the ApplicationUser class and add the properties we want:
using Microsoft.AspNet.Identity.EntityFramework;
// Add this to bring in Data Annotations:
using System.ComponentModel.DataAnnotations;

namespace DbMigrationExample.Models
{
    public class ApplicationUser : IdentityUser
    {
        [Required]
        public string FirstName { get; set; }

        [Required]
        public string LastName { get; set; }

        [Required]
        public string Email { get; set; }
    }

    public class ApplicationDbContext : IdentityDbContext<ApplicationUser>
    {
        public ApplicationDbContext()
            : base("DefaultConnection")
        {
        }
    }
}
In the above, we added our three new properties to the ApplicationUser class, and also added the [Required] attribute. To do so, we need to add System.ComponentModel.DataAnnotations to our using statements at the top of the class file.
Update the Register Method of the AccountController
We also need to update the Register method on the AccountController. Currently, the code creates an instance of ApplicationUser and sets only the UserName property:
Currently, Only the UserName Property is Set:
var user = new ApplicationUser() { UserName = model.UserName };
We need to add the following (the code following the comment) to make our controller work properly:
Register Method of AccountController Updated to Set the New User Properties:
[HttpPost]
[AllowAnonymous]
[ValidateAntiForgeryToken]
public async Task<ActionResult> Register(RegisterViewModel model)
{
    if (ModelState.IsValid)
    {
        // Add the following to populate the new user properties
        // from the ViewModel data:
        var user = new ApplicationUser()
        {
            UserName = model.UserName,
            FirstName = model.FirstName,
            LastName = model.LastName,
            Email = model.Email
        };
        var result = await UserManager.CreateAsync(user, model.Password);
        if (result.Succeeded)
        {
            await SignInAsync(user, isPersistent: false);
            return RedirectToAction("Index", "Home");
        }
        else
        {
            AddErrors(result);
        }
    }

    // If we got this far, something failed, redisplay form
    return View(model);
}
Update the Register ViewModel
Now that we have added the new properties to our ApplicationUser class, we also need to provide a way for the user to input the values during the registration process. If we open the AccountViewModels.cs file, we see a number of ViewModel classes defined. At the bottom is the RegisterViewModel class. It currently looks like this:
The Default RegisterViewModel Class:
public class RegisterViewModel
{
    [Required]
    [Display(Name = "User name")]
    public string UserName { get; set; }

    [Required]
    [StringLength(100, ErrorMessage =
        "The {0} must be at least {2} characters long.", MinimumLength = 6)]
    [DataType(DataType.Password)]
    [Display(Name = "Password")]
    public string Password { get; set; }

    [DataType(DataType.Password)]
    [Display(Name = "Confirm password")]
    [Compare("Password", ErrorMessage =
        "The password and confirmation password do not match.")]
    public string ConfirmPassword { get; set; }
}
We want to add our new properties, so we modify it as follows:
Modified RegisterViewModel Class:
public class RegisterViewModel
{
    [Required]
    [Display(Name = "User name")]
    public string UserName { get; set; }

    [Required]
    [StringLength(100, ErrorMessage =
        "The {0} must be at least {2} characters long.", MinimumLength = 6)]
    [DataType(DataType.Password)]
    [Display(Name = "Password")]
    public string Password { get; set; }

    [DataType(DataType.Password)]
    [Display(Name = "Confirm password")]
    [Compare("Password", ErrorMessage =
        "The password and confirmation password do not match.")]
    public string ConfirmPassword { get; set; }

    [Required]
    [Display(Name = "First name")]
    public string FirstName { get; set; }

    [Required]
    [Display(Name = "Last name")]
    public string LastName { get; set; }

    [Required]
    [Display(Name = "Email")]
    public string Email { get; set; }
}
Update the Register View
Now that we have that taken care of, we need to also modify the Register.cshtml View to match. In the folder Views => Account open the Register.cshtml file. It should look like this:
The Default Register.cshtml File:
@model DbMigrationExample.Models.RegisterViewModel
@{
    ViewBag.Title = "Register";
}

<h2>@ViewBag.Title.</h2>

@using (Html.BeginForm("Register", "Account",
    FormMethod.Post, new { @class = "form-horizontal", role = "form" }))
{
    @Html.AntiForgeryToken()
    <h4>Create a new account.</h4>
    <hr />
    @Html.ValidationSummary()
    <div class="form-group">
        @Html.LabelFor(m => m.UserName, new { @class = "col-md-2 control-label" })
        <div class="col-md-10">
            @Html.TextBoxFor(m => m.UserName, new { @class = "form-control" })
        </div>
    </div>
    <div class="form-group">
        @Html.LabelFor(m => m.Password, new { @class = "col-md-2 control-label" })
        <div class="col-md-10">
            @Html.PasswordFor(m => m.Password, new { @class = "form-control" })
        </div>
    </div>
    <div class="form-group">
        @Html.LabelFor(m => m.ConfirmPassword, new { @class = "col-md-2 control-label" })
        <div class="col-md-10">
            @Html.PasswordFor(m => m.ConfirmPassword, new { @class = "form-control" })
        </div>
    </div>
    <div class="form-group">
        <div class="col-md-offset-2 col-md-10">
            <input type="submit" class="btn btn-default" value="Register" />
        </div>
    </div>
}

@section Scripts {
    @Scripts.Render("~/bundles/jqueryval")
}
Add the new properties after the existing form-group element for “ConfirmPassword” as follows:
Modified Register.cshml File:
<h2>@ViewBag.Title.</h2>

@using (Html.BeginForm("Register", "Account",
    FormMethod.Post, new { @class = "form-horizontal", role = "form" }))
{
    @Html.AntiForgeryToken()
    <h4>Create a new account.</h4>
    <hr />
    @Html.ValidationSummary()
    <div class="form-group">
        @Html.LabelFor(m => m.UserName, new { @class = "col-md-2 control-label" })
        <div class="col-md-10">
            @Html.TextBoxFor(m => m.UserName, new { @class = "form-control" })
        </div>
    </div>
    <div class="form-group">
        @Html.LabelFor(m => m.Password, new { @class = "col-md-2 control-label" })
        <div class="col-md-10">
            @Html.PasswordFor(m => m.Password, new { @class = "form-control" })
        </div>
    </div>
    <div class="form-group">
        @Html.LabelFor(m => m.ConfirmPassword, new { @class = "col-md-2 control-label" })
        <div class="col-md-10">
            @Html.PasswordFor(m => m.ConfirmPassword, new { @class = "form-control" })
        </div>
    </div>

    // Add new properties here:
    <div class="form-group">
        @Html.LabelFor(m => m.FirstName, new { @class = "col-md-2 control-label" })
        <div class="col-md-10">
            @Html.TextBoxFor(m => m.FirstName, new { @class = "form-control" })
        </div>
    </div>

    <div class="form-group">
        @Html.LabelFor(m => m.LastName, new { @class = "col-md-2 control-label" })
        <div class="col-md-10">
            @Html.TextBoxFor(m => m.LastName, new { @class = "form-control" })
        </div>
    </div>

    <div class="form-group">
        @Html.LabelFor(m => m.Email, new { @class = "col-md-2 control-label" })
        <div class="col-md-10">
            @Html.TextBoxFor(m => m.Email, new { @class = "form-control" })
        </div>
    </div>

    <div class="form-group">
        <div class="col-md-offset-2 col-md-10">
            <input type="submit" class="btn btn-default" value="Register" />
        </div>
    </div>
}

@section Scripts {
    @Scripts.Render("~/bundles/jqueryval")
}
Updating the Database to Reflect Modified Entity Classes
So far, we have modified one of our Data model Entity classes – namely, the ApplicationUser class. In our application, EF is mapping this class to the dbo.AspNetUsers table in our backend. We need to run Migrations again to update things. Before we do that though, there is one more thing we need to do. Our seed method is no longer in sync with what our classes (and shortly, our back-end tables) require. We need to add values for the new FirstName, LastName, and Email properties to our user Seed data:
Updated Seed method:
protected override void Seed(ApplicationDbContext context)
{
    var manager = new UserManager<ApplicationUser>(
        new UserStore<ApplicationUser>(
            new ApplicationDbContext()));

    for (int i = 0; i < 4; i++)
    {
        var user = new ApplicationUser()
        {
            UserName = string.Format("User{0}", i.ToString()),

            // Add the following so our Seed data is complete:
            FirstName = string.Format("FirstName{0}", i.ToString()),
            LastName = string.Format("LastName{0}", i.ToString()),
            Email = string.Format("Email{0}@Example.com", i.ToString()),
        };
        manager.Create(user, string.Format("Password{0}", i.ToString()));
    }
}
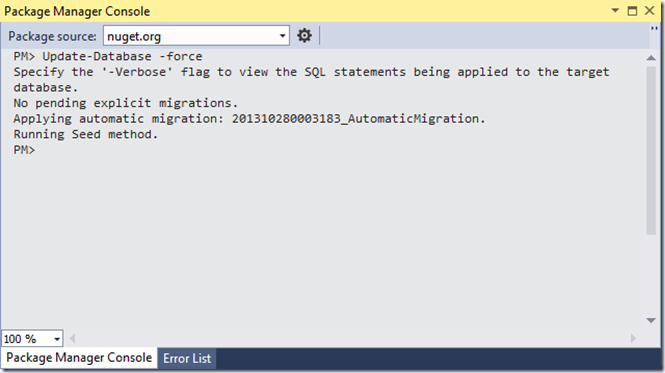
Now, if we were to run the Update-Database command again, the changes to our entity objects will be reflected in the dbo.AspNetUsers table schema, but our seed data will not be updated, because Entity Framework doesn’t like to do things which will cause data loss. While there are ways to make this happen, they are beyond the scope of this article. Instead, we will manually delete the database, and then run Update-Database again. However, since EF thinks that we have existing data from our previous migration, we have to use Update-Database -force.
Once we have deleted the database and run the Update-Database –force command, our console output should look like this:
Console Output Update-Database –force After Deleting Database:
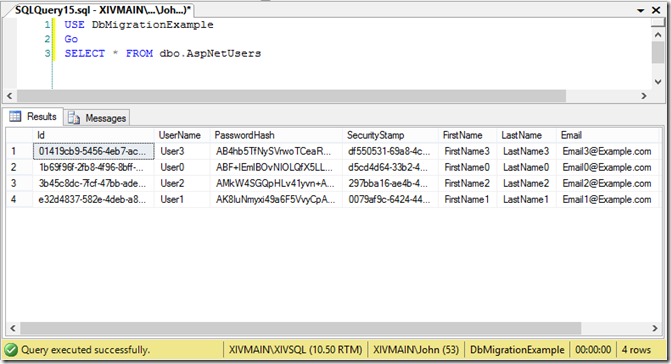
Quickly re-running our query shows that indeed, the new fields have been added to our table, and the test data populated:
Query Result from dbo.AspNetUsers Table:
User Registration with Updated Registration Form
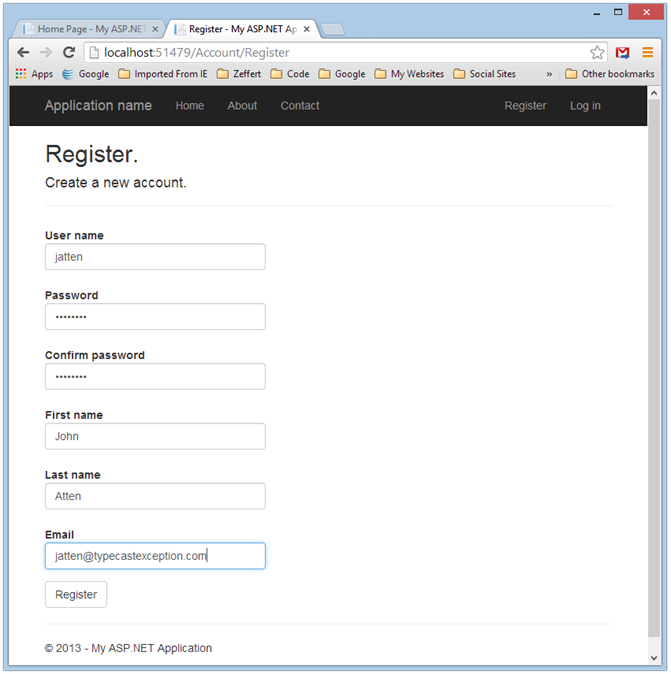
Now that we have updated our Registration.cshtml View, Controller method, ViewModel, and Database, when we run the application and go to register, we see the updated Registration form:
The Updated Registration Form:
Once we complete the form and hit the Register button, we are logged in successfully, wit our additional data persisted in the database, ready to be used in our application.
Logging in Using Seed Data
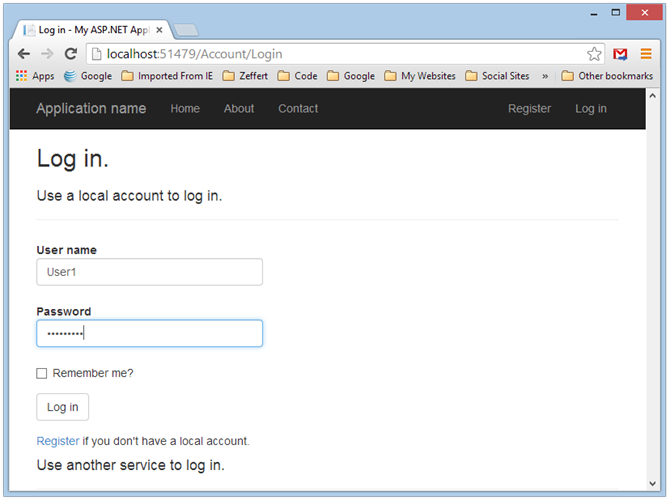
Alternatively, we can also log out, and log in as one of our test users by clicking the “Log in” link:
Logging in with Test Data:
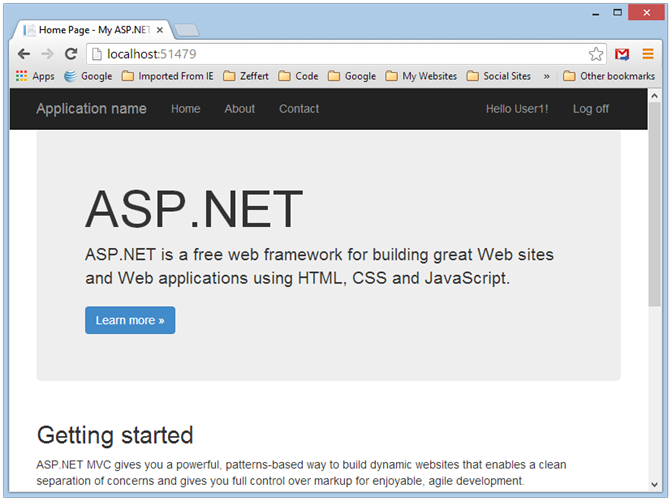
Successful Log-in:
Only the Beginning
The updates to ASP.NET MVC 5 are numerous, and cool. In this article I have kept it really basic, and only scratched the surface of the updated Account management possibilities. The ASP.NET and MVC team has made it easy to do things like add role-based identity management, as well as external log-ins from social networks such as Google +, Facebook, and Twitter.
In my next post, I will take a closer look at creating a role-based identity management model for administering a “closed” site.
Additional Resources and Items of Interest
- ASP.NET MVC–Azure Websites and EF Model First Connection Strings when Deploying from Github
- Reverse-Engineering an Existing Database in your ASP.NET MVC Application Using Entity Framework Model/Database-First
- Building Out a Clean, REST-ful Web Api Service with a Minimal Web Api Project
- Creating a Clean, Minimal-Footprint ASP.NET WebAPI Project with VS 2012 and ASP.NET MVC 4
- Customizing Routes in ASP.NET MVC
- Routing Basics in ASP.NET MVC
Comments
 marjan
Authorvery veryyyyyyyyyyyyy GOooooOOOoooooooOOOOOOood
So Thank You


YOU HELPED ME very much
 Q
Q
AuthorWow, wow, although I was using 2015, and there’s a slight difference in that it uses email as a username, I got this to work without a single glitch.
Thank you, thank you, thank you
 John Atten
AuthorThank you for taking the time to comment, and congrats!
 Tim
Tim
AuthorI hate to say but after several hours of searching, this is the first example that actually walked me through, step by step on how to add the database tables, using the the package manager and then how to understand and manipulate the user classes and database schema…to end with an actual function application that i can now work with..
Thank you, thank you, thank you….
 mieszkania pozna�
AuthorI've a couple of query for you, write to these I don't e-mail
 jatten
AuthorThe MVC team themselves acknowledge that using EF in an MVC application is not an ideal separation of concerns, but instead represents a convenient paradigm which lends itself to getting your app up and running fast.
As you indicate, you can rather easily move the data access into its own DAL library project. What is about that that you are having trouble with?
 Edward
AuthorI'm reading over your MVC5 posts now. I consider myself fairly advanced developer but I'm getting annoyed at the new entity framework they stuck into the MVC project. I'm looking for some instructions on moving the entity framework back to the dal class library project. Was Separation of Concerns just thrown out in the design?
 Patrick Schaller
AuthorEither, both…:)
Reality is I need to provide one or the other. What I can't have is a disjointed setup where it's being controlled/managed in multiple places.
The auth service seems like it'd be more complex so I've been looking more at simply having a setup that I point each individual webapp at.
 XIV-Admin
AuthorInteresting idea. Do you mean point more than one application at the same auth service, or build a re-useable component to be added to different projects?
 Patrick Schaller
AuthorThank you for taking the time to post this well done article. Would you mind if I asked you a related question? How would I set this up so as to be usable by numerous webapps? I just started a new job where I am converting a bunch of FoxPro apps to asp.net MVC apps. I keep finding articles on using the new Accounts Management system but none for reusing or setting it up to be used by multiple apps/sites.
Any pointers or thoughts? I really appreciate it, thanks.