 If you have spent most of your computing life using Windows, odds are good you may find yourself in unfamiliar territory when if comes to setting up a Linux box. Even for some experienced technical folks, the differences between the platforms can have you feeling like a noob from the very start.
Setting Linux up in a virtual machine can save some time and pain, but comes with the added overhead of understanding how the particular virtualization software works.
In this post, we will look at setting up a basic Linux environment in a virtual machine, and look at some of the trouble-shooting you may need to do along the way.
Image by Photozel | Some Rights Reserved
Note, I am not a Linux expert. I have been learning my way through Linux for most of the past year or so, but there is a lot to learn. I find I really, really enjoy using Linux, and once I got past the initial learning curve, things began to make sense rather quickly.
- Virtualization Software
- Downloading the Linux Mint ISO
- Configure a new Virtual Machine in VirtualBox
- Allocating Resources to the Virtual Machine
- Other VM Settings
- Share Folder(s) Between the VM and Physical Host
- Start the VM and Install Linux Mint
- Additional Resources and Items of Interest
Learn Linux the Hard Way
Most of the recommended introductory Linux distributions (“distro’s”) feature a GUI to varying degrees. It is possible to do much of what you set out to do without cracking open a terminal. However, when I started down the golden Linux path, a determined to use the terminal wherever possible, and patiently become proficient with this OS in the terms under which, ultimately, it was designed to be used.
I strongly recommend you do the same. Not only will you gain a deeper, better understanding of Unix-based systems, but of how your machine works in general. Unlike the Windows world in which I grew up, Linux/Unix is first and foremost a command-line driven platform, and is optimized as such. In fact, it’s fair to say that, unlike Windows, in *nix OS’s, anything you can do from the GUI, you can also do from the terminal, usually more efficiently (once you know how, and depending on your typing proficiency).
If you are stuck on how to do something from the terminal, Google is you friend. If your are still stuck, you can probably do it from the GUI until you find an answer. As I said, though, I strongly recommend using the terminal for everything you can. It will feel incredibly clumsy at first, but like all things, the more you do, the better you get.
The article linked below was focused on getting to know Git for folks with a Windows background, but there are a number of handy bash references you may find helpful:
Virtualization Software
Before we can set up a virtual machine, we need some virtualization software. I tend towards the free and open source VirtualBox solution. Despite lacking some of the polish associated with VMWare, I find that VirtualBox meets my needs nicely.
In this article we will be using VirtualBox as our virtualization environment.
Download and Install the appropriate VirtualBox package for your PC from the VirtualBox Downloads page.
Linux Mint
While Ubuntu is the most popular “beginner” Linux distro, I prefer Linux Mint. Newer releases of Ubuntu seem slow and bloated to me, and oriented more directly at desktop users, with many of the more advanced tools well hidden. Also note that Linux Mint is derived from Ubuntu.
Mint seems to more effectively consider both desktop/GUI users, as well as more technical folk. While the full desktop GUI is available (and well-done, compared to some), the terminal is a short context menu away.
At the time of this writing, Linux Mint 17 is the most recent stable release, and is targeted for long-term support.
Downloading the Linux Mint ISO
Linux Mint is available with a number of different desktop options. Until recently, I have been using Mint with the KDE desktop, but have just switched to the newer Cinnamon desktop to check it out. Also, I had issues getting MonoDevelop working in the KDE implementation.
You can download the stable Linux Mint release with the Cinnamon desktop from one of the mirrors on this page:
Once you have downloaded the Linux Mint ISO, save the file somewhere safe. You will need this shortly.
Configure a new Virtual Machine in VirtualBox
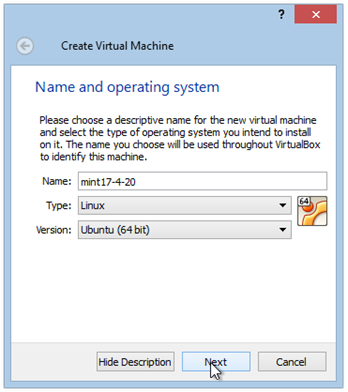
Once you have installed VirtualBox on your PC, select the “New” button from the top menu. You should be greeted with the Create Virtual Machine window like so:
VirtualBox Configuration – The Create Virtual Machine Window
Choose a unique and descriptive name for the VM you intend to create. I tend to follow a convention of OS-RAM-HDD specs, but how you do it may depend on what you plan to do with the VM.
Next choose the type (Linux), and the version. In this case, Linux Mint is not one of the options. However, Mint is a descendant of Ubuntu, so Ubuntu will work here.
Allocating Resources to the Virtual Machine
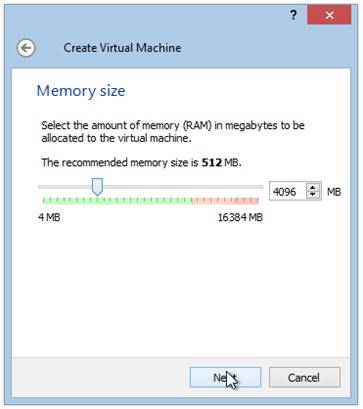
Once you click next, you will be asked to select how much RAM your virtual machine will have. Note that your VM will be sharing RAM with your physical host machine. VirtualBox will offer up a “recommended” amount of RAM to allocate. However, I tend to push this up, as I have physical RAM in abundance on my PC. You can see here I selected 4Gb of RAM, which is likely more than I will ever need.
Allocate RAM to the Virtual Machine:
Clicking next again, you will be asked if you want to create a virtual hard drive. The default (VDI) is the best bet here. You will also be asked if you want this to be fixed size, or dynamically allocated. I generally go with dynamically allocated.
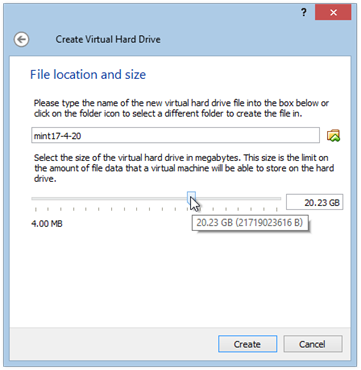
Once you select these parameters, you will have the opportunity to specify the “size” and location of the disk to be created. The recommended size if 8Gb. I generally bump this up to 20Gb, which is probably overkill. However, you will want to consider your intended use for the VM, and allocate disk space accordingly. If you plan to be working with lots of images or video, for example, you will want more disk space than if you plan to simply play with the terminal and familiarize yourself with Linux.
Allocate Disk Space to the Virtual Machine:
Once we hit the Create button, we are returned to the VirtualBox Management window. However, we are not done preparing our VM.
Other VM Settings
Now that we are back in the VirtualBox Management window, we can adjust the various settings for individual VM’s by clicking on the appropriate heading to the right.
We want to change a few of the default settings here before we proceed.
Enable 3D Video Acceleration
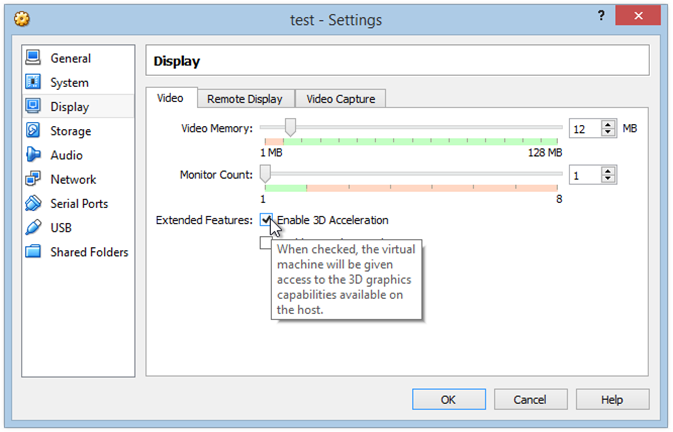
If we click on the “Display” heading, we are greeted with the Display settings window. Here, we may want to increase the amount of Video RAM available to our VM. I generally push this up to 32 Mb.
Also, in order to get acceptable graphics performance, we will enable 3D acceleration.
Adjust Display Settings:
Share Folder(s) Between the VM and Physical Host
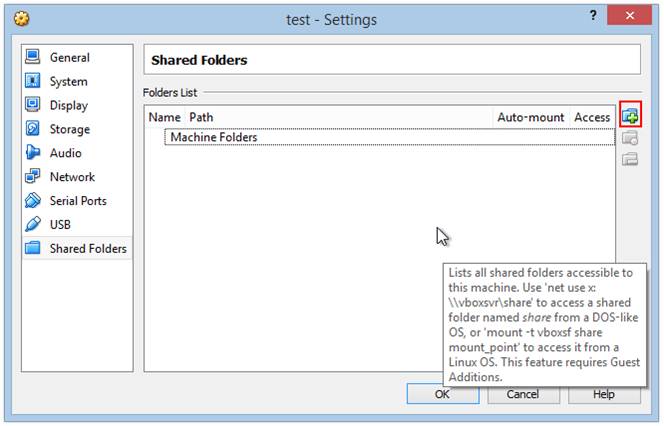
We may want to share files between our host machine (our physical PC) and our VM. We can do this by specifying a folder on the host to be shared. I generally have a dedicated folder named “VM Share” that I use for this.
To set up a folder to be shared between the host and your VM(s), select the “Shared Folders” header in the settings window. Then, click the folder icon (top right) to select/create a folder to share.
For our purposes, the other settings for network, USB, and such are generally good with the default settings.
Start the VM and Install Linux Mint
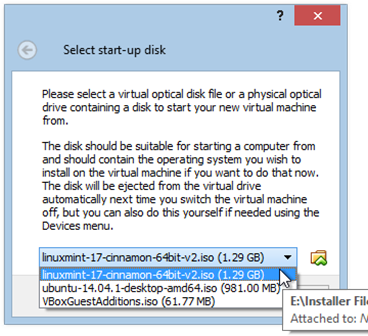
The first time you start your VM, you will be prompted to select a startup disk. At this point, navigate to the Linux Mint ISO you downloaded previously. Click on the folder icon to the right of the drop-down list to navigate your file system.
Select Startup Disk:
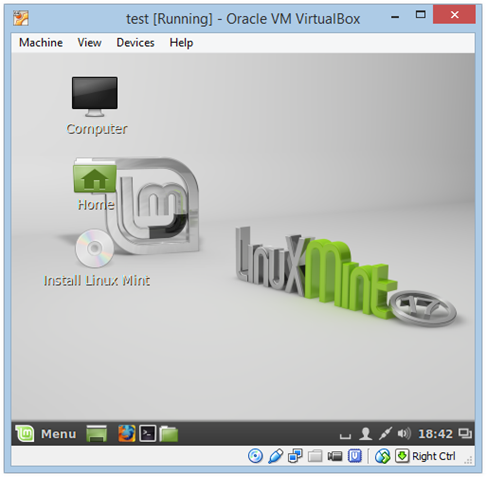
The system will boot into the Linux Mint OS on the ISO. When Mint is done loading, note the CD icon on the Mint desktop:
Mint Desktop when Booted from ISO:
Double click the CD icon, and follow the installation instructions to install Linux Mint on your VM.
NOTE: Linux will only accept lower-case user names, but the password you enter during set-up is case-sensitive.
If you enter a mixed-case username, it will be down-cased when it is saved.
When the installation completes, you will be asked to re-start the VM. Do this. If your VM hangs during the shutdown process (mine did), Simply close the VM window. When you are prompted to indicate how you want the machine to shut down, select the simple “Power Down the Machine” option.
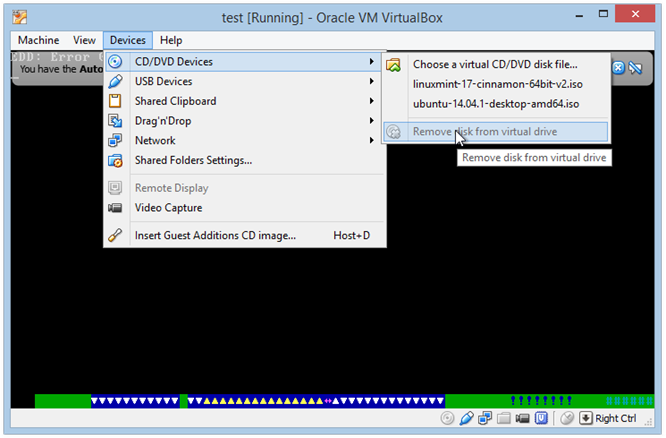
Now, start the machine again using the “Start” icon in the VirtualBox Manager window. As soon as the window comes up, go to the “Devices” menu, eject the Mint Installation ISO:
Startup and Eject the Mint Installation ISO:
If everything has worked properly to this point, you should be greeted with a login screen to log in to Linux Mint.
Enter the user name and password you specified during installation (remember, your username will be all lower-case), and you should be off and running.
Additional Resources and Items of Interest
- Install Sublime Text 3 (beta) on Linux Mint or Ubuntu
- Getting Started with Git for the Windows Developer (Part II) – Get Acquainted with Bash
- Basic Git Command Line Reference for Windows Users
- Getting Started with Git for the Windows Developer (Part III) – Working with Files Using Bash
Comments