 Recently we looked at the fundamentals of the OWIN/Katana Middleware pipeline, and we then applied what we learned, and built out a minimal, OWIN-Based, self-hosted Web Api. In doing so, we managed to avoid the heavy weight of the
 System.Web library or IIS, and we ended up with a pretty lightweight application. However, all of the concepts we have discussed remain valid no matter the hosting environment.
But what if we want to add some basic authentication to such a minimal project?
Image by Chad Miller | Some Rights Reserved
Once again, we are going to see if we can’t apply what we’ve learned, and pull a very small Authentication / Authorization component into our minimal Web Api application. We’ll start by implementing a basic authentication/authorization model without using the components provided by the ASP.NET Identity framework.
Identity is fully compatible with the OWIN Authorization model, and when used in this manner, represents a very useful, ready-to go concrete implementation. But we can perhaps better understand the structure of OWIN authorization, and application security in general, if we start with simple concepts, and work our way up to concrete implementations and additional frameworks.
- Source Code for Examples
- The OAuth Owner Resource Flow Authentication Model
- Starting Point – The Self-Hosted Web Api Project
- Adding The Embedded Authorization Server
- Configuring OWIN Authentication and Adding to the Middleware Pipeline
- Retrieving an Access Token from the Authorization Server
- Implementing the API Client with Authenticated API Calls
- Protecting Resources With [Authorize] Attribute
- Accessing Protected Resources with Authenticated Client Requests
- Adding Roles as Claims
- What Next?
- Additional Resources and Items of Interest
From the Ground Up
In this series of posts we will start with concepts, and slowly build from there.
- Part I (this post) – We will examine the basic OAuth Resource Owner Flow model for authentication, and assemble to most basic components we need to implement authentication using this model. We will not be concerning ourselves with the cryptographic requirements of properly hashing passwords, or persisting user information to a database. We will also not be using Identity, instead implementing security using the basic components available in the Microsoft.Owin libraries.
- Part II – We will mock up some basic classes needed to model our user data, and a persistence model to see how storage of user data and other elements works at a fundamental level.
- Part III – We will replace our mock objects with Identity 2.0 components to provide the crypto and security features (because rolling your own crypto is not a good idea).
As with our previous posts, the objective here is as much about building an understanding of how authentication in general, and Identity 2.0 in particular, actually fit in to the structure of an OWIN-based application as it is about simply “how to do it.”
With that in mind, we will take this as far as we reasonably can using only the OWIN/Katana authorization components and simplified examples. Once we have seen the underlying structure for authentication and authorization in an OWIN-based Web Api application, THEN we will bring Identity 2.0 in to provide the concrete implementation.
Source Code for Examples
We are building up a project over a series of posts here. In order that the source for each post make sense, I am setting up branches that illustrate each concept:
On Github, the branches of the Web Api repo so far look like this:
- Branch: Master – Always the most current, includes all changes
- Branch: Api – The simplest OWIN/Katana Web Api Implementation, from the post ASP.NET Web Api 2.2: Create a Self-Hosted OWIN-Based Web Api from Scratch
- Branch: ef – Added Entity Framework and a local SQL CE database, also from the post ASP.NET Web Api 2.2: Create a Self-Hosted OWIN-Based Web Api from Scratch. The code in this branch is where we start from in this post.
- Branch: auth-minimal – The code built up throughout this post.
The code for the API client application is in a different repo, and the branches look like this:
- Branch: Master – Always the most current, includes all changes
- Branch: owin-auth – Code as modified in this post
Application Security is Hard – Don’t Roll Your Own!
Implementing effective application security is a non-trivial exercise. Behind the simple-looking framework APIs we use, such as Identity 2.0 (or any other membership/auth library) is a few decades worth of development by the best and brightest minds in the industry.
Throughout the examples we will be looking at, you will see areas where we mock together some ridiculous methods of (for example) hashing or validating passwords. In reality, securely hashing passwords is a complex, but solved problem. You should never attempt to write your own crypto or data protection schemes.
Even a simple authentication mechanism such as we will implement here brings some complexity to the project, because authentication itself is inherently complex. Behind the simple-seeming framework API provided by frameworks such as ASP.NET Identity lies some crypto and logic that is best left as it is unless you REALLY know what you’re doing.
That said, understanding how the pieces fit, and where you can dig in and adapt existing authorization / authentication flows to the needs of your application, is important, and forms the primary objective of this series.
The OAuth Owner Resource Flow Authentication Model
One of the commonly used patterns for authentication in a web application is the OAuth Resource Owner Flow model. In fact, this is the model used in the Web Api Template project in Visual Studio. We are going to implement authentication using the Resource Owner Flow from “almost scratch” in our OWIN-based Web Api application.
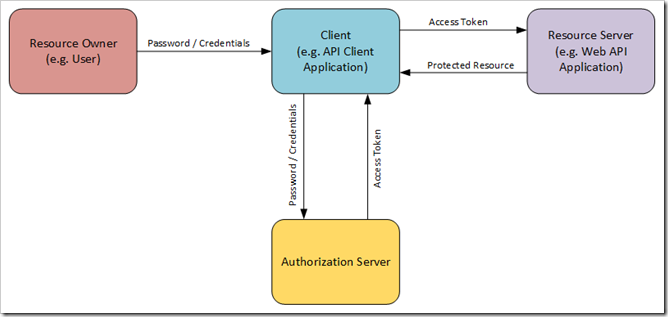
The Owner Resource Flow posits four principal “actors” in an authentication scenario:
- The Resource Owner – For example, a user, or perhaps another application.
- The Client – Generally a client application being used by the resource owner to access the protected resource. In our case, the Client might be our Web Api Client application.
- The Authorization Server – A server which accepts the Resource Owners credentials (generally a combination of some form of credentials and a password, such as a User Name/Password combination) and returns an encoded or encrypted Access Token.
- The Resource Server – The server on which the resource is located, and which protects the resource from unauthorized access unless valid authentication/authorization credentials are supplied with the request.
Overview of the Owner Resource Authentication Flow:
In the above, the Resource Owner presents a set of credentials to the Client. The Client then submits the credentials to the Authorization Server, and if the credentials can be properly validated by the Authorization Server, an encoded and/or encrypted Access Token is returned to the Client.
The Client then uses the Access Token to make requests to the Resource Server. The Resource Server has been configured to accept Access Tokens which originate at the Authorization Server, and to decode/decrypt those tokens to confirm the identity and authorization claims (if provided) of the Resource Owner.
All of this is predicated on the Resource Owner having been properly registered with the Authorization Server.
It should be noted there that the OAuth specification requires that any transaction involving transmission of password/credentials MUST be conducted using SSL/TSL (HTTPS).
Our implementation, and that of the VS Web Api project template, puts a slight twist on this, by embedding the Authentication Server within the Resource Server:
The Embedded Authentication Server Variant of the Owner Resource Flow:
The Basics – OWIN, Katana, and Authentication
We can put together a very stripped down example to demonstrate how the pieces fit together, before we clutter things up with higher-level components and any additional database concerns.
To get started, you can pull down the source for the Self-hosted web api we built in the previous post. We’re going to pick up where we left off with that project, and add a basic authentication component.
Recall that we had assembled a fairly minimal Owin-Based Web Api, consisting of an OWIN Startup class, a simple Company model class, and a CompaniesController. The application itself is a console-based application, with a standard entry point in the Main() method of the Program class.
In that project, we had decided that since we were self-hosting the application, we would keep our data store in-process and use a local file-based data store. We opted to use SQL Server Compact Edition since it would readily work with Entity Framework and Code-First database generation. Therefore, we also added an ApplicationDbContext.
We can review our existing project components before we make any changes.
Starting Point – The Self-Hosted Web Api Project
First, we have our OWIN Startup class:
The OWIN Startup Class from the Minimal Self-Hosted Web Api Project:
// Add the following usings:
using Owin;
using System.Web.Http;

namespace MinimalOwinWebApiSelfHost
{
    public class Startup
    {
        // This method is required by Katana:
        public void Configuration(IAppBuilder app)
        {
            var webApiConfiguration = ConfigureWebApi();

            // Use the extension method provided by the WebApi.Owin library:
            app.UseWebApi(webApiConfiguration);
        }


        private HttpConfiguration ConfigureWebApi()
        {
            var config = new HttpConfiguration();
            config.Routes.MapHttpRoute(
                "DefaultApi",
                "api/{controller}/{id}",
                new { id = RouteParameter.Optional });
            return config;
        }
    }
}
Then, we had a simple Company model, suitably located in the Models folder in our project:
The Original Company Model Class:
using System;
using System.Collections.Generic;
using System.Linq;
using System.Text;
using System.Threading.Tasks;

// Add using:
using System.ComponentModel.DataAnnotations;

namespace MinimalOwinWebApiSelfHost.Models
{
    public class Company
    {
        // Add Key Attribute:
        [Key]
        public int Id { get; set; }
        public string Name { get; set; }
    }
}
And our original CompaniesController class, again suitably located in the Controllers folder within our project::
The Original Companies Controller:
public class CompaniesController : ApiController
{
    ApplicationDbContext _Db = new ApplicationDbContext();


    public IEnumerable<Company> Get()
    {
        return _Db.Companies;
    }


    public async Task<Company> Get(int id)
    {
        var company =
                await _Db.Companies.FirstOrDefaultAsync(c => c.Id == id);
        if (company == null)
        {
            throw new HttpResponseException(
                System.Net.HttpStatusCode.NotFound);
        }
        return company;
    }


    public async Task<IHttpActionResult> Post(Company company)
    {
        if (company == null)
        {
            return BadRequest("Argument Null");
        }
        var companyExists =
                await _Db.Companies.AnyAsync(c => c.Id == company.Id);

        if (companyExists)
        {
            return BadRequest("Exists");
        }

        _Db.Companies.Add(company);
        await _Db.SaveChangesAsync();
        return Ok();
    }


    public async Task<IHttpActionResult> Put(Company company)
    {
        if (company == null)
        {
            return BadRequest("Argument Null");
        }
        var existing =
                await _Db.Companies.FirstOrDefaultAsync(c => c.Id == company.Id);

        if (existing == null)
        {
            return NotFound();
        }

        existing.Name = company.Name;
        await _Db.SaveChangesAsync();
        return Ok();
    }


    public async Task<IHttpActionResult> Delete(int id)
    {
        var company =
                await _Db.Companies.FirstOrDefaultAsync(c => c.Id == id);
        if (company == null)
        {
            return NotFound();
        }
        _Db.Companies.Remove(company);
        await _Db.SaveChangesAsync();
        return Ok();
    }
}
Also in the Models folder is our ApplicationDbContext.cs file, which actually contains the ApplicationDbContext itself, as well as a DBInitializer. For the moment, this derives from DropDatabaseCreateAlways, so that the database is blown away and re-seeded each time the application runs.
The Original ApplicationDbContext and DbInitializer:
using System;
using System.Collections.Generic;
using System.Linq;
using System.Text;
using System.Threading.Tasks;

// Add using:
using System.Data.Entity;
using Microsoft.AspNet.Identity;
using Microsoft.AspNet.Identity.EntityFramework;

namespace MinimalOwinWebApiSelfHost.Models
{
    public class ApplicationDbContext : DbContext
    {
        public ApplicationDbContext()
            : base("MyDatabase")
        {

        }

        static ApplicationDbContext()
        {
            Database.SetInitializer(new ApplicationDbInitializer());
        }

        public IDbSet<Company> Companies { get; set; }
    }


    public class ApplicationDbInitializer
        : DropCreateDatabaseAlways<ApplicationDbContext>
    {
        protected override void Seed(ApplicationDbContext context)
        {
            context.Companies.Add(new Company { Name = "Microsoft" });
            context.Companies.Add(new Company { Name = "Apple" });
            context.Companies.Add(new Company { Name = "Google" });
            context.SaveChanges();
        }
    }
}
I actually changed the code for the original ApplicationDbContext since the previous post. I have added a static constructor which sets the Database Initializer when the context is instantiated. This will call the initializer the first time we hit the database.
This is a much cleaner solution than previously, where we were doing the database initialization in the Main() method of our Program class:
The Original Program.cs File (slightly modified):
using System;
using System.Collections.Generic;
using System.Linq;
using System.Text;
using System.Threading.Tasks;

// Add reference to:
using Microsoft.Owin.Hosting;
using System.Data.Entity;
using MinimalOwinWebApiSelfHost.Models;

namespace MinimalOwinWebApiSelfHost
{
    class Program
    {
        static void Main(string[] args)
        {
            // Specify the URI to use for the local host:
            string baseUri = "http://localhost:8080";

            Console.WriteLine("Starting web Server...");
            WebApp.Start<Startup>(baseUri);
            Console.WriteLine("Server running at {0} - press Enter to quit. ", baseUri);
            Console.ReadLine();
        }
    }
}
Now that we know where we left off, let’s see about implementing a very basic example of the OAuth Resource Owner Flow model for authentication.
The Microsoft.AspNet.Identity.Owin Nuget Package includes everything we need to implement a basic example of the Resource Owner Flow, even though we won’t be dealing with Identity directly just yet.
Pull the Microsoft.AspNet.Identity.Owin package into our project:
Add Microsoft ASP.NET Identity Owin Nuget Package:
PM> Install-Package Microsoft.AspNet.Identity.Owin -Pre
Now we are ready to get started…
Adding The Embedded Authorization Server
Key to the Resource Owner Flow is the Authorization Server. In our case, the Authorization Server will actually be contained within our Web Api application, but will perform the same function as it would if it were hosted separately.
The Microsoft.Owin.Security.OAuth library defines a default implementation of IOAuthAuthorizationServerProvider, OAuthAuthorizationServerProvider which allows us to derive a custom implementation for our application. You should recognize this if you have used the Visual Studio Web Api project templates before. Add a new folder to the project, OAuthServerProvider, and then add a class ass follows:
Add the ApplicationOAuthServerProvider Class:
using System;
using System.Collections.Generic;
using System.Linq;
using System.Text;
using System.Threading.Tasks;

// Add Usings:
using Microsoft.Owin.Security;
using Microsoft.Owin.Security.OAuth;
using System.Security.Claims;
using MinimalOwinWebApiSelfHost.Models;

namespace MinimalOwinWebApiSelfHost.OAuthServerProvider
{
    public class ApplicationOAuthServerProvider
        : OAuthAuthorizationServerProvider
    {
        public override async Task ValidateClientAuthentication(
            OAuthValidateClientAuthenticationContext context)
        {
            // This call is required...
            // but we're not using client authentication, so validate and move on...
            await Task.FromResult(context.Validated());
        }


        public override async Task GrantResourceOwnerCredentials(
            OAuthGrantResourceOwnerCredentialsContext context)
        {
            // DEMO ONLY: Pretend we are doing some sort of REAL checking here:
            if (context.Password != "password")
            {
                context.SetError(
                    "invalid_grant", "The user name or password is incorrect.");
                context.Rejected();
                return;
            }

            // Create or retrieve a ClaimsIdentity to represent the
            // Authenticated user:
            ClaimsIdentity identity =
                new ClaimsIdentity(context.Options.AuthenticationType);
            identity.AddClaim(new Claim("user_name", context.UserName));

            // Identity info will ultimately be encoded into an Access Token
            // as a result of this call:
            context.Validated(identity);
        }
    }
}
You can see we are overriding two of the methods available on OAuthAuthorizationServerProvider. The First, ValidateClientAuthentication(), is necessary even though in our case we are not validating the Client application (although we COULD, if we wanted to). We are simply calling Validated() on the ClientValidationContext and moving on. In a more complex scenario, or one for which stronger security was required, we might authenticate the client as well as the resource owner.
Where the meat and potatoes of our authentication process occurs is in the GrantResourceOwnerCredentials() method. For this part of our example, we’re keeping this simple. We have hacked an authentication process which basically compares the password passed in with the hard-coded string value “password.” IF this check fails, an error is set, and authentication fails.
In reality, of course, we would (and WILL, shortly) implement a more complex check of the user’s credentials. For now though, this will do, without distracting us from the overall structure of things.
If the credentials check succeeds, an instance of ClaimsIdentity is created to represent the user data, including any Claims the user should have. For now, all we are doing is adding the user’s name as the single claim, and then calling Validated() on the GrantResourceOwnerCredentials context.
The call to Validated() ultimately results in the OWIN middleware encoding the ClaimsIdentity data into an Access Token. How this happens, in the context of the Microsoft.Owin implementation, is complex and beyond the scope of this article. If you want to dig deeper on this, grab a copy of Telerik’s fine tool Just Decompile. Suffice it to say that the ClaimsIdentity information is encrypted with a private key (generally, but not always the Machine Key of the machine on which the server is running). Once so encrypted, the access token is then added to the body of the outgoing HTTP response.
Configuring OWIN Authentication and Adding to the Middleware Pipeline
Now that we have our actual Authorization Server in place, let’s configure our OWIN Startup class to authenticate incoming requests.
We will add a new method, ConfigureAuth() to our Startup class. Check to make sure you have added the following usings and code to Startup:
Add a ConfigureAuth() Method to the OWIN Startup Class:
using System;

// Add the following usings:
using Owin;
using System.Web.Http;
using MinimalOwinWebApiSelfHost.Models;
using MinimalOwinWebApiSelfHost.OAuthServerProvider;
using Microsoft.Owin.Security.OAuth;
using Microsoft.Owin;

namespace MinimalOwinWebApiSelfHost
{
    public class Startup
    {
        // This method is required by Katana:
        public void Configuration(IAppBuilder app)
        {
            ConfigureAuth(app);
            var webApiConfiguration = ConfigureWebApi();
            app.UseWebApi(webApiConfiguration);
        }


        private void ConfigureAuth(IAppBuilder app)
        {
            var OAuthOptions = new OAuthAuthorizationServerOptions
            {
                TokenEndpointPath = new PathString("/Token"),
                Provider = new ApplicationOAuthServerProvider(),
                AccessTokenExpireTimeSpan = TimeSpan.FromDays(14),

                // Only do this for demo!!
                AllowInsecureHttp = true
            };
            app.UseOAuthAuthorizationServer(OAuthOptions);
            app.UseOAuthBearerAuthentication(
                    new OAuthBearerAuthenticationOptions());
        }


        private HttpConfiguration ConfigureWebApi()
        {
            var config = new HttpConfiguration();
            config.Routes.MapHttpRoute(
                "DefaultApi",
                "api/{controller}/{id}",
                new { id = RouteParameter.Optional });
            return config;
        }
    }
}
There’s a lot going on in the ConfigureAuth() method above.
First, we initialize an instance of OAuthAuthorizationServerOptions. As part of the initialization, we see that we set the token endpoint, as well as assign a new instance of our ApplicationOAuthAuthenticationServerProvider class to the Provider property of the options object.
We set an expiry for any tokens issues, and then we explicitly allow the Authorization Server to allow insecure HTTP connections. A note on this last – this is strictly for demo purposes. In the wild, you would definitely want to connect to the authorization server using a secure SSL/TLS protocol (HTTPS), since you are transporting user credentials in the clear.
Once our authorization server options are configured, we see the standard extension methods commonly used to add middleware to IAppBuilder. We pass our server options in with UseAuthorizationServer(), and then we indicate that we want to return Bearer Tokens with UseOAuthBearerAuthentication(). In this case, we are passing the default implementation for OAuthBearerAuthenticationOptions, although we could derive from that and customize if we needed to.
The server is added to the options object, which specifies other configuration items, and which is then passed into the middleware pipeline.
Authenticating the Client: Retrieve an Access Token from the Authorization Server
Again, from the previous post, we had put together a crude but effective API client application to exercise our API.
For this post, we are going to basically re-write the client application.
First, we will add a new Class, the apiClient class. This class will be responsible for submitting our credentials to our Web Api and obtaining a Dictionary<string, string> containing the de-serialized response body, which includes the access token, and additional information about the authentication process:
The ApiClient Class:
using System;
using System.Collections.Generic;
using System.Linq;
using System.Text;
using System.Threading.Tasks;

// Add Usings:
using System.Net.Http;

// Add for Identity/Token Deserialization:
using Newtonsoft.Json;

namespace MinimalOwinWebApiClient
{
    public class apiClientProvider
    {
        string _hostUri;
        public string AccessToken { get; private set; }

        public apiClientProvider(string hostUri)
        {
            _hostUri = hostUri;
        }


        public async Task<Dictionary<string, string>> GetTokenDictionary(
            string userName, string password)
        {
            HttpResponseMessage response;
            var pairs = new List<KeyValuePair<string, string>>
                {
                    new KeyValuePair<string, string>( "grant_type", "password" ),
                    new KeyValuePair<string, string>( "username", userName ),
                    new KeyValuePair<string, string> ( "password", password )
                };
            var content = new FormUrlEncodedContent(pairs);

            using (var client = new HttpClient())
            {
                var tokenEndpoint = new Uri(new Uri(_hostUri), "Token");
                response =  await client.PostAsync(tokenEndpoint, content);
            }

            var responseContent = await response.Content.ReadAsStringAsync();
            if (!response.IsSuccessStatusCode)
            {
                throw new Exception(string.Format("Error: {0}", responseContent));
            }

            return GetTokenDictionary(responseContent);
        }


        private Dictionary<string, string> GetTokenDictionary(
            string responseContent)
        {
            Dictionary<string, string> tokenDictionary =
                JsonConvert.DeserializeObject<Dictionary<string, string>>(
                responseContent);
            return tokenDictionary;
        }
    }
}
With that in place, we can re-implement the client Program class like so:
The Client Program Class:
using System;
using System.Collections.Generic;
using System.Linq;
using System.Text;
using System.Threading.Tasks;

// Add Usings:
using System.Net.Http;

namespace MinimalOwinWebApiClient
{
    class Program
    {
        static void Main(string[] args)
        {
            // Wait for the async stuff to run...
            Run().Wait();

            // Then Write Done...
            Console.WriteLine("");
            Console.WriteLine("Done! Press the Enter key to Exit...");
            Console.ReadLine();
            return;
        }


        static async Task Run()
        {
            // Create an http client provider:
            string hostUriString = "http://localhost:8080";
            var provider = new apiClientProvider(hostUriString);
            string _accessToken;
            Dictionary<string, string> _tokenDictionary;

            try
            {
                // Pass in the credentials and retrieve a token dictionary:
                _tokenDictionary = await provider.GetTokenDictionary(
                        "john@example.com", "password");
                _accessToken = _tokenDictionary["access_token"];
            }
            catch (AggregateException ex)
            {
                // If it's an aggregate exception, an async error occurred:
                Console.WriteLine(ex.InnerExceptions[0].Message);
                Console.WriteLine("Press the Enter key to Exit...");
                Console.ReadLine();
                return;
            }
            catch (Exception ex)
            {
                // Something else happened:
                Console.WriteLine(ex.Message);
                Console.WriteLine("Press the Enter key to Exit...");
                Console.ReadLine();
                return;
            }

            // Write the contents of the dictionary:
            foreach(var kvp in _tokenDictionary)
            {
                Console.WriteLine("{0}: {1}", kvp.Key, kvp.Value);
                Console.WriteLine("");
            }
        }
    }
}
Up to this point, we’ve ditched all the code that makes requests to the CompaniesController in our API, and we’re only looking at the code which authenticates us and retrieves the access token.
Note, we have included some very rudimentary exception handling here. In a real application we would probably want a little more info, and we would need to incorporate a more robust mechanism for handling HTTP errors and other things that might go wrong.
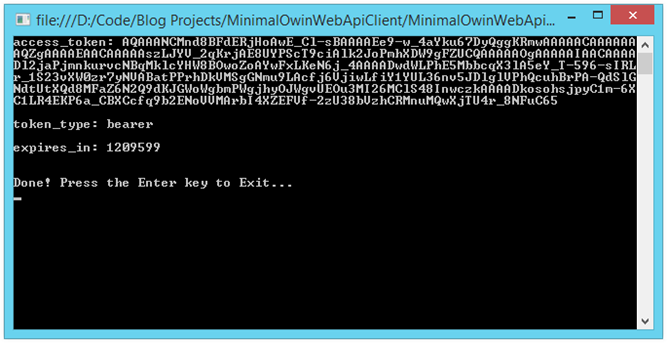
If we run our Web Api application, and then run our client application, we should see the following output from our Client application:
Client Application Output after Authentication:
And we see that we have successfully retrieved an access token from our extra-simple auth server. But, what if we pass invalid credentials?
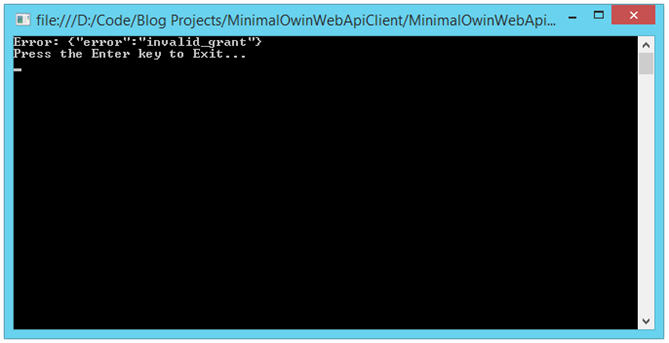
Change the password we are passing in from “password” to something else, say, “assword” (but mom, all I did was take the letter “p” out??!!):
Client Application after Invalid Authentication:
Appropriately, we get back an error indicating we have provided an invalid grant.
Now let’s implement the rest of our client, and try some calls into our API itself.
Implementing the API Client with Authenticated API Calls
Now, we’ll add an updated version of the CompanyClient class. In this case, we have made everything async. Also, we have updated the class itself, and all of the methods, to work with the the new authentication requirement we have introduced in our API:
The Heavily Modified CompanyClient Class:
using System;
using System.Collections.Generic;
using System.Linq;
using System.Text;
using System.Threading.Tasks;

// Add Usings:
using System.Net.Http;
using System.Net;
using System.Net.Http.Headers;

// Add for Identity/Token Deserialization:
using Newtonsoft.Json;


namespace MinimalOwinWebApiClient
{
    public class CompanyClient
    {
        string _accessToken;
        Uri _baseRequestUri;
        public CompanyClient(Uri baseUri, string accessToken)
        {
            _accessToken = accessToken;
            _baseRequestUri = new Uri(baseUri, "api/companies/");
        }


        // Handy helper method to set the access token for each request:
        void SetClientAuthentication(HttpClient client)
        {
            client.DefaultRequestHeaders.Authorization
                = new AuthenticationHeaderValue("Bearer", _accessToken);
        }


        public async Task<IEnumerable<Company>> GetCompaniesAsync()
        {
            HttpResponseMessage response;
            using(var client = new HttpClient())
            {
                SetClientAuthentication(client);
                response = await client.GetAsync(_baseRequestUri);
            }
            return await response.Content.ReadAsAsync<IEnumerable<Company>>();
        }


        public async Task<Company> GetCompanyAsync(int id)
        {
            HttpResponseMessage response;
            using (var client = new HttpClient())
            {
                SetClientAuthentication(client);

                // Combine base address URI and ID to new URI
                // that looks like http://hosturl/api/companies/id
                response = await client.GetAsync(
                    new Uri(_baseRequestUri, id.ToString()));
            }
            var result = await response.Content.ReadAsAsync<Company>();
            return result;
        }


        public async Task<HttpStatusCode> AddCompanyAsync(Company company)
        {
            HttpResponseMessage response;
            using(var client = new HttpClient())
            {
                SetClientAuthentication(client);
                response = await client.PostAsJsonAsync(
                    _baseRequestUri, company);
            }
            return response.StatusCode;
        }


        public async Task<HttpStatusCode> UpdateCompanyAsync(Company company)
        {
            HttpResponseMessage response;
            using (var client = new HttpClient())
            {
                SetClientAuthentication(client);
                response = await client.PutAsJsonAsync(
                    _baseRequestUri, company);
            }
            return response.StatusCode;
        }


        public async Task<HttpStatusCode> DeleteCompanyAsync(int id)
        {
            HttpResponseMessage response;
            using (var client = new HttpClient())
            {
                SetClientAuthentication(client);

                // Combine base address URI and ID to new URI
                // that looks like http://hosturl/api/companies/id
                response = await client.DeleteAsync(
                    new Uri(_baseRequestUri, id.ToString()));
            }
            return response.StatusCode;
        }
    }
}
Now, we can update our Program class to call into CompanyClient to work with our API and output the results to the console. Basically, we’ll expand the Run() method, and exercise each of the methods we defined on CompaniesController asynchronously. We also added a pair of convenience methods for writing to the console, WriteCompaniesList() and WriteStatusCodeResult() :
Update Program Class to Consume API and Write to Console:
static async Task Run()
{
    // Create an http client provider:
    string hostUriString = "http://localhost:8080";
    var provider = new apiClientProvider(hostUriString);
    string _accessToken;
    Dictionary<string, string> _tokenDictionary;

    try
    {
        // Pass in the credentials and retrieve a token dictionary:
        _tokenDictionary =
            await provider.GetTokenDictionary("john@example.com", "password");
        _accessToken = _tokenDictionary["access_token"];

        // Write the contents of the dictionary:
        foreach (var kvp in _tokenDictionary)
        {
            Console.WriteLine("{0}: {1}", kvp.Key, kvp.Value);
            Console.WriteLine("");
        }

        // Create a company client instance:
        var baseUri = new Uri(hostUriString);
        var companyClient = new CompanyClient(baseUri, _accessToken);

        // Read initial companies:
        Console.WriteLine("Read all the companies...");
        var companies = await companyClient.GetCompaniesAsync();
        WriteCompaniesList(companies);

        int nextId = (from c in companies select c.Id).Max() + 1;

        Console.WriteLine("Add a new company...");
        var result = await companyClient.AddCompanyAsync(
            new Company { Name = string.Format("New Company #{0}", nextId) });
        WriteStatusCodeResult(result);

        Console.WriteLine("Updated List after Add:");
        companies = await companyClient.GetCompaniesAsync();
        WriteCompaniesList(companies);

        Console.WriteLine("Update a company...");
        var updateMe = await companyClient.GetCompanyAsync(nextId);
        updateMe.Name = string.Format("Updated company #{0}", updateMe.Id);
        result = await companyClient.UpdateCompanyAsync(updateMe);
        WriteStatusCodeResult(result);

        Console.WriteLine("Updated List after Update:");
        companies = await companyClient.GetCompaniesAsync();
        WriteCompaniesList(companies);

        Console.WriteLine("Delete a company...");
        result = await companyClient.DeleteCompanyAsync(nextId - 1);
        WriteStatusCodeResult(result);

        Console.WriteLine("Updated List after Delete:");
        companies = await companyClient.GetCompaniesAsync();
        WriteCompaniesList(companies);
    }
    catch (AggregateException ex)
    {
        // If it's an aggregate exception, an async error occurred:
        Console.WriteLine(ex.InnerExceptions[0].Message);
        Console.WriteLine("Press the Enter key to Exit...");
        Console.ReadLine();
        return;
    }
    catch (Exception ex)
    {
        // Something else happened:
        Console.WriteLine(ex.Message);
        Console.WriteLine("Press the Enter key to Exit...");
        Console.ReadLine();
        return;
    }
}


static void WriteCompaniesList(IEnumerable<Company> companies)
{
    foreach (var company in companies)
    {
        Console.WriteLine("Id: {0} Name: {1}", company.Id, company.Name);
    }
    Console.WriteLine("");
}

static void WriteStatusCodeResult(System.Net.HttpStatusCode statusCode)
{
    if (statusCode == System.Net.HttpStatusCode.OK)
    {
        Console.WriteLine("Opreation Succeeded - status code {0}", statusCode);
    }
    else
    {
        Console.WriteLine("Opreation Failed - status code {0}", statusCode);
    }
    Console.WriteLine("");
}
Now that we are able to properly authenticate requests to our Web Api, we should be protected against unauthorized access, right?
Not so fast.
Protecting Resources With [Authorize] Attribute
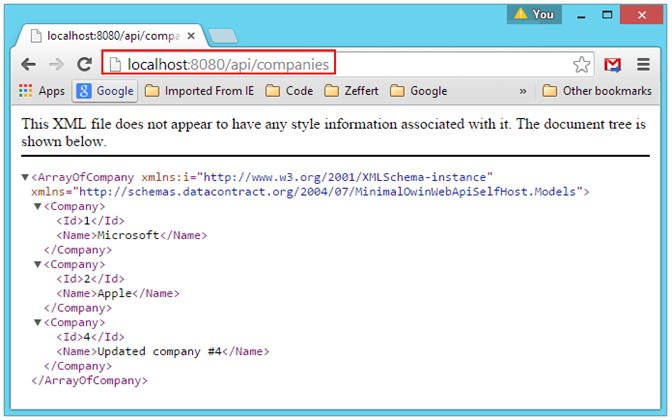
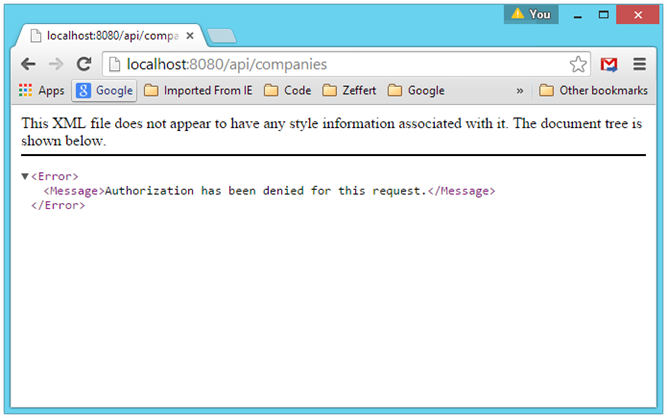
If we fire up our Web Api Application now, open a browser, and type the URL routed to the GetCompanies() method on the CompaniesController, we find that we can still access the resource, even though the requests from the browser contains no authentication token:
Accessing the Companies Resource from the Browser without Authentication:
This is because we haven’t specified that the resources represented by CompaniesController should be protected. We can fix that easily, by decorating the CompaniesController class itself with an [Authorize] attribute:
Decorate CompaniesController with an [Authorize] Attribute:
[Authorize]
public class CompaniesController : ApiController
{
    // ... Code for Companies Controller ...
}
If we re-run the Web Api application now, and refresh our browser, we find:
Accessing the Protected Companies Resource from the Browser without Authentication:
Since the browser request had no access token in the request body, the request for the protected resource was denied.
Accessing Protected Resources with Authenticated Client Requests
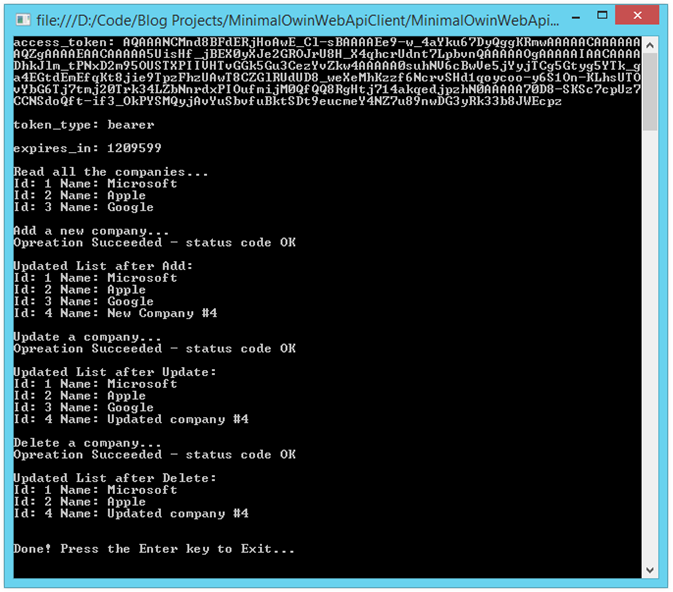
Now, we should be able to run our API Client application (don’t forget to re-set the password to “password!”). If we run our client application now, we should see console output resembling the following:
Console Output from Authenticated Request for Protected Resource:
With that, we have implemented a very basic example of authenticating a user with our embedded authorization server, retrieved an access token from our client application, and successfully requested access to protected resources on the resource server.
Adding Roles as Claims
A deep look at claims-based authorization is beyond the scope of this article. However, we can use the [Authorize] attribute to ensure that only users with a specific role claim can access a protected resource:
Change the [Authorize] attribute on the CompanyController class to the following:
Add a specific Role to the [Authorize] Attribute on Company Controller:
[Authorize(Roles="Admin")]
public class CompaniesController : ApiController
{
    // ... Code for Companies Controller ...
}
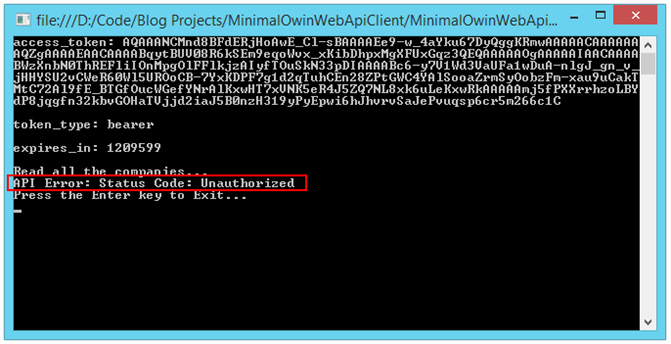
If we run our Web Api application now, and then run our Api Client application, we find we have a problem:
Running the Api Client when Role Authorization is Required:
Given we have added the Role restriction for access to the CompaniesController resource, this is what we expect to see. Now let’s see about authorizing access based on Role membership in our Web Api.
Add a Role Claim to Resource Owner Identity
At the simplest level, we can add a claim to the access token granted to the resource owner in the call to GrantResourceOwnerCredentials():
Add a Role Claim to the authenticated User in GrantResourceOwnerCredentials():
public override async Task GrantResourceOwnerCredentials(
    OAuthGrantResourceOwnerCredentialsContext context)
{
    // DEMO ONLY: Pretend we are doing some sort of REAL checking here:
    if (context.Password != "password")
    {
        context.SetError(
            "invalid_grant", "The user name or password is incorrect.");
        context.Rejected();
        return;
    }

    // Create or retrieve a ClaimsIdentity to represent the
    // Authenticated user:
    ClaimsIdentity identity =
        new ClaimsIdentity(context.Options.AuthenticationType);
    identity.AddClaim(new Claim("user_name", context.UserName));

    // Add a Role Claim:
    identity.AddClaim(new Claim(ClaimTypes.Role, "Admin"));

    // Identity info will ultimatly be encoded into an Access Token
    // as a result of this call:
    context.Validated(identity);
}
With that simple change, we have now added a claim to the identity of the authenticated user. The claims will be encoded/encrypted as part of the access token. When the token is received by the resource server (in this case, our application), the decoded token will provide the identity of the authenticated user, as well as any additional claims, including the fact that the user is a member of the “Admin” role.
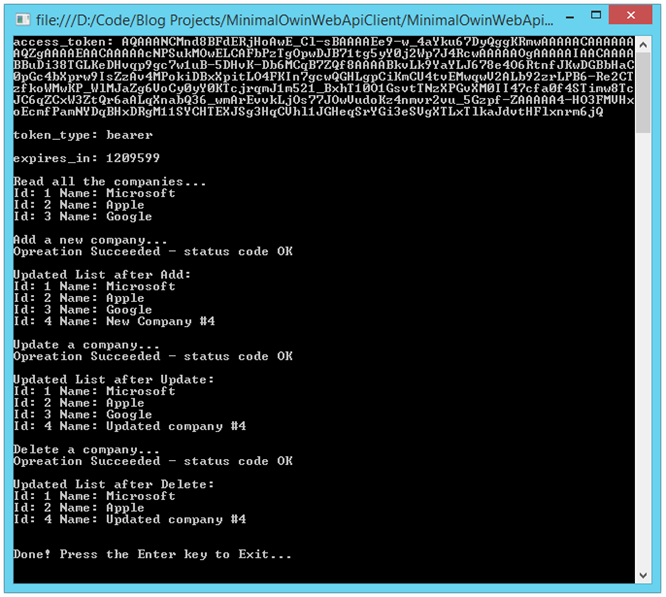
If we run both applications now, the console output from our Api Client application is what we would expect:
Console Output from Client with Authenticated User with Proper Admin Role Claim:
We have once again successfully accessed a protected resource. Access to the CompaniesController is now restricted to authenticated users who also present a claim indicating they are a member of the Admin role.
What Next?
So far, we’ve seen in a very basic way how the Resource Owner Flow is implemented in the context of the OWIN/Katana pipeline. We have not yet examined where we might store our user information, how we get it there, or how our authorization framework might access that data.
In the next post, we’ll look at persisting authorization information, and how we access it.
NEXT: ASP.NET Web Api: OWIN/Katana Authentication/Authorization Part II: Models and Persistence
Additional Resources and Items of Interest
- ASP.NET: Understanding OWIN, Katana, and the Middleware Pipeline
- ASP.NET Web Api 2.2: Create a Self-Hosted OWIN-Based Web Api from Scratch
- ASP.NET Web Api: Understanding OWIN/Katana Authentication/Authorization Part II: Models and Persistence
- ASP.NET Identity 2.0: Introduction to Working with Identity 2.0 and Web API 2.2
- ASP.NET Web Api: Unwrapping HTTP Error Results and Model State Dictionaries Client-Side
- ASP.NET Web Api and Identity 2.0 – Customizing Identity Models and Implementing Role-Based Authorization
Some very helpful articles I have referred to in learning this stuff:
- Taiseer Joudeh’s outstanding series on Authentication
- Dominick Baier’s Least Privilege Blog
- Brock Allen’s Blog

Comments
 Don Gusher
AuthorJohn – Thanks for the post, I did successfully implemented an embedded authorization server within my resource server based on your instruction. But when I Decoupled the Authorization Server from Resource Server On the same machine, my solution does not work and I get Unauthorized response from the resource server. Taiseer Joudeh has a good post on decoupling Authorization Server from Resource Server, but his specific solution is based on IIS/System.web, and MachineKey. Any suggestion how we may take your approach and decouple Authorization Server from Resource Server? Thanks in advance.
 Tanvir
AuthorWhat the hell!! Why did you use console application as client?? It would have been better if you would have used MVC web application as client!!
 John Atten
AuthorWhat the hell! I assume most who are reading will understand that accessing an API is a simple matter of sending the proper http requests, and that putting together a console application would allow the post to focus on the topic at hand (WebApi with OWIN/Katana, not yet another MVC demo application). Again, note, right in the title of the post – ASP.NET Web Api – NOT ASP.NET MVC.
The same concepts apply if you are using middleware in an MVC application. But the demo bits would have become cluttered. MVC != Web Api.
 John P
AuthorHi
For some reason I was getting a JsonDeserialization error rather than your expected output. I inserted a throw and then it was OK
By the way thanks for these articles..
public async Task<IEnumerable<Company>> GetCompaniesAsync()
{
….
if (response.StatusCode == HttpStatusCode.Unauthorized)
{
throw new Exception("Message is unauthorized");
}
return await response.Content.ReadAsAsync<IEnumerable<Company>>();
}
 jatten
AuthorThanks Brent –
indeed, I am leading up to a full implementait on on IIS as well, which changes some things and not others.
Thanks for taking the time to comment!
 Brent Newbury
AuthorTo anyone wondering why this doesn't work when using IIS or IISExpress hosted environment, rather than self hosted, you'll need to add the following code when creating the HttpConfiguration:
config.Filters.Add(new HostAuthenticationFilter("Bearer"));