Image by Ian Britton | Some Rights Reserved
Entity Framework’s “Code-First” development model has become a highly popular approach to data modeling in ASP.NET MVC development in the last few years. The Code First approach saves the average developer the perceived pain of working with SQL, and also minimizes the amount of repetitive, “boiler plate” code we need to write as part of a more traditional data access layer.
However, quite frequently we will need to develop against an existing database, the schema of which may or may not be open for modification.
- Create an ADO.NET Entity Data Model
- Add Functionality to Generated Classes with Partial Classes
- Adding Metadata Annotations to Generated Classes using Partial Classes
- Updating the Model to Reflect Changes in the Underlying Database
- Why Model or Database First?
- Additional Resources and Items of Interest
While it is possible to reverse-engineer an existing database and then switch to a code-first approach once the models have been created, for various reasons this approach may be impossible or impractical. In certain cases we must start with a pre-defined database schema and/or allow database changes to drive our model instead of the other way around. In this post we will take a quick look at how to reverse engineer an existing database to create your conceptual data model.
Within the context of an ASP.NET MVC application, we may find ourselves looking at the Database or Model First approach in a number of different situations, including:
- Creating a new front end against an existing database
- An organizational or DBA philosophy driven by the modeling the database first
- Personal developer preference – some of us simply prefer to model the data first.
For Our Examples: The Database . . . First . . .
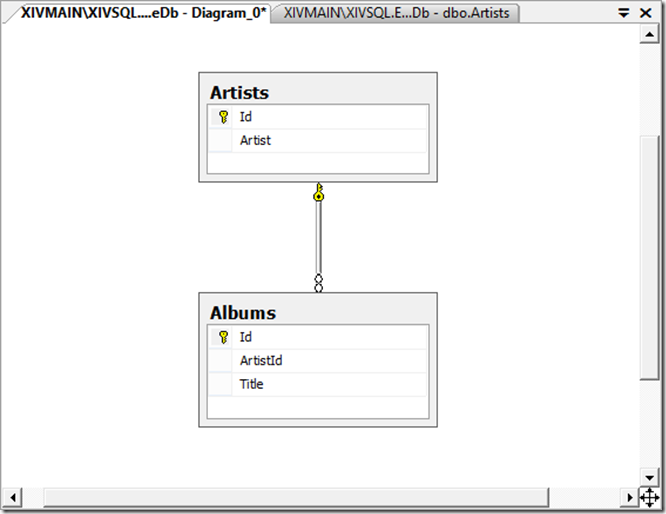
Under the premise that we must (for whatever reason) build out our application around an existing database, we will create an extremely complex SQL Server database and pretend it is what we have been given by the powers that be:
Example Database:
As you can see, we have a complicated database with two related tables. Now, let’s look at an example ASP.NET MVC project, into which we will reverse engineer this database to create our model classes and database context.
Create an ADO.NET Entity Data Model
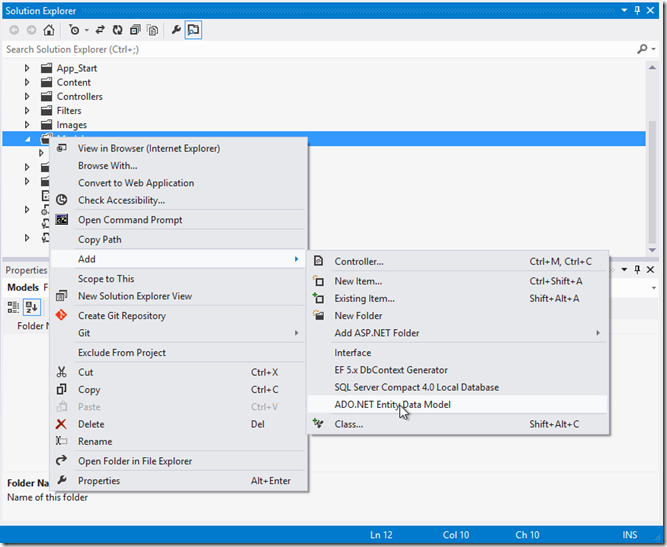
In a standard ASP.NET project, we should find a pre-defined Models folder, in which there will (usually) already be an Account Model related to ASP.NET Forms Membership. Right-click on the Models folder in the VS Solution Explorer and select Add => ADO.NET Entity Data Model:
Adding an ADO.NET Entity Data Model:
After you do this, you will be prompted to provide a name for the data model you are about to create. The convention is something along the lines of “<ProjectName>Entities.” In this case, I chose “ExampleEntities” and then proceed to the next step, where we are asked to choose what the model should contain. Obviously, we want to select “Generate from database” here, and then select Next in the Wizard.
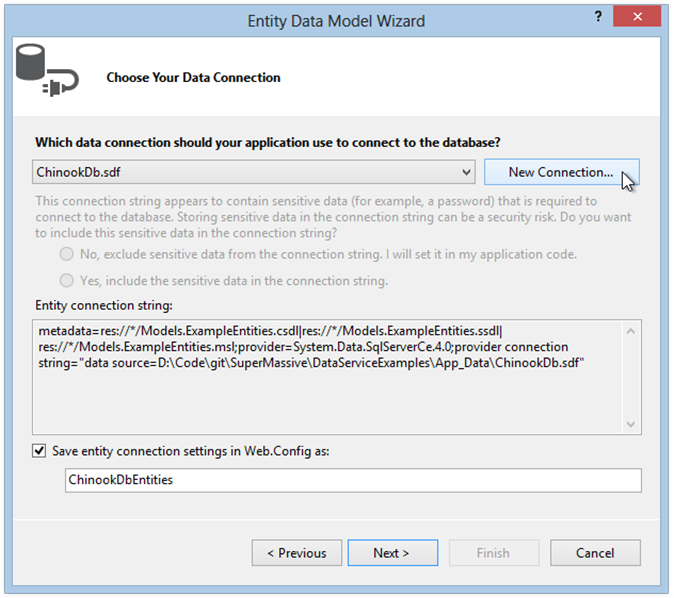
In the next window, we are asked to choose a connection:
Choose Your Data Connection (or create a New One):
Obviously, our database is not called “ChinookDb.sdf” as seen in the picture above, and in fact we probably don’t already have our database available as an existing connection, so we need to click the “New Connection” button and create one. Once that’s done, you will notice the wizard automatically determined an appropriate name (in my case, “ExampleDbEntities” for our connection string in Web.config. You can change this if you like, but I recommend using the default for consistency. Hit “Next.”
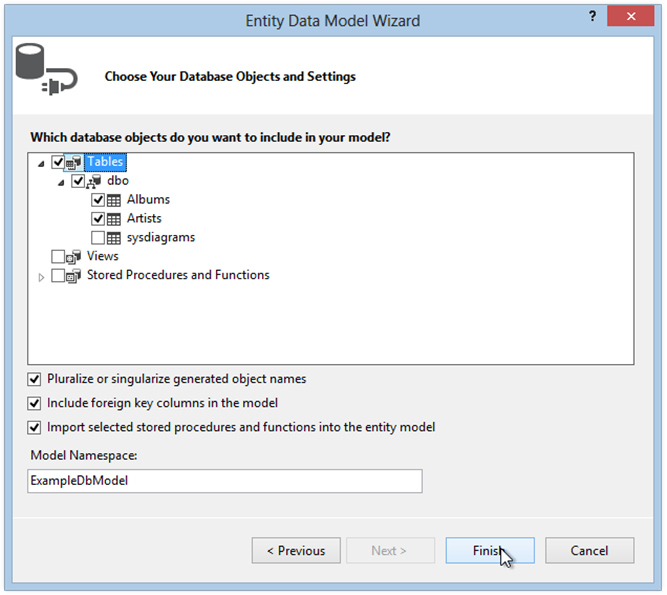
In the next window, we are asked to select the database objects we wish to include in our model. For our simple database (and in most cases) we just want the tables. In my case, there is an extra table “sysDiagrams” that is NOT part of our domain model. In your own project, select the tables which make sense as part of your model domain. The other default settings in this window are usually appropriate as well:
Select the Database Objects:
Now, hit “Finish.”
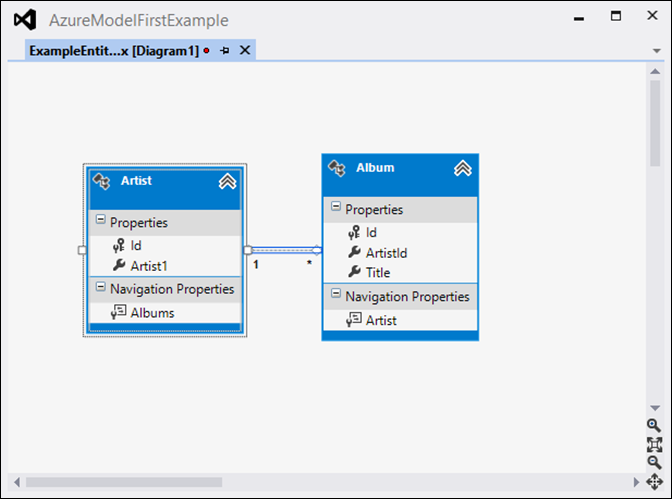
VS will take a few seconds to reverse engineer your database, and when finished, will present you with a diagram of the conceptual model of your database. As you can see, VS made fast work of our extremely complex data model:
The EDMX Diagram for ExampleEntities:
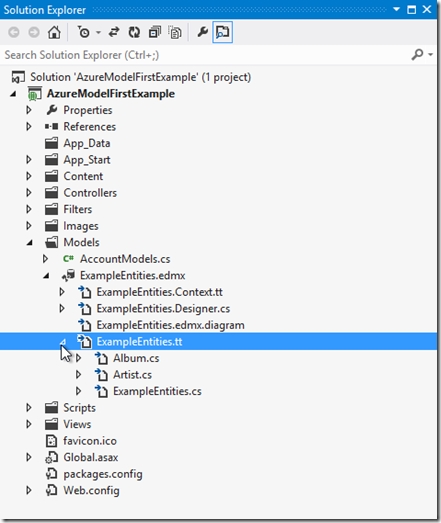
We can find our generated model classes in Solution Explorer under Models => ExampleEntities => ExampleEntities.tt:
The New Model Classes in VS Solution Explorer:
Add Functionality to Generated Classes with Partial Classes
Now that we have our model classes, it may often be the case we need to add functionality to them to suit the requirements of our program. Under the model-first or Database First approach, there are some things to be aware of here. These classes are generated, and can be automagically updated to reflect changes in the underlying database. If and when you do this, they will be re-written, and any code you may have added will be gone. Therefore, when you need to add additional properties or methods to one of these classes, use partial classes and add them in the Models folder.
For a contrived example, let’s say we absolutely needed a CountOfAlbums property defined on our Artist class. We COULD open up our Artist class and simply add a new method like so:
Modifying the Artist Class in the Generated File:
//------------------------------------------------------------------------------
// <auto-generated>
//    This code was generated from a template.
//
//    Manual changes to this file may cause unexpected behavior in your application.
//    Manual changes to this file will be overwritten if the code is regenerated.
// </auto-generated>
//------------------------------------------------------------------------------

namespace AzureModelFirstExample.Models
{
    using System;
    using System.Collections.Generic;

    public partial class Artist
    {
        public Artist()
        {
            this.Albums = new HashSet<Album>();
        }

        public int Id { get; set; }
        public string Artist1 { get; set; }

        public virtual ICollection<Album> Albums { get; set; }

        // THIS IS OUR NEW METHOD:
        public int CountAlbums
        {
            get
            {
                return this.Albums.Count;
            }
        }
    }
}
However, if later we were to have EF update our model to reflect changes in the underlying database schema (We’ll look at this in a moment), this addition would be over-written. A better approach would be to add a new class file named ArtistPartial to our Models folder. Once we have done this by right-clicking in Solution Explorer => Add => Class . . . , we get a code file which looks like this:
using System;
using System.Collections.Generic;
using System.Linq;
using System.Web;
namespace AzureModelFirstExample.Models
{
    public class ArtistPartial
    {
    }
}
Now, we will leave the actual code file name as ArtistPartial.cs, but we can replace the class declaration using the partial keyword and the class name Artist to match our generated model class. Then we can put our custom property in this file:
using System;
using System.Collections.Generic;
using System.Linq;
using System.Web;

namespace AzureModelFirstExample.Models
{
    public partial class Artist
    {
        // THIS IS OUR NEW METHOD:
        public int CountAlbums
        {
            get
            {
                return this.Albums.Count;
            }
        }
    }
}
Now, we can simply add the partial keyword to the class declaration for our EF-generated Artist model class (which we may need to do again if we regenerate the code as well, but it is easier to deal with than re-writing one or more potentially complex properties or methods . . .):
//------------------------------------------------------------------------------
// <auto-generated>
//    This code was generated from a template.
//
//    Manual changes to this file may cause unexpected behavior in your application.
//    Manual changes to this file will be overwritten if the code is regenerated.
// </auto-generated>
//------------------------------------------------------------------------------

namespace AzureModelFirstExample.Models
{
    using System;
    using System.Collections.Generic;

    public partial class Artist
    {
        public Artist()
        {
            this.Albums = new HashSet<Album>();
        }

        public int Id { get; set; }
        public string Artist1 { get; set; }

        public virtual ICollection<Album> Albums { get; set; }
    }
}
Adding MetaData Annotations to Generated Classes using Partial Classes
ASP.NET MVC provides some powerful and time-saving validation and other features which rely on Data Annotations facilitated in System.ComponentModel.DataAnnotations. Important attribute decorations for our model classes such as [Required] and [DisplayName] allow us to let the MVC framework and JQuery provide basic data entry validations for our site right out of the box.
As generated, our simple model classes don’t know anything about whether (for example) NULL values are allowed in the database. If we want to take advantage of MVC’s out-of-the-box validation and other helpers with our generated classes, we need to find a way to implement the data annotations and other metadata attributes. As before, if we implement these annotations directly in the generated Artist (or any other EF-generated) code file, they would again be over-written any time the model is updated. However, we can do this in our partial class, and thus preserve our validations through successive model updates throughout the development process. As an example, we know that:
- The
Artist1property of ourArtistclass is required, as in our database null values are not allowed (and we ALL KNOW that an empty string is NOT THE SAME AS NULL . . . RIGHT??). Artist1is a terrible name for what should be the “Name” property of the artist. However, in our database. we would like to be able to give this a[Display]name attribute so that in our views, MVC will use a more appropriate label (such as “Name” or simply “Artist”).
We can achieve both objectives by adding the following to our ArtistPartial code file:
using System;
using System.Collections.Generic;
using System.Linq;
using System.Web;

// This must be added to our using statements:
using System.ComponentModel.DataAnnotations;

namespace AzureModelFirstExample.Models
{
    // We have added a class-level MetaData attribute here:
    [MetadataType(typeof(ArtistMetadata))]
    public partial class Artist
    {
        // THIS IS OUR NEW METHOD:
        public int CountAlbums
        {
            get
            {
                return this.Albums.Count;
            }
        }
    }

    // We have defined and ArtistMetaData class which defines the
    // meta-data attributes for various properties on the artist class:
    public class ArtistMetadata
    {
        [Required]
        [Display(Name = "Artist Id")]
        public string Id { get; set; }

        [Required]
        [Display(Name = "Name")]
        public string Artist1 { get; set; }
    }
}
Make sure to add the using System.ComponentModel.DataAnnotations to your using statements for the above to work properly.
As you can see, we added a new ArtistMetaData class to our ArtistPartial.cs code file, and defined the data annotations we wanted for each of the properties. To me, the one of greatest import is the [Required] attribute, which allows the MVC framework to perform JQuery validations right from the start.
When we work under a code-first development model, we would define these and other attributes on our classes, and EF would use this metadata while creating our database. In Model/Database first development, we need to decorate our classes manually. Doing this using partial classes allows us to preserve the annotations through successive automated updates to the model.
Updating the Model to Reflect Changes in the Underlying Database
Imagine the harsh, cruel DBA (aren’t they all? – kidding, of course) at our company informs us that he has added a new table, RecordLabels to the database, and created a foreign key on the Albums table to reflect the label for each particular album.
No big deal, Entity Framework has us covered, right?
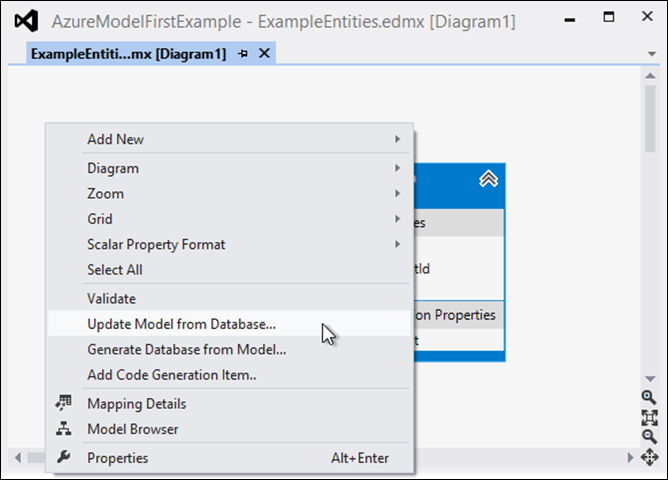
We can simply open our EDMX diagram, right-click anywhere in the viewing area, and select “Update model from database . . .” :
Updating the Model to Reflect Changes in the Database Schema:
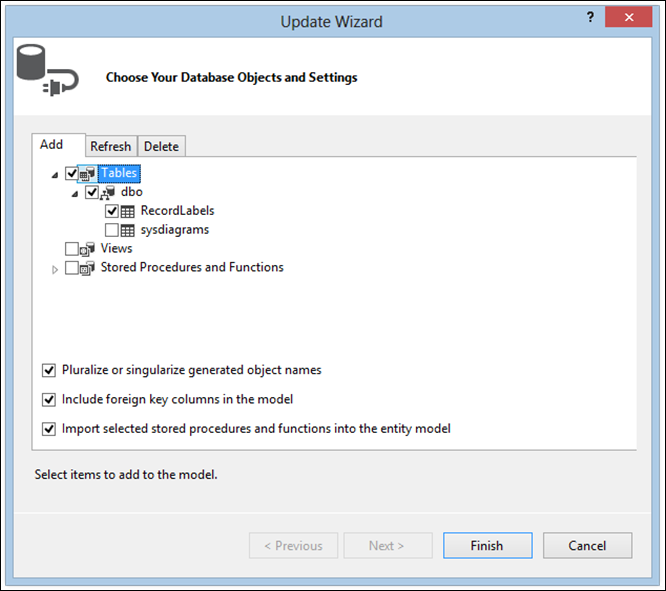
Once we select this option, we see a familiar window. However, there are some differences. Once again, we will select the new tables to add. Again in my case sysDiagrams appears as an option, as well as the new RecordLabels table our cruel DBA added. We only want to select the RecordLabels table to add:
Select the RecordLabels Table to Add to the EF Model:
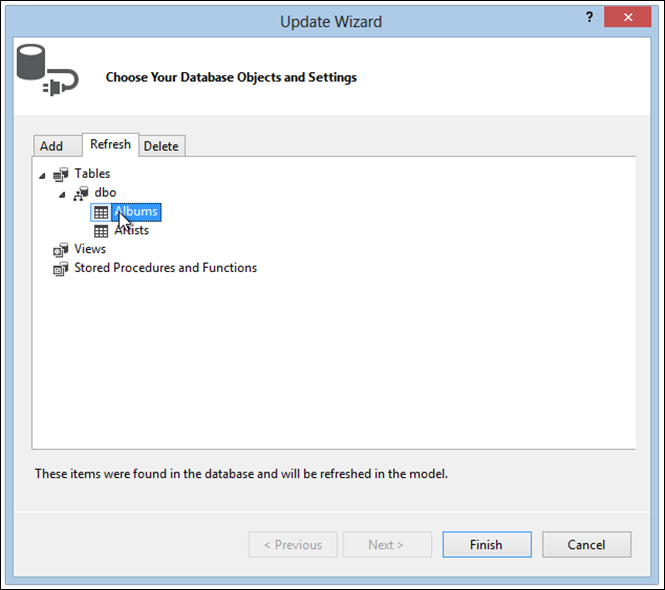
This time, however, we also see a tab named “Refresh.” Here we find any database objects which have been changed since the last model update. In our case, we have added a foreign key to the Albums table. In my specific case, the Artist table also appears, because I modified a few things in the course of preparing these examples.
Database Objects Modified Since the Last Model Update:
Once we click the “Finish” button, VS will again take a moment to regenerate our model classes. Once we Rebuild the project, we find that we now have the new model class RecordLabel in our ExampleEntities.tt file. Further, if we open our Album class we see that EF has now added a LabelId field, and a RecordLabel class as a property.
Last, since we carefully defined any additional methods required for our classes, along with relevant meta-data annotations, in respective partial class files for each of our model classes, our custom code for each class is untouched. We may need to modify it to reflect some of the changes (for example, we have added a LabelId field to the Album class, which likely should be non-nullable in the database and hence [Required] in our model.
We may need to go back through and add the partial keyword to some of our classes, although in some cases EF can figure out that it needs this as well.
Also, we should probably create a similar partial class file for our new RecordLabel class, and add what annotations and additional code make sense.
Why Model or Database First?
The Entity Framework Code-First approach seems to be the new shiny thing for use in developing database applications. From a strictly developer standpoint, the Code First approach may be attractive in that:
- We can (to an extent) allow our database to be modeled upon our object domain, and we get to work and think in the familiar Object-Oriented realm we understand the best;
- Changes to the underlying data base structure can be propagated automatically as our code evolves
- We don’t have to deal directly with SQL (for some, this is a strangely big deal).
However, there are plenty of times when the Code First approach is either not an option (remember the cruel DBA with the existing database we are required to use?), or when as a matter of preference we choose to work with the data model first, and build our code on top of that. In these situations, it is important to recognize the small but significant differences between the two approaches, and build out our application accordingly.
Additional Resources and Items of Interest
- ASP.NET MVC– Azure Websites and EF Model-First Connection Strings when Deploying from Github
- Customizing Routes in ASP.NET MVC
- Routing Basics in ASP.NET MVC
- Building Out a Clean, REST-ful Web Api Service with a Minimal Web Api Project
- Creating a Clean, Minimal-Footprint ASP.NET WebAPI Project with VS 2012 and ASP.NET MVC 4
- Deploying an Azure Website from Source Control
- Deploying an Azure Website from Source Control
Comments