Image by Matt MacGillivray | Some Rights Reserved
In a previous post, we saw how to create a minimal ASP.NET WebApi project template, so that we can avoid some of the bloat and complexity inherent in the standard VS WebApi project. Getting started building out an API project using the minimal project template is much easier, and we can always add back stuff as our project grows.
For starters, though, the minimal project makes it much easier to focus on our principle task – creating a simple, clean API. This minimal project is especially useful if, like myself, you are less-than-experienced, and learning your way through Web API development. Or, if you just want a simple project.
The source code for the projects used in this article can be found at my Github Repo:
- Empty WebApiProject (Ready-to-Use)
- MinimalApiDemo
- MinimalWebApiClientDemo
- Modeling Data
- WebApi Controllers
- Api Controllers – a Closer Look
- Creating a Simple Console API Client
- WebApi Built-in Serialization
- JSON-Based Example Code
- Class-Based Example Code
I. Create an Empty (or nearly so) WebApi Project
As we have seen, the default WebApi project in Visual Studio can be a bit much. To start with a stripped-down, minimal project template, either review the previous post referred to in the link above, which will install the Empty WebApi Project template into Visual Studio directly, clone the EmptyWebApi Project from my Github Repository, or download the zipped project.
II. Modeling Our Data
In building our example, we will adhere to what are recommended conventions for an MVC project. While we are not creating a website proper, it will serve us well to follow the conventions designed into the MVC framework (of which WebApi is a part). Note how I have set up the basic project, with a Models folder and a Controllers folder (at this point, we don’t need Views). If you have worked with a standard ASP.NET MVC project before, this part should look pretty familiar.
Right-click on the Models folder in Solution Explorer, and select the “Add Class” Menu Item. Name the class Person and hit Ok. Now add the following code to the Person class:
Code for the Person Class:
public class Person
{
    public int Id { get; set; }
    public string FirstName { get; set; }
    public string LastName { get; set; }
}
The Person class will be used to represent data from our data store once loaded into our application. Again following something of a convention, we will use a simple repository pattern to represent our database. It is good practice to use an interface to abstract away the specific implementation of your data store, and we will do so here. First of all, because we are going to avoid cluttering up this tutorial (at this point) with details of wiring up a database, and second of all because even in a finished project, your data storage requirements may change. With a properly implemented interface representing your datastore in code, changing up the database-specific code does not require changes to the rest of our project, only the concrete database implementation classes.
NOTE: I am aware that the Repository Pattern has fallen slightly out-of-favor in some quarters. Also, If you are planning to use Entity Framework, NHibernate, or another ORM, your approach in a real project might be different with respect to actual data access implementation. However, for this simple example, the repository pattern works.
Right-click on the Models folder again, and this time select “Add New Item.” From from the “Code” sub-menu, select “Interface.” Name the interface IPersonRepository and hit Ok. Then, add the following code to the newly created interface:
Code for the IPersonRepository Interface:
interface IPersonRepository
{
    IEnumerable<Person> GetAll();
    Person Get(int id);
    Person Add(Person person);
    void Remove(int id);
    bool Update(Person person);
}
Now that we have defined the interface for our repository, let’s create a concrete implementation. Right-click once more on the Models folder in Solution Explorer, and select “Add Class” again. Name the new class PersonRepository and hit Ok. Now add the following code, which we’ll walk through in a moment:
Code for the PersonRepository Class:
public class PersonRepository : IPersonRepository
{
    // We are using the list and _fakeDatabaseID to represent what would
    // most likely be a database of some sort, with an auto-incrementing ID field:
    private List<Person> _people = new List<Person>();
    private int _fakeDatabaseID = 1;


    public PersonRepository()
    {
        // For the moment, we will load some sample data during initialization.
        this.Add(new Person { LastName = "Lennon", FirstName = "John" });
        this.Add(new Person { LastName = "McCartney", FirstName = "Paul" });
        this.Add(new Person { LastName = "Harrison", FirstName = "George" });
        this.Add(new Person { LastName = "Starr", FirstName = "Ringo" });
    }


    public IEnumerable<Person> GetAll()
    {
        return _people;
    }


    public Person Get(int id)
    {
        return _people.Find(p => p.Id == id);
    }


    public Person Add(Person person)
    {
        if (person == null)
        {
            throw new ArgumentNullException("person");
        }
        person.Id = _fakeDatabaseID++;
        _people.Add(person);
        return person;
    }


    public void Remove(int id)
    {
        _people.RemoveAll(p => p.Id == id);
    }


    public bool Update(Person person)
    {
        if (person == null)
        {
            throw new ArgumentNullException("person");
        }
        int index = _people.FindIndex(p => p.Id == person.Id);
        if (index == -1)
        {
            return false;
        }
        _people.RemoveAt(index);
        _people.Add(person);
        return true;
    }
}
Note in the code above, we are using a List<Person> to represent a datastore. In a real API application, you would most likely be using this class to access a database, XML file, or other persistence mechanism. We will look at connecting it all to a database in another post. For now I am keeping it simple, and loading some mock data into the list during initialization.
Using Api Controllers to Access Our API Service
Unlike an ASP.NET/MVC Project, which generally uses Controllers derived from System.Web.MVC.Controller, a WebApi project will generally utilize controllers derived from System.Web.Http.WebApiController. Like the standard MVC Controller, The WebApi Controller accepts incoming HTTP requests and processes accordingly. However, the standard MVC Controller returns a View, while the WebApi controller returns data.
Of particular note is that the WebApiController examines the Accept Header in the HTTP Request, and (where applicable) converts our .Net objects into the appropriate return data type (usually either XML or JSON). In this way, consumers of your API can specify the format required, and expect the proper return in the HTTP Response from the server. Content negotiation details are beyond the scope of this article, but suffice it to say that the WebApiController is what delivers the goods in a WebApiProject.
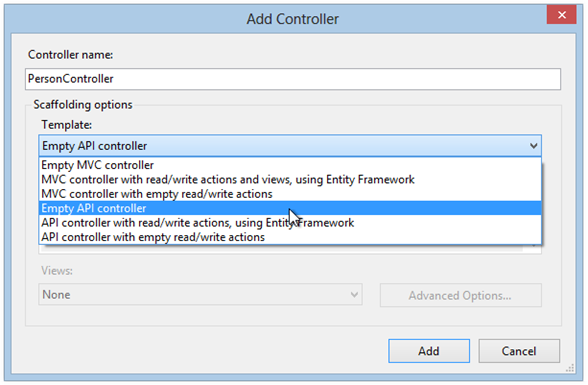
Right-click on the Controllers folder and select “Add Controller.” In the dialog window, name the new controller PersonController and then select Empty WebApi Controller from the drop-down list of controller templates:
Notice that the generated class inherits from ApiController.
Now add the following code for some basic CRUD operations to the new controller (Note you need to add the using statement to reference the classes you defined in the Models Folder – see comment at the top of the class):
Code for the PersonController Class:
using System;
using System.Collections.Generic;
using System.Linq;
using System.Net;
using System.Net.Http;
using System.Web.Http;

// Add a using statement to refer to Models:
using MinimalApiDemo.Models;

namespace MinimalApiDemo.Controllers
{
    public class PersonController : ApiController
    {
        static readonly IPersonRepository databasePlaceholder = new PersonRepository();

        public IEnumerable<Person> GetAllPeople()
        {
            return databasePlaceholder.GetAll();
        }


        public Person GetPersonByID(int id)
        {
            Person person = databasePlaceholder.Get(id);
            if (person == null)
            {
                throw new HttpResponseException(HttpStatusCode.NotFound);
            }
            return person;
        }


        public HttpResponseMessage PostPerson(Person person)
        {
            person = databasePlaceholder.Add(person);
            string apiName = App_Start.WebApiConfig.DEFAULT_ROUTE_NAME;
            var response =
                this.Request.CreateResponse<Person>(HttpStatusCode.Created, person);
            string uri = Url.Link(apiName, new { id = person.Id });
            response.Headers.Location = new Uri(uri);
            return response;
        }


        public bool PutPerson(Person person)
        {
            if (!databasePlaceholder.Update(person))
            {
                throw new HttpResponseException(HttpStatusCode.NotFound);
            }

            return true;
        }


        public void DeletePerson(int id)
        {
            Person person = databasePlaceholder.Get(id);
            if (person == null)
            {
                throw new HttpResponseException(HttpStatusCode.NotFound);
            }
            databasePlaceholder.Remove(id);
        }
    }
}
A Closer Look at the WebApi Controller
As we have alluded to previously, a core tenet of MVC is to favor Convention over Configuration. In terms of our controller class, what this means is that the ASP.NET/MVC runtime establishes certain default behaviors which require no additional configuration, unless you want to change them. Initially, for me anyway, this was also a source of confusion, as the runtime appeared to perform sufficient “magic” that I didn’t know what was happening.
One of the Web API conventions is the mapping of controller methods to HTTP verbs. In our case, we are specifically mapping methods to the HTTP verbs GET, POST, PUT, and DELETE. Notice how our method names begin with one of these four verbs? Our two methods which retrieve person data, GetAllPeople and GetPersonByID begin with the word “Get.” The Web Api framework will map HTTP GET requests to this controller and to one of these methods by following the convention set up in the Route mapping we registered in our WebApiConfig file:
If we go into the App_Start folder, and open the WebApiConfig file, we should see something similar to this:
public static class WebApiConfig
{
    public const string DEFAULT_ROUTE_NAME = "MyDefaultRoute";
    public static void Register(HttpConfiguration config)
    {
        config.Routes.MapHttpRoute(
            name: DEFAULT_ROUTE_NAME,
            routeTemplate: "api/{controller}/{id}",
            defaults: new { id = RouteParameter.Optional }
        );
        config.EnableSystemDiagnosticsTracing();
    }
}
In the above, the route template is used by the MVC framework to map incoming HTTP requests to the appropriately named controller (named such that the first part of the controller name matches the {controller} mapping, and to the most appropriate method with a name that begins with the HTTP verb specified in the request.
In order for all this to work, it becomes our responsibility to simply name our controllers and methods in accordance with this convention. For example, a GET request coming in with a URL mapping:
http://localhost:<port number>/person/
will be mapped to the PersonController.GetAllPeople() method, since the URL contains the Person mapping, the request contains the GET verb, and the optional /id parameter is not present.
Similarly, an HTTP GET request with the following URL mapping:
http://localhost:<port number>/person/2
will be mapped again to the PersonController, but this time to the GetPersonByID method, since the optional id parameter is provided.
Consuming The Example API with a Simple Console Client
The value of an exposed API service is that independent client applications can consume and interact with our API data in a manner we control through the API. We can make available as much, or as little, access as we wish. To demonstrate, we will create a very simple console application which will exercise our API project in a couple different ways.
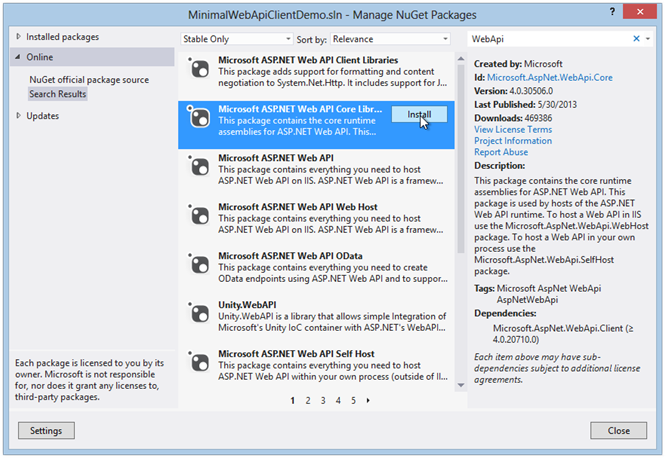
To get started, open a second instance of Visual Studio, and use File –> New Project to create a Console Application. Then, go straight to the Tools –> Library Package Manager –> Manage Nuget Packages for Solution. Select “Online” in the left-hand tree menu, then, in the Search box, type “WebApi.” Select the ASP.NET Web API Core Libraries package, and click Install.
Install WebApi Core Libraries in the Console Application
Once the installation is complete, select the Updates item from the left-hand tree menu. Install any relevant WebApi library updates.
WebApi and JSON give us Options for Client Code
WebApi provides flexible options for how we might retrieve data from our API application. Right out of the box, the WebApi library provides built-in serialization and de-serialization for POCO (“Plain Old CLR Objects”) objects we might use, as well as send and receive straight JSON (“JavaScript Object Notation”) or XML.
We will take a (very!) rudimentary look at client code that uses primarily JSON. One might at some point call into an API infrequently, and deem it not worth building a class hierarchy for these infrequent calls. We will also look at a more standard .NET approach, in which class models are built which represent data from the API we are consuming.
The example client project we are about to build by no means represents a design we might build in the real world. The purpose is to take a quick look at calling into a simple API and doing something semi-meaningful with the data.
IMPORTANT NOTE: for this sample code, I am using calls to GetAsync and ReadAsAsync and accessing the Result property of the return value. This creates blocking call, which is less than optimal for most real-world projects. I used this call to keep things simple in this demo. However, we will look at making non-blocking asynchronous calls in upcoming post.
Building the JSON-Based Example Code
The following example does not rely on a Person class being present. We will use the Newtonsoft JSON library installed with WebApi to parse and use JSON, and to basically shuttle our data around. Where needed, we will utilize C# Anonymous classes where the API we are calling into demands it.
In the example project, I basically added a separate class for the separate calls into our API project. Then, I added an ugly, monolithic method which walks through each, and writes the data retrieved out to the console window. The important part in the code below is getting a feel for making the API calls.
I added a class called JsonExamples for this. At the top of the class, make sure to add the following using statements:
Add Using Statements to the JsonExamples Class:
using System;
using System.Net.Http;
using Newtonsoft.Json.Linq;
Then, separate methods to call into our API project:
The Calls to the API GET, POST, PUT, and DELETE Controllers Using JSON:
// Sends HTTP GET to Person Controller on API:
static JArray getAllPeople()
{
    HttpClient client = new HttpClient();
    HttpResponseMessage response =
        client.GetAsync("http://localhost:57772/api/person/").Result;
    return response.Content.ReadAsAsync<JArray>().Result;
}


// Sends HTTP GET to Person Controller on API with ID:
static JObject getPerson(int id)
{
    HttpClient client = new HttpClient();
    HttpResponseMessage response =
        client.GetAsync("http://localhost:57772/api/person/" + id).Result;
    return response.Content.ReadAsAsync<JObject>().Result;
}


// Sends HTTP POST to Person Controller on API with Anonymous Object:
static JObject AddPerson(string newLastName, string newFirstName)
{
    // Initialize an anonymous object representing a new Person record:
    var newPerson = new { LastName = newLastName, FirstName = newFirstName };

    HttpClient client = new HttpClient();
    client.BaseAddress = new Uri("http://localhost:57772/");
    var response = client.PostAsJsonAsync("api/person", newPerson).Result;
    return response.Content.ReadAsAsync<JObject>().Result;
}


// Sends HTTP PUT to Person Controller on API with Anonymous Object:
static bool UpdatePerson(int personId, string newLastName, string newFirstName)
{
    // Initialize an anonymous object representing a the modified Person record:
    var newPerson = new { id = personId, LastName = newLastName, FirstName = newFirstName };
    HttpClient client = new HttpClient();
    client.BaseAddress = new Uri("http://localhost:57772/");
    var response = client.PutAsJsonAsync("api/person/", newPerson).Result;
    return response.Content.ReadAsAsync<bool>().Result;
}


// Sends HTTP DELETE to Person Controller on API with Id Parameter:
static void DeletePerson(int id)
{
    HttpClient client = new HttpClient();
    client.BaseAddress = new Uri("http://localhost:57772/");
    var relativeUri = "api/person/" + id.ToString();
    var response = client.DeleteAsync(relativeUri).Result;
    client.Dispose();
}
Last, an ugly, procedural chunk of code that walks through each of the methods above and writes the results to the console window:
Ugly, Monolothic Console Output Code:
public static void PrintJsonExamples()
{
    // WRITE ALL PEOPLE TO CONSOLE (JSON):
    Console.WriteLine("Retreive All The People:");
    JArray people = getAllPeople();
    foreach (var person in people)
    {
        Console.WriteLine(person);
    }


    // WRITE A SPECIFIC PERSON TO CONSOLE (JSON):
    Console.WriteLine(Environment.NewLine + "Retreive a Person by ID:");
    JObject singlePerson = getPerson(2);
    Console.WriteLine(singlePerson);

    // ADD NEW PERSON, THEN WRITE TO CONSOLE (JSON):
    Console.WriteLine(Environment.NewLine + "Add a new Person and return the new object:");
    JObject newPerson = AddPerson("Atten", "John");
    Console.WriteLine(newPerson);

    // UPDATE AN EXISTING PERSON, THEN WRITE TO CONSOLE (JSON):
    Console.WriteLine(Environment.NewLine + "Update an existing Person and return a boolean:");

    // Pretend we already had a person's data:
    JObject personToUpdate = getPerson(2);
    string newLastName = "Richards";

    Console.WriteLine("Update Last Name of " + personToUpdate + "to " + newLastName);

    // Pretend we don't already know the Id:
    int id = personToUpdate.Value<int>("Id");
    string FirstName = personToUpdate.Value<string>("FirstName");
    string LastName = personToUpdate.Value<string>("LastName");

    if (UpdatePerson(id, newLastName, FirstName))
    {
        Console.WriteLine(Environment.NewLine + "Updated person:");
        Console.WriteLine(getPerson(id));
    }

    // DELETE AN EXISTING PERSON BY ID:
    Console.WriteLine(Environment.NewLine + "Delete person object:");
    JsonExamples.DeletePerson(5);

    // WRITE THE UPDATED LIST TO THE CONSOLE:
    {
        // WRITE ALL PEOPLE TO CONSOLE
        Console.WriteLine("Retreive All The People using classes:");
        people = JsonExamples.getAllPeople();
        foreach (var person in people)
        {
            Console.WriteLine(person);
        }
    }

    Console.Read();
}
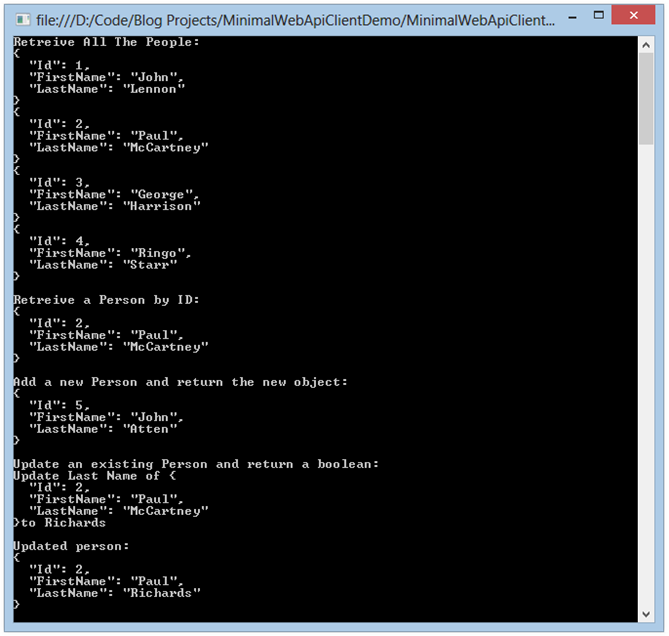
If we run the application by calling the PrintJsonExamples method, we see the JSON results in our console:
Console Output – Json Data:
Building the Class-Based Example Code
Depending on the needs of your project, you may decide adding a Person class to your API client makes sense. WebApi understands how to serialize and de-serialize .NET classes to and from JSON or XML, which are the two most common data exchange formats in use.
We can re-write our client examples to utilize a Person class if it suits our needs, and pass instances of Person to and from our API project indirectly through serialization. Our core client methods, re-written, look like this:
IMPORTANT: See the note above about the blocking calls used in this example!
The Calls to the API GET, POST, PUT, and DELETE Controllers Using an added Person Class:
// DEFINE A PERSON CLASS IDENTICAL TO THE ONE IN THE API:
public class Person
{
    public int Id { get; set; }
    public string LastName { get; set; }
    public string FirstName { get; set; }
}


static IEnumerable<Person> getAllPeople()
{
    HttpClient client = new HttpClient();
    HttpResponseMessage response =
        client.GetAsync("http://localhost:57772/api/person/").Result;
    client.Dispose();

    return response.Content.ReadAsAsync<IEnumerable<Person>>().Result;
}


static Person getPerson(int id)
{
    HttpClient client = new HttpClient();
    HttpResponseMessage response =
        client.GetAsync("http://localhost:57772/api/person/" + id).Result;
    client.Dispose();
    return response.Content.ReadAsAsync<Person>().Result;
}


static Person AddPerson(Person newPerson)
{
    HttpClient client = new HttpClient();
    client.BaseAddress = new Uri("http://localhost:57772/");
    var response = client.PostAsJsonAsync("api/person", newPerson).Result;
    client.Dispose();
    return response.Content.ReadAsAsync<Person>().Result;
}


static bool UpdatePerson(Person newPerson)
{
    HttpClient client = new HttpClient();
    client.BaseAddress = new Uri("http://localhost:57772/");
    var response = client.PutAsJsonAsync("api/person/", newPerson).Result;
    client.Dispose();
    return response.Content.ReadAsAsync<bool>().Result;
}


static void DeletePerson(int id)
{
    HttpClient client = new HttpClient();
    client.BaseAddress = new Uri("http://localhost:57772/");
    var relativeUri = "api/person/" + id.ToString();
    var response = client.DeleteAsync(relativeUri).Result;
    client.Dispose();
}
Next, some minor variations on the ugly console-output code:
Ugly, Monolithic Code, Modified:
public static void PrintClassExamples()
{
    string personOutputString = "id: {0};  LastName: {1}, FirstName: {2}";

    // WRITE ALL PEOPLE TO CONSOLE
    Console.WriteLine("Retreive All The People using classes:");
    IEnumerable<Person> people = ClassBasedExamples.getAllPeople();
    foreach (var person in people)
    {
        Console.WriteLine(personOutputString, person.Id, person.LastName, person.FirstName);
    }

    // WRITE A SPECIFIC PERSON TO CONSOLE:
    Console.WriteLine(Environment.NewLine
        + "Retreive a Person object by ID:");

    Person singlePerson = ClassBasedExamples.getPerson(2);
    Console.WriteLine(personOutputString, singlePerson.Id,
        singlePerson.LastName, singlePerson.FirstName);

    // ADD NEW PERSON, THEN WRITE TO CONSOLE:
    Console.WriteLine(Environment.NewLine
        + "Add a new Person object and return the new object:");

    Person newPerson = new Person { LastName = "Atten", FirstName = "John" };
    newPerson = AddPerson(newPerson);
    Console.WriteLine(personOutputString, newPerson.Id,
        newPerson.LastName, newPerson.FirstName);

    // UPDATE AN EXISTING PERSON, THEN WRITE TO CONSOLE:
    Console.WriteLine(Environment.NewLine
        + "Update an existing Person object:");

    // Pretend we already had a person's data:
    Person personToUpdate = getPerson(2);
    string newLastName = "Richards";

    Console.WriteLine("Updating Last Name of "
        + personToUpdate.LastName + " to " + newLastName);
    personToUpdate.LastName = newLastName;

    if (ClassBasedExamples.UpdatePerson(personToUpdate))
    {
        Console.WriteLine(Environment.NewLine + "Updated person object:");
        Person updatedPerson = getPerson(2);
        Console.WriteLine(personOutputString, updatedPerson.Id,
            updatedPerson.LastName, updatedPerson.FirstName);
    }


    // DELETE AN EXISTING PERSON BY ID:
    Console.WriteLine(Environment.NewLine + "Delete person object:");

    ClassBasedExamples.DeletePerson(5);

    // WRITE THE UPDATED LIST TO THE CONSOLE:
    {
        Console.WriteLine("Retreive All The People using classes:");
        people = ClassBasedExamples.getAllPeople();
        foreach (var person in people)
        {
            Console.WriteLine(personOutputString, person.Id,
                person.LastName, person.FirstName);
        }
    }

    Console.Read();
}
NOTE: The data in the API project is not persisted. However, until the IIS Server re-starts, the data is maintained between project debugging sessions. Re-start IIS Express by right-clicking the IIS Express icon in the system tray. Then stop and restart the API project.
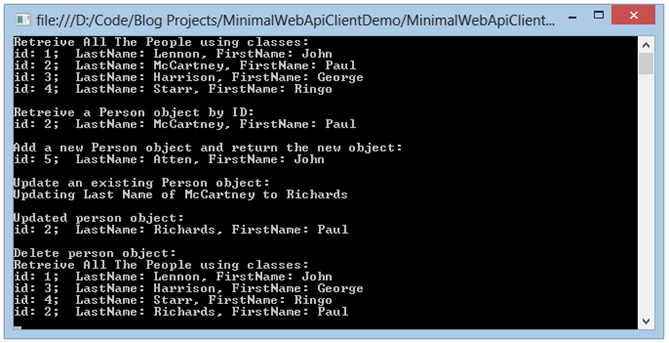
Again, if we run our code, we will see the console output, this time reflecting the manner in which we decided to format our class data:
Console Output – Class-Based Data:
Wrapping Up
We’ve taken a look at building out a very basic API using the minimal components. We’ve also looked quickly at creating a basic client to consume such an API, independently of the API project itself. Next we will examine implementing proper asynchronous methods in an API client, and examine more advanced controllers and querying.
Additional Resources
- Creating a Clean, Minimal-Footprint ASP.NET WebAPI Project with VS 2012 and ASP.NET MVC 4
- Routing Basics in ASP.NET MVC
- Routing Basics in ASP.NET Web API
- Reverse-Engineering an Existing Database in your ASP.NET MVC Application Using Entity Framework Model/Database-First
- ASP.NET MVC–Azure Websites and EF Model First Connection Strings when Deploying from Github


Comments
 Morgan
AuthorHey,
Nice article – I'm learning REST myself and found this refcard very handy
http://refcardz.dzone.com/refcardz/rest-foundations-restful
 jatten
AuthorAwesome list! Many thanks. And no, no offense taken. Your comment was on point and factual – the internet is chock full these days of people looking to take offense.
I appreciate those who take the time to share insight in a direct and helpful way!
Cheers!
 Marbach Daniel
AuthorHy,
Sorry my comment was a bit short and maybe rude. I don't wanted to get in the holy RESTful discussion and only give a hint. Luckily you didn't take offense. Here is my unsorted reading list:
http://shishkin.org/blog/hypermedia-dna/
http://amundsen.com/hypermedia/hfactor/
http://www.lexicalscope.com/blog/2012/03/12/how-are-rest-apis-versioned/
http://developer.github.com/v3/mime/
http://stateless.co/hal_specification.html
https://github.com/ploeh/Hyprlinkr
http://devlicio.us/blogs/rob_eisenberg/archive/2012/03/05/alt-tekpub-rest.aspx
https://github.com/JakeGinnivan/WebApi.Hal
http://www.designinghypermediaapis.com
Hypermedia APIs – Jon Moore
http://vimeo.com/20781278
http://amundsen.com/blog/archives/1136
http://martinfowler.com/articles/richardsonMaturityModel.html
http://roy.gbiv.com/untangled/2008/rest-apis-must-be-hypertext-driven#comment-718
http://www.subbu.org/blog/2012/04/protocols-vs-styles
http://www.infoq.com/news/2011/06/RestAPIs
http://jcalcote.wordpress.com/2008/10/16/put-or-post-the-rest-of-the-story/
http://stackoverflow.com/questions/630453/put-vs-post-in-rest
and of course the following book:
http://www.amazon.com/REST-Practice-Hypermedia-Systems-Architecture/dp/0596805829/ref=sr_1_1?ie=UTF8&qid=1373617762&sr=8-1&keywords=rest+in+practice
Daniel
 jatten
AuthorDaniel – I get what you're saying. I guess the idea was more about showing how to build out the "clean/minimal" WebApi project in a manner which could become a RESTful API.
As you may have guessed,I am essentially blogging my own learning process here, so the very next thing I am going to do this morning after I post this comment is dig into some research on the hypermedia concern and the "majurity model."
My understanding is that the actual meaning of the term "RESTful" is a point of some contention nowadays. Also, I assume there are some key requirements without which the term "RESTful" simply does not apply. Sounds like I missed one or more of those.
If you have any good links which would assist a "REST newcomer" in better understanding the model, please do post in a comment. There is a lot of crap out there, and a link from someone who knows would be a great way to avoid going down the wrong path!
Thanks for reading, and especially for taking the time to comment!
 Daniel Marbach
AuthorHaving CRUD operations on your controller unfortunately isn't enough for API to earn the name RESTful. Your sample is missing the hypermedia concern (level 3 on majurity model)
 Christopher Sommers
AuthorNice article, Excellent job.