Image by Christopher Rose | Some Rights Reserved
How often do you find yourself tossing together a console application for the purpose of trying out code, “testing” in the sense of seeing what works best, or, possibly, as a means to demo some library of function?
I do, a lot. And I usually end up with some horrid mess which, while never intended for public use, still becomes a pain to deal with.
In preparing material for another post, I found myself once again working with the Console, hacking together some demonstration code to illustrate working with the Identity in the context of WebApi. The premise was to create a console application to demonstrate remote identity management via WebApi, and once again I found myself throwing together a minimal, ugly series of Console.WriteLine(sometext) statements, and in general writing code that was “illustration-only.” And, Ugly as sin.
I wanted to put something together which functioned a little more like a shell terminal a la the Linux Bash. You know, enter a command, tell the computer to do something, the on to the next. Interactive.
- Source Code on GitHub
- Console Basics – The Interactive Input and Output Loop
- Basic Application Architecture
- Parsing Console Input into Commands and Arguments
- Parse the Command from the Input Text
- Parse the Arguments from the Input Text
- Using Reflection to Load and Validate Commands and Arguments
- Loading Commands at Application Startup
- Executing Console Commands Using Reflection
- Coercing Console Arguments to the Proper Type
- Adding Additional Classes and Commands to the Commands Namespace
- Think of it as MVC for the Console
How do I make the C# Console behave like a Shell, at least within the context of my application?
Lest you have any illusions, no, I am not trying to write a shell. But when working with my little demo and testing applications, I thought it would be nice if the console environment behaved in some (at least, reasonably) familiar, interactive ways, and without having to write a bunch of boilerplate code every time.
What I came up with is pretty functional for half an afternoon’s work. It’s basic, and easily extensible. Most importantly, it makes if easy to plug in some code and go, be it for testing purposes, and to demo a library. Or, possibly, you just might find you need a console-based application, and this may solve your problem.
Source Code on GitHub
We’re going to build out the structure of this application framework here in the post. However, you can also clone the completed source from Github:
Building Blocks
The goal here was not to emulate a fully-functioning Shell or terminal. I wanted to be able to:
- Run the program, be greeted with a prompt (customizable, in this case), and then enter commands corresponding to various methods defined in a specific area of the application.
- Receive feedback (where appropriate), error messages, and such
- Easily add/remove commands
- Generally be able to quickly put together a functioning console application, with predictable and familiar interactive behavior, without re-inventing the wheel every time.
We are going to set up the basic input/output functionality first. It will be easier to understand the basic structure of the program if we start with some very basic program flow, then move on to command parsing, and finally command execution.
Console Basics – The Interactive Input and Output Loop
Before the console can do anything else, it needs to be able to take input from the user, and provide feedback where needed. We are all familiar with Console.Write() or Console.WriteLine(), and also Console.Read() and Console.ReadLine(). However, these methods in and of themselves are utilitarian at best, and don’t quite get us to the interactive Input/output loop we are looking for.
Also, the .NET Console does not directly afford us the ability to add a custom prompt.
We’ll start with a very basic, but functional skeleton which will set up the basic input/output loop, and provide us with a means of adding a text prompt for input:
The Basic Interactive Console Skeleton Code:
class Program
{
    static void Main(string[] args)
    {
        Console.Title = typeof(Program).Name;

        // We will add some set-up stuff here later...
        Run();
    }
    static void Run()
    {
        while (true)
        {
            var consoleInput = ReadFromConsole();
            if (string.IsNullOrWhiteSpace(consoleInput)) continue;

            try
            {
                // Execute the command:
                string result = Execute(consoleInput);

                // Write out the result:
                WriteToConsole(result);
            }
            catch (Exception ex)
            {
                // OOPS! Something went wrong - Write out the problem:
                WriteToConsole(ex.Message);
            }
        }
    }


    static string Execute(string command)
    {
        // We'll make this more interesting shortly:
        return string.Format("Executed the {0} Command", command);
    }


    public static void WriteToConsole(string message = "")
    {
        if(message.Length > 0)
        {
            Console.WriteLine(message);
        }
    }


    const string _readPrompt = "console> ";
    public static string ReadFromConsole(string promptMessage = "")
    {
        // Show a prompt, and get input:
        Console.Write(_readPrompt + promptMessage);
        return Console.ReadLine();
    }
}
We can see in the above that execution is quickly passed from the entry point Main() method to the Run() method. In just a little bit, we’ll be adding some configuration and set-up code to main, which needs to run once, upon application startup.
Once execution is in our Run() method, we begin to see how our basic interactive IO loop works. Before we look at Run() , however, let’s look at the other two methods we see, at the bottom of the class. WriteToConsole() and ReadFromConsole() look suspiciously like Console.WriteLine() and Console.ReadLine() and in fact, we wrap those two methods within each of our own.
The primary purpose of the ReadFromConsole() method is to show a prompt, and collect user input. Note the use of Console.Write() as opposed to Console.WriteLine() here. This way, our custom prompt is displayed on the same line that input will occur. For some unknown reason, the .NET Console does not provide a means of adding or customizing the standard prompt, so this is how we have to do things.
9/8/2014 NOTE: Thanks to a few intrepid commenters from r/csharp on Reddit, I have been saved from my own stupidity here. I had originally set up the Run() method discussed below with a recursive call to itself to create the interactive “loop” we are seeking. This would have created, over time, a big fat balloon of a memory leak. I have now repaired the damage before the universe collapsed in on itself, and updated the code in this post.
See I am a Programmer, and I can Complicate the #@$% out of a Ball Bearing for an examination of this idiocy…
Instead, we are going to use the (should have been obvious!) while loop.
Now, back to that Run() method. It is easy to see how things work here. Once control is passed to the Run() method, ReadFromConsole() is called, and the program awaits input from the user. Once text has been entered, control returns to Run().
Now, back to the Run() method. The Run() method features what is essentially an infinite while loop. Control is passed to ReadFromConsole() to get input from the user. When control returns (when the user hits Enter), the input is examined. If the string returned is null or empty, the loop resumes from the top again.
The next call from within Run() is to the Execute() method, which doesn’t actually DO anything just yet, but we’ll flesh that out in a minute. For the moment, execute returns the result of whatever command was called back to Run(). If something goes wrong, any exception thrown during Execute() will be caught in the catch block, and (hopefully!) a meaningful message will be displayed, informing the user about the nature of the problem.
Finally, Run() calls itself, recursively, thus completing our interactive loop, and the process starts anew.
When control once again returns to Run() from WriteToConsole(), the loop resumes.
Run the Bare-Bones IO Loop
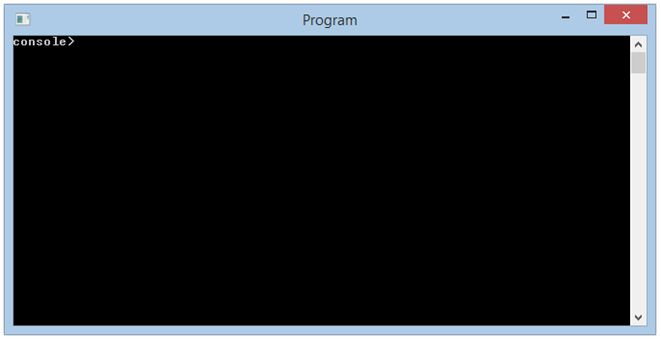
If we run our little application at this point, we see that it doesn’t do much besides take input, repeat what we told it to do back to us, and return to the input prompt. But for now, that’s the point – getting the interactive IO loop in place.
Console Application with Minimal IO loop at Start-up:
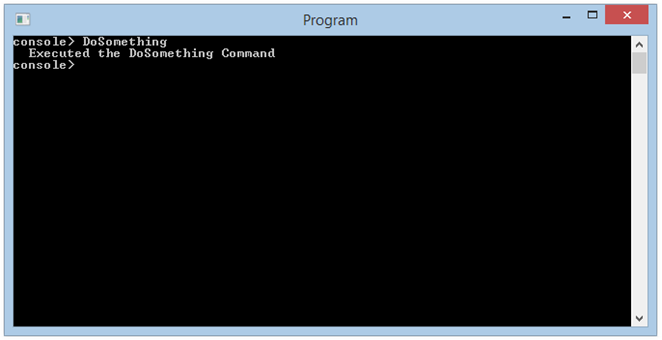
If we go ahead and type a “command” in and hit enter:
Console Application with Minimal IO Loop After Entering a Command:
As we can see – not terribly interesting yet, with the exception that we can now interact with our console in a familiar way. We’ll fix that soon.
Basic Application Architecture
With the basic IO loop in place, we now need to take a look at how to set things up architecturally. Recall one of the primary goals of the project is to make it easy to plug in commands or sets of commands.
We will achieve this by creating a special project folder and namespace, Commands. We will enforce some (arbitrary, but good for consistency) rules for how commands will be provided to the project.
- Methods representing Console commands will be defined as
public staticmethods which always return astring, and are defined onpublic staticclasses. - Classes containing methods representing Console commands will be located in the
Commandsnamespace, and in the Commands folder. - There will always be a static class named
DefaultCommandsfrom which methods may be invoked from the Console directly by name. For many console project, this will likely be sufficient. - Commands defined on classes other than
DefaultCommandswill be invoked from the console using the familiar dot syntax:ClassName.CommandName.
We will execute commands from the terminal and call our Command methods using Reflection. Yeah, I know – we’re supposed to be hyper-sensitive about possible performance penalties when using reflection. In our case, this is negligible. Most of the so-called heavy lifting will be done at application startup. Also, it’s 2014. Computers are fast.
We’ll look more closely at the Reflection aspect in a bit. For now, understand how this plays into how we parse text entered by the user into Commands and Arguments.
Parsing Console Input into Commands and Arguments
Now that we can interact with our console in a meaningful way, let’s look at parsing the text input from the console into some sort of meaningful structure of commands and arguments.
Here, we need to make some decisions. For the purpose of this very basic application template, I made some assumptions:
- The text entered will always consist of a command followed by zero or more arguments, separated by spaces.
- Quoted text will be preserved as a single string argument, and may contain spaces.
- Text arguments without spaces will be treated as strings, quotes are optional.
To manage to collection of commands and arguments, we’re going to build a ConsoleCommand class:
The ConsoleCommand Class:
public class ConsoleCommand
{
    public ConsoleCommand(string input)
    {
        // Ugly regex to split string on spaces, but preserve quoted text intact:
        var stringArray =
            Regex.Split(input,
                "(?<=^[^\"]*(?:\"[^\"]*\"[^\"]*)*) (?=(?:[^\"]*\"[^\"]*\")*[^\"]*$)");

        _arguments = new List<string>();
        for (int i = 0; i < stringArray.Length; i++)
        {
            // The first element is always the command:
            if (i == 0)
            {
                this.Name = stringArray[i];

                // Set the default:
                this.LibraryClassName = "DefaultCommands";
                string[] s = stringArray[0].Split('.');
                if (s.Length == 2)
                {
                    this.LibraryClassName = s[0];
                    this.Name = s[1];
                }
            }
            else
            {
                var inputArgument = stringArray[i];
                string argument = inputArgument;

                // Is the argument a quoted text string?
                var regex = new Regex("\"(.*?)\"", RegexOptions.Singleline);
                var match = regex.Match(inputArgument);

                if (match.Captures.Count > 0)
                {
                    // Get the unquoted text:
                    var captureQuotedText = new Regex("[^\"]*[^\"]");
                    var quoted = captureQuotedText.Match(match.Captures[0].Value);
                    argument = quoted.Captures[0].Value;
                }
                _arguments.Add(argument);
            }
        }
    }

    public string Name { get; set; }
    public string LibraryClassName { get; set; }

    private List<string> _arguments;
    public IEnumerable<string> Arguments
    {
        get
        {
            return _arguments;
        }
    }
}
To achieve proper parsing of all this, we will need to engage everyone’s favorite, Regular Expressions. That big, long, ugly Regular Expression near the top of the ConsoleCommand class is used to parse incoming text by splitting the text string where spaces occur, but to leave quoted text string intact.
I am not a Regex genius, and I found this Regular Expression on stack overflow, in an answer by someone who clearly IS a Regex Genius.
That is a big constructor method, and could possibly be refactored into a few smaller methods. But maybe not. In any case, let’s take a look at what happens here:
Parse the Command from the Input Text
- The string passed as the constructor argument is first split into a string array, delimited by spaces, with the exception that quoted text is preserved intact (the quotes are also preserves as part of the string, but we’ll take care of that momentarily).
- We then iterate over the array elements. One of the assumptions we have made about our program is that the first element will always be a command, so we grab element 0 on our first pass and assume it is the command.
Recall from earlier that we have some rules about command names:
- We will always have a set of default commands available to our Console directly using the corresponding method name as defined on the class
DefaultCommands. - We MAY have commands defined on other special classes within the Commands namespace, but from the console, we need to access any of these with the
ClassName.CommandNamedot notation.
At this point in our constructor is where we implement this rule. Our constructor code assumes that, time, a Console application will likely be using the default commands class, and assigns the LibraryClassName property as “DefaultCommands” accordingly. Then, the code checks to see if the command can be split on a period. If so, the new string array resulting from the check will have two elements, so the LibraryClassName property is set to match the first array element in the array (element[0]). The second array element is then assumed to be the actual command name, and is assigned to the Command property accordingly.
Parse the Arguments from the Input Text
Once the command has been properly parsed, and the LibraryClassName and Command properties have been set, we complete the iteration by parsing the arguments:
- Each array element that is not element[0] is examined (once again using Regex, but not as bad this time) to see if it is a quoted string.
- If the element is a quoted string, the text between the quotes is extracted, and added in its entirety to the
Argumentslist. - Otherwise, the string element is simply added to the
Argumentslist as-is.
Update the Run() Method to Use ConsoleCommand Class
Now that we have an object to represent a command issued by the user from the console, let’s update our Run() and Execute() methods to use that. In Run() we will create an instance of our ConsoleCommand class, and then pass that to Execute():
Update Run Method to Consume ConsoleCommand Class:
static void Run()
{
    while (true)
    {
        var consoleInput = ReadFromConsole();
        if (string.IsNullOrWhiteSpace(consoleInput)) continue;
        try
        {
            // Create a ConsoleCommand instance:
            var cmd = new ConsoleCommand(consoleInput);
            // Execute the command:
            string result = Execute(cmd);
            // Write out the result:
            WriteToConsole(result);
        }
        catch (Exception ex)
        {
            // OOPS! Something went wrong - Write out the problem:
            WriteToConsole(ex.Message);
        }
    }
}
And we will modify the signature of the Execute() method to accept an argument of type ConsoleCommand (and make a silly modification to the body code for simple demo purposes at this point):
Update Execute Method to Consume ConsoleCommand Class:
static string Execute(ConsoleCommand command)
{
    // We'll make this more interesting shortly.

    // For now, output the command details:
    var sb = new StringBuilder();
    sb.AppendLine(string.Format("Executed the {0}.{1} Command",
        command.LibraryClassName, command.Name));
    for(int i = 0; i < command.Arguments.Count(); i++)
    {
        sb.AppendLine(ConsoleFormatting.Indent(4) +
            string.Format("Argument{0} value: {1}", i, command.Arguments.ElementAt(i)));
    }
    return sb.ToString();
}
Run the Application with Command Parsing in Place
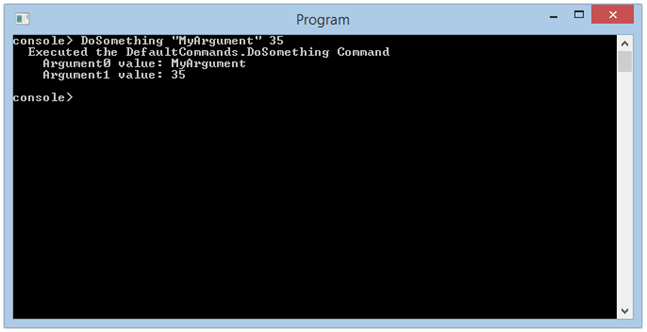
If we run the application now, we can see, from the values written to the console, how our input is being parsed. We can input some reasonable approximation of a command with arguments, and view the result:
Command and Arguments are Parsed and Displayed:
Now that we can effectively parse commands and arguments, how are we going to define commands available to our program, validate the arguments, and execute? Why, Reflection, of course.
Using Reflection to Load and Validate Commands and Arguments
We have set up our application structure specifically so we can easily use Reflection to load information about the commands we wish to make available to our application, and also to execute commands from the Console. This way, when we wish to add or change the commands available, all we need do is add the relevant code within the Commands folder/namespace, and our application will properly load everything it needs.
Let’s recall the rules we established for defining commands within our application:
- Methods representing Console commands will be defined as
public staticmethods which always return astring, and are defined onpublic staticclasses. - Classes containing methods representing Console commands will be located in the
Commandsnamespace, and in the Commands folder. - There will always be a static class named
DefaultCommandsfrom which methods may be invoked from the Console directly by name. For many console project, this will likely be sufficient. - Commands defined on classes other than
DefaultCommandswill be invoked from the console using the familiar dot syntax:ClassName.CommandName.
If we haven’t already, add a folder to the project named Commands. Within this folder we will define at least one static class and name it DefaultCommands. It is within this class that we will define the core set of commands available to our application. Commands within this class will be invokeable from the Console using only the method name, no need to prefix with the class name using dot notation.
As an aside, some thought should be put into naming the methods we define as our commands. Short, easily remembered (and easily typed) method names will go a long way towards the usability factor of any Console application.
For now, we will set up a couple trivial commands as default commands to use while we work out the details:
Add the DefautCommands Class in the Commands Folder:
// All console commands must be in the sub-namespace Commands:
namespace ConsoleApplicationBase.Commands
{
    // Must be a public static class:
    public static class DefaultCommands
    {
        // Methods used as console commands must be public and must return a string

        public static string DoSomething(int id, string data)
        {
            return string.Format(
                "I did something to the record Id {0} and save the data {1}", id, data);
        }


        public static string DoSomethingElse(DateTime date)
        {
            return string.Format("I did something else on {0}", date);
        }
    }
}
While it may not seem intuitive at first, any command available to our console returns a string because, well, that’s what the console can use. It may be an empty string, but a string nonetheless. This gives us a consistent return type to work with, easily consumed by our console.
The assumption here is that most of the real work to be done by any command will likely be sourced off into other classes or libraries. Once the command has completed its work, what our Console application is interested in is either a result it can display, or an empty string.
I my case, most of the time when a command succeeds, we either have asked for output to be displayed, or instructed the application to perform some function which succeeds or fails, but does not produce output. In the former case, we expect to see the results of our request. In the latter, we are going to assume that no feedback indicates successful execution, and return an empty string. If something goes wrong in the latter case, feedback will inform us of the details.
Loading Commands at Application Startup
First, we need to add a reference to System.Reflection in the using statements of our Program class:
Add System.Reflection to Using Statements:
using System;
using System.Collections.Generic;
using System.Linq;
using System.Text;
using System.Threading.Tasks;
using System.Reflection;
Next, we need to add a couple variables for use by the code we will be adding next. First, we want a constant defining the full Command namespace, and next we want a static dictionary to hold key-value pairs representing the classes defined in our Commands namespace. Each dictionary entry will use the class name as a key, and the value will be a nested dictionary containing information about the methods defined within that class.
Add Class-Level Variables to Program Class:
class Program
{
    const string _commandNamespace = "ConsoleApplicationBase.Commands";
    static Dictionary<string, Dictionary<string, IEnumerable<ParameterInfo>>> _commandLibraries;

    // ... The rest of the Program class code ...
}
Next, let’s update our Main() method as follows:
Updated Main() method Loading Command Information Using Reflection:
static void Main(string[] args)
{
    Console.Title = typeof(Program).Name;

    // Any static classes containing commands for use from the
    // console are located in the Commands namespace. Load
    // references to each type in that namespace via reflection:
    _commandLibraries = new Dictionary<string, Dictionary<string,
            IEnumerable<ParameterInfo>>>();

    // Use reflection to load all of the classes in the Commands namespace:
    var q = from t in Assembly.GetExecutingAssembly().GetTypes()
            where t.IsClass && t.Namespace == _commandNamespace
            select t;
    var commandClasses = q.ToList();

    foreach (var commandClass in commandClasses)
    {
        // Load the method info from each class into a dictionary:
        var methods = commandClass.GetMethods(BindingFlags.Static | BindingFlags.Public);
        var methodDictionary = new Dictionary<string, IEnumerable<ParameterInfo>>();
        foreach (var method in methods)
        {
            string commandName = method.Name;
            methodDictionary.Add(commandName, method.GetParameters());
        }
        // Add the dictionary of methods for the current class into a dictionary of command classes:
        _commandLibraries.Add(commandClass.Name, methodDictionary);
    }
    Run();
}
We load the information we need into the _commandLibrariesDictionary as follows:
- We load all the Types contained in the
_commandNamespaceinto aIEnumerable<Type>using Linq - Iterate over each
Typein the list, use theGetMethods()method to retreive anIEnumerable<MethodInfo>for the methods in the class which meet the criteria specified in the call toGetMethods()(in this case, methods which are both public and static). - We create a
Dictionary<string, IEnumerable<ParameterInfo>>for each method on a given class, and add a key-value pair for the method. Thekey, in this case, is the method name, and the corresponding value for each key is theIEnumerable<ParameterInfo>for the method. - Add each of these dictionaries, in nested fashion, into the
_commandLibrariesDictionaryand use the class name as the key.
With this in place, we can now update our Execute() method, and begin to get it doing something useful.
Executing Console Commands Using Reflection
Once again, we need to do a lot within this method, and there is likely potential for refactoring here. Within the Execute() method, we need to accomplish, broadly, three things:
- Validate that the command passed in corresponds to a class and method defined in our Commands namespace
- Make sure that all required method arguments are provided with the command.
- Make sure that the arguments passed from the Console are all properly converted to the Type specified in the method signature (coming from the Console, all arguments are passed as strings).
- Set up to execute the command using Reflection
- Return the result of the execution, or catch exceptions and return a meaningful exception message.
Updated Execute() Method:
    // Validate the command name:
    if(!_commandLibraries.ContainsKey(command.LibraryClassName))
    {
        return badCommandMessage;
    }
    var methodDictionary = _commandLibraries[command.LibraryClassName];
    if (!methodDictionary.ContainsKey(command.Name))
    {
        return badCommandMessage;
    }

    // Make sure the corret number of required arguments are provided:
    // +++++++++++++++++++++++++++++++++++++++++++++++++++++++++++++++++++++++++++++++++

    var methodParameterValueList = new List<object>();
    IEnumerable<ParameterInfo> paramInfoList = methodDictionary[command.Name].ToList();

    // Validate proper # of required arguments provided. Some may be optional:
    var requiredParams = paramInfoList.Where(p => p.IsOptional == false);
    var optionalParams = paramInfoList.Where(p => p.IsOptional == true);
    int requiredCount = requiredParams.Count();
    int optionalCount = optionalParams.Count();
    int providedCount = command.Arguments.Count();

    if (requiredCount > providedCount)
    {
        if (requiredCount > providedCount)
        {
            return string.Format(
                "Missing required argument. {0} required, {1} optional, {2} provided",
                requiredCount, optionalCount, providedCount);
        }
    }

    // Make sure all arguments are coerced to the proper type, and that there is a
    // value for every emthod parameter. The InvokeMember method fails if the number
    // of arguments provided does not match the number of parameters in the
    // method signature, even if some are optional:
    // +++++++++++++++++++++++++++++++++++++++++++++++++++++++++++++++++++++++++++++++++

    if (paramInfoList.Count() > 0)
    {
        // Populate the list with default values:
        foreach (var param in paramInfoList)
        {
            // This will either add a null object reference if the param is required
            // by the method, or will set a default value for optional parameters. in
            // any case, there will be a value or null for each method argument
            // in the method signature:
            methodParameterValueList.Add(param.DefaultValue);
        }

        // Now walk through all the arguments passed from the console and assign
        // accordingly. Any optional arguments not provided have already been set to
        // the default specified by the method signature:
        for (int i = 0; i < command.Arguments.Count(); i++)
        {
            var methodParam = paramInfoList.ElementAt(i);
            var typeRequired = methodParam.ParameterType;
            object value = null;
            try
            {
                // Coming from the Console, all of our arguments are passed in as
                // strings. Coerce to the type to match the method paramter:
                value = CoerceArgument(typeRequired, command.Arguments.ElementAt(i));
                methodParameterValueList.RemoveAt(i);
                methodParameterValueList.Insert(i, value);
            }
            catch (ArgumentException ex)
            {
                string argumentName = methodParam.Name;
                string argumentTypeName = typeRequired.Name;
                string message =
                    string.Format(""
                    + "The value passed for argument '{0}' cannot be parsed to type '{1}'",
                    argumentName, argumentTypeName);
                throw new ArgumentException(message);
            }
        }
    }

    // Set up to invoke the method using reflection:
    // +++++++++++++++++++++++++++++++++++++++++++++++++++++++++++++++++++++++++++++++++

    Assembly current = typeof(Program).Assembly;

    // Need the full Namespace for this:
    Type commandLibaryClass =
        current.GetType(_commandNamespace + "." + command.LibraryClassName);

    object[] inputArgs = null;
    if (methodParameterValueList.Count > 0)
    {
        inputArgs = methodParameterValueList.ToArray();
    }
    var typeInfo = commandLibaryClass;

    // This will throw if the number of arguments provided does not match the number
    // required by the method signature, even if some are optional:
    try
    {
        var result = typeInfo.InvokeMember(
            command.Name,
            BindingFlags.InvokeMethod | BindingFlags.Static | BindingFlags.Public,
            null, null, inputArgs);
        return result.ToString();
    }
    catch (TargetInvocationException ex)
    {
        throw ex.InnerException;
    }
}
As we can see, we use the InvokeMember() method to execute our command. A good deal of the code above deals with setting up for this. There are a few things to be aware of here.
First off, we need to make sure the text passed as the the LibraryClassName and the Command Name properties are both valid, and correspond to appropriate objects within our Commands namespace. If not, we want to return the error information to the console immediately.
Next, we need to be aware of matching our arguments to method parameters. Some things to deal with here:
Our methods may have zero or more parameters defined within the method signature. Some may be required, and some may be “optional” (meaning they have been provided with default values within the method signature itself). In all cases, we want to fail immediately if the number of arguments provided doesn’t at least match the number of required method parameters. So we check for that using reflection.
The InvokeMember() method attempts to match the requested method by matching the method name, and also by matching the method signature to the number of arguments provided as part of the call. Because of this, even though some of the parameters specified within the target method signature may be optional, InvokeMember() still needs to have arguments for them. Therefore, we need to provide values for ALL the parameters in the method, optional or not.
To accomplish this, we iterate once over the complete list of method parameters contained in paramInfoList, and add a corresponding object to methodParametersValueList. In the case of optional method parameters, the default value from the method signature will be used. All other values will be added simply as empty objects.
Once we have a value in methodParametersValueList for every corresponding method parameter, we can walk through the arguments passed in from the Console, coerce them to the proper type required by the parameter, and swap them into the list at the proper index.
We do the type coercion using the CoerceArgument() method discussed momentarily.
Once the list of arguments needed to call the method are assembled, we use InvokeMethod() to call into our command and return the result of the call as a string.
Coercing Console Arguments to the Proper Type
Note the call to CoerceArgument() about midway through our revised Execute() method. We need to be able to parse the incoming string representation of our argument values to the proper type required by the corresponding method parameter.
There may be more elegant ways to write this method, but this is pretty straightforward boiler plate code. The switch statement examines the type passed in and attempts to parse the string value to that type. If the method succeeds, the value is returned as an object. If the method fails, an ArgumentException is thrown, and caught by the calling code.
Add the following method to the Program class:
The CoerceArgument() Method:
static object CoerceArgument(Type requiredType, string inputValue)
{
    var requiredTypeCode = Type.GetTypeCode(requiredType);
    string exceptionMessage =
        string.Format("Cannnot coerce the input argument {0} to required type {1}",
        inputValue, requiredType.Name);

    object result = null;
    switch (requiredTypeCode)
    {
        case TypeCode.String:
            result = inputValue;
            break;
        case TypeCode.Int16:
            short number16;
            if (Int16.TryParse(inputValue, out number16))
            {
                result = number16;
            }
            else
            {
                throw new ArgumentException(exceptionMessage);
            }
            break;
        case TypeCode.Int32:
            int number32;
            if (Int32.TryParse(inputValue, out number32))
            {
                result = number32;
            }
            else
            {
                throw new ArgumentException(exceptionMessage);
            }
            break;
        case TypeCode.Int64:
            long number64;
            if (Int64.TryParse(inputValue, out number64))
            {
                result = number64;
            }
            else
            {
                throw new ArgumentException(exceptionMessage);
            }
            break;
        case TypeCode.Boolean:
            bool trueFalse;
            if (bool.TryParse(inputValue, out trueFalse))
            {
                result = trueFalse;
            }
            else
            {
                throw new ArgumentException(exceptionMessage);
            }
            break;
        case TypeCode.Byte:
            byte byteValue;
            if (byte.TryParse(inputValue, out byteValue))
            {
                result = byteValue;
            }
            else
            {
                throw new ArgumentException(exceptionMessage);
            }
            break;
        case TypeCode.Char:
            char charValue;
            if (char.TryParse(inputValue, out charValue))
            {
                result = charValue;
            }
            else
            {
                throw new ArgumentException(exceptionMessage);
            }
            break;
        case TypeCode.DateTime:
            DateTime dateValue;
            if (DateTime.TryParse(inputValue, out dateValue))
            {
                result = dateValue;
            }
            else
            {
                throw new ArgumentException(exceptionMessage);
            }
            break;
        case TypeCode.Decimal:
            Decimal decimalValue;
            if (Decimal.TryParse(inputValue, out decimalValue))
            {
                result = decimalValue;
            }
            else
            {
                throw new ArgumentException(exceptionMessage);
            }
            break;
        case TypeCode.Double:
            Double doubleValue;
            if (Double.TryParse(inputValue, out doubleValue))
            {
                result = doubleValue;
            }
            else
            {
                throw new ArgumentException(exceptionMessage);
            }
            break;
        case TypeCode.Single:
            Single singleValue;
            if (Single.TryParse(inputValue, out singleValue))
            {
                result = singleValue;
            }
            else
            {
                throw new ArgumentException(exceptionMessage);
            }
            break;
        case TypeCode.UInt16:
            UInt16 uInt16Value;
            if (UInt16.TryParse(inputValue, out uInt16Value))
            {
                result = uInt16Value;
            }
            else
            {
                throw new ArgumentException(exceptionMessage);
            }
            break;
        case TypeCode.UInt32:
            UInt32 uInt32Value;
            if (UInt32.TryParse(inputValue, out uInt32Value))
            {
                result = uInt32Value;
            }
            else
            {
                throw new ArgumentException(exceptionMessage);
            }
            break;
        case TypeCode.UInt64:
            UInt64 uInt64Value;
            if (UInt64.TryParse(inputValue, out uInt64Value))
            {
                result = uInt64Value;
            }
            else
            {
                throw new ArgumentException(exceptionMessage);
            }
            break;
        default:
            throw new ArgumentException(exceptionMessage);
    }
    return result;
}
Now, before we take this for another test spin, let’s add one more silly demonstration method to our set of default commands. Add the following method, which includes and optional method parameter, to the DefaultCommands class:
Add a Method with Optional Parameters to Default Commands:
public static string DoSomethingOptional(int id, string data = "No Data Provided")
{
    var result = string.Format(
        "I did something to the record Id {0} and save the data {1}", id, data);

    if(data == "No Data Provided")
    {
        result = string.Format(
        "I did something to the record Id {0} but the optinal parameter "
        + "was not provided, so I saved the value '{1}'", id, data);
    }
    return result;
}
This will give us an opportunity to examine the behavior of our application when a method with an optional parameter is called.
Running the Console Application and Executing Commands
We now have what should be a working prototype of our Console Application Template. While the current example commands are simplistic, we can run this current version and make sure things are functioning as expected.
When we run the application, we have three commands to choose from. We enter the command name, followed by the arguments, separated by spaces. Recall that in cases where we wish to enter strings with spaces, we need to use quotes.
Our current method signatures look like this:
Reminder: Sample Method Signatures:
DoSomething(int id, string data)
DoSomethingElse(DateTime date)
DoSomethingOptional(int id, string data = "No Data Provided")
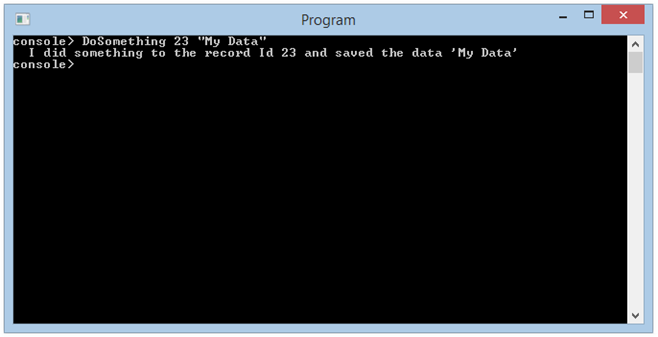
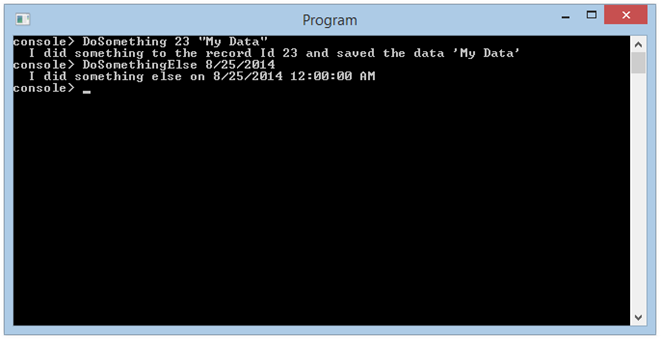
We’ll start with the DoSomething() method. The method signature requires an id argument of type int, and a data argument of type string. We might enter something like this at the console:
Example Console Input for the DoSomething Command:
console> DoSomething 23 "My Data"
If we enter that, we see what happens:
Execute the DoSomething() method:
We can do similarly for the DoSomethingElse() command, which expects a date argument:
Execute the DoSomethingElse() Command:
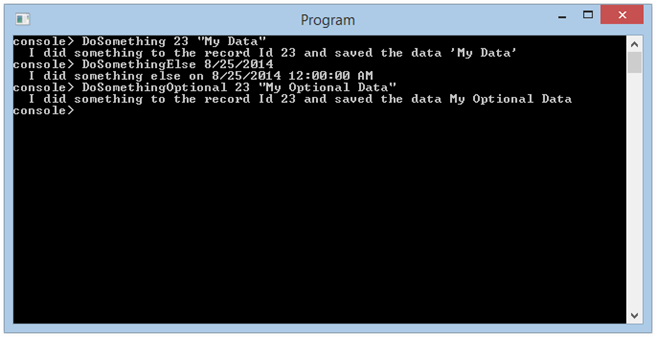
Likewise, the DoSomethingOptional() Command (we will provide the second, optional argument this pass):
Execute the DoSomethingOptional() Command:
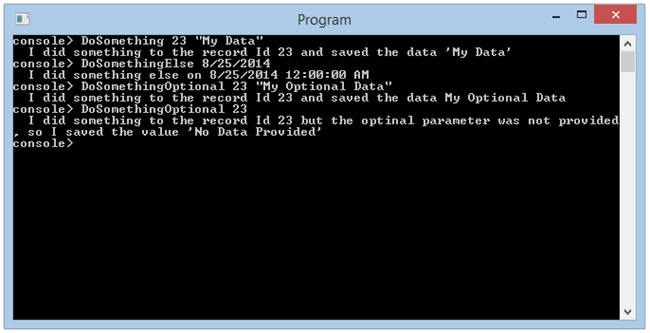
If we enter the DoSomethingOptional() Command again, but this time omit the optional second argument, the command still executes, using the default value provided in our original method signature:
Execute the DoSomethingOptional() Command Omitting Optional Argument:
In this last case, we can see that command execution uses the default value defined in the method signature for the optional parameter, and takes the alternate execution path indicated by the conditional we implemented in the method itself.
Adding Additional Classes and Commands to the Commands Namespace
Depending upon our application requirements, the DefaultCommands class may not be sufficient to our needs. For any number of reasons, we may want to break our commands out into discreet classes. As we have seen, we have set up our Console application to handle this, so long as we observe the rules we defined.
Let’s add a little bit business logic, and a new commands class to our application.
Add a Models Folder to your project, and add the following code in a file named SampleData.cs:
The SampleData Code File:
namespace ConsoleApplicationBase.Models
{
    // We'll use this for our examples:
    public class User
    {
        public int Id { get; set; }
        public string FirstName { get; set; }
        public string LastName { get; set; }
    }


    public static class SampleData
    {
        private static List<User> _userData;
        public static List<User> Users
        {
            get
            {
                // List will be initialized with data the first time the
                // static property is accessed:
                if(_userData == null)
                {
                    _userData = CreateInitialUsers();
                }
                return _userData;
            }
        }


        // Some test data:
        static List<User> CreateInitialUsers()
        {
            var initialUsers = new List<User>()
            {
                new User { Id = 1, FirstName = "John", LastName = "Lennon" },
                new User { Id = 2, FirstName = "Paul", LastName = "McCartney" },
                new User { Id = 3, FirstName = "George", LastName = "Harrison" },
                new User { Id = 4, FirstName = "Ringo", LastName = "Starr" },
            };
            return initialUsers;
        }
    }
}
Here, we are going to use the SampleData class as a mock database, and work against that with a couple new commands. We can now add a Users class to our Commands namespace and folder.
Add A Users Class to the Commands Namespace
Add a class named Users to the Commands folder in Solution Explorer. Make sure it is in the Commands namespace:
The Users Command class:
public static class Users
{
    public static string Create(string firstName, string lastName)
    {
        Nullable<int> maxId = (from u in SampleData.Users
                              select u.Id).Max();
        int newId = 0;
        if(maxId.HasValue)
        {
            newId = maxId.Value + 1;
        }

        var newUser = new User
        {
            Id = newId,
            FirstName = firstName,
            LastName = lastName
        };
        SampleData.Users.Add(newUser);
        return "";
    }


    public static string Get()
    {
        var sb = new StringBuilder();
        foreach(var user in SampleData.Users)
        {
            sb.AppendLine(ConsoleFormatting.Indent(2)
                + string.Format("Id:{0} {1} {2}",
                user.Id, user.FirstName, user.LastName));
        }
        return sb.ToString();
    }
}
Above, we have added two rather simplistic methods, Users.Create() and Users.Get(). We had to take some liberties faking up an auto-incrementing Id for the new users, but you get the idea.
With that, we can now try out our application with an added commands library. Recall that to call commands other than those defined in our DefaultCommands class, we need to user the dot syntax ClassName.CommandName.
Running the Project with Additional Command Classes
We can now invoke our User-related commands from the Console. The Console syntax for these two new commands would be similar to:
Console Syntax for the Users.Get() Method:
Users.Get
Console Syntax for the Users.Create() Method:
Users.Create Joe Strummer
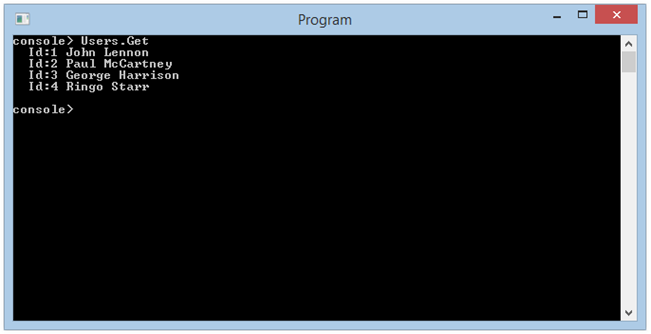
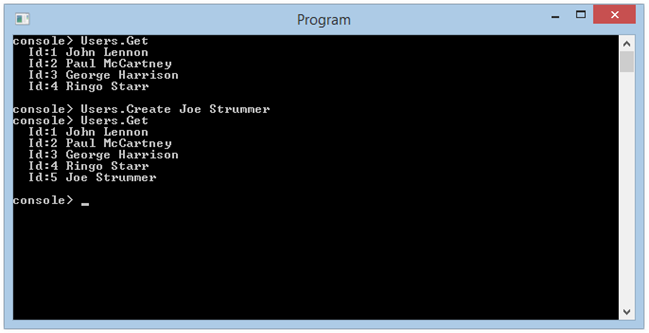
If we run the application and execute the Users.Get() command, we get the following result:
Execute Users.Get() Command from the Console:
Above, we see what we’d expect – the sample data we cooked up. If we then execute the Create() command, and then follow that up by executing Get() again, we see the added user data:
Execute Users.Create() Followed by Users.Get():
Exception Handling for Console Command Execution
I don’t claim to have handled every exception case we might run into here, but I believe I’ve provided a good start. The goal is to handle exceptions and errors and provide useful feedback to the user to know what went wrong, and how to correct things.
Note, however, that using InvokeMember adds a few minor wrinkles to the exception handling equation:
Invoke member catches any Exceptions thrown by the target method, and then throws a new TargetInvocationException. Our code needs to catch TargetInvocationException and retreive the inner exception to obtain meaningful information about what happened.
Therefore, carefully thinking through how exceptions are defined and processed by your command code, and any code called by your command code is in order. The goal is to pass meaningful exception messages up through the call stack such that, when TargetInvocationException is caught, there will be sufficient meaningful information present to display on the Console.
TargetInvocationException Always Breaks at the Exception Source
Unlike the standard experience in Visual Studio, where user-handled exceptions are, well, handled according to how the code is written, when using InvokeMember, Visual Studio always breaks at the exception source, regardless of any exception handling in the code. In other words, user-handled exceptions thrown within the context of a call via InvokeMember will always cause VS to drop into debug mode, unless you employ certain workarounds in your VS settings. More information about this in this StackOverflow Answer by Jon Skeet.
The upside of all that is, when the application .exe is run normally, exceptions sourced by calls to InvokeMember propagate normally up the call stack, and messages will be output correctly to the console.
Next Steps – Building Out a Real Console Application
Of course, the commands we have defined here are simplistic, used for demonstration and to make sure our application, in its nascent form, is working correctly in terms of parsing out commands and arguments, and then executing those commands.
As we plug in some actual business logic, there are some things we want to bear in mind.
The purpose of each command defined within the Commands namespace is primarily to receive instruction from the console, and essentially act as the go-between for the console and the business layer of an application. In other words, like controllers in an ASP.NET MVC application, most of the business logic (and work) performed by our application proper would likely not occur within the command itself.
The command receives input from the console in terms of arguments, and a directive to execute. The code within the command should then call out to whatever other methods or libraries it needs in order to do the work requested, receive the result, and then translate to the desired console output string (if any).
Think of it as MVC for the Console
Within certain limits, what we are trying to achieve here is essentially an MVC-like separation of concerns. The classes within the Commands namespace provide a function similar to that performed by Controllers in an MVC application. The Commands we define on those classes work in a similar manner to Controller actions.
in both cases, the function of the class is to be an intermediary between the presentation layer of the application (in our case, the “presentation layer” is the Console) and the Models that make up the business logic.
We can easily add additional Command classes and methods, and our application framework will properly “discover” them, provided we adhere to the rules we defined at the beginning (or, of course, we can change the rules to suit our needs).
It’s Not Done…
Most of the basic application structure is in place here, but really, there is a lot more that could be done, depending upon how extensive your needs are.
I certainly haven’t exhaustively tested things here (in fact, you’ll note, there are no tests at all!), and there are myriad areas ripe with potential for improvement.
The basic idea, for me, was to get some sort of basic structure in place so that, whether I am trying out ideas, demoing library code, or actually building a real console application, I can plug in the code I want to work with and go. Without messing with, or thinking much about writing to and from the console itself.
Ideas, Issues, and Pull Requests Welcome!
The project code for this is hosted on my Github account, and I welcome all suggestions, Issues, and Pull Requests.
Additional Resources and Items of Interest
- Project Source Code on GitHub
- On InvokeMember TargetInvocationException w/Jon Skeet (Stack Overflow)
- C#: Using Reflection and Custom Attributes to Map Object Properties
- ASP.NET MVC and Identity 2.0: Understanding the Basics
- ASP.NET Identity 2.0: Implementing Group-Based Permissions Management
- C#: Create and Manipulate Word Documents Programmatically Using DocX
Comments
 John
John
AuthorJust recently found this… Powershell can do this easily too. https://docs.microsoft.com/en-us/powershell/module/microsoft.powershell.utility/add-type?view=powershell-6
I still like your implementation though!
 Marcelo
AuthorHi John, I developed a service with a console based on your article.
Did you ever study the implementation of security and encryption (ssh)? I’m looking everywhere and I find .Net servers in projects that do not use the shell windows.
 ira
ira
AuthorThe post has been an eye opener, happy to have found it.