Image by frankieleon | Some Rights Reserved
The default WebApi project template that ships with Visual Studio 2012 has a lot to offer in some respects, but is less than ideal for either learning your way through the impressive WebApi framework, or building a lean, mean API project with a minimal footprint.
In this article, we will examine creating a simple and minimal WebApi project template in Visual Studio. In the next article, we will look at building out the template into a simple, but illustrative example WebApi project.
The default template in VS 2012 creates a project with no less than 40 references alone, which include a whole lot of stuff you may not want or need for your Simple API project. Also, the project created includes a morass of script files, images, Nuget Packages, and other supporting items for a fully-functional MVC site, but not needed for all API projects. In fact, there is a good chance your project needs only a fraction of the total.
- Getting and Installing the Empty WebApi Template
- Creating the Empty WebApi Project from the New Template
- Updating the Nuget Packages
- Adding WebApi Tracing (Optional)
- Add Routing and Filters
- Updating the Global.asax File
- Convention Over Configuration: Add Models and Controllers Folders
- Setting the Appropriate Start Action
- Clone the Source Code from this Post or Download a Zip File
The Default WebApi Project is Cool, for Certain Cases, But Overkill for Many
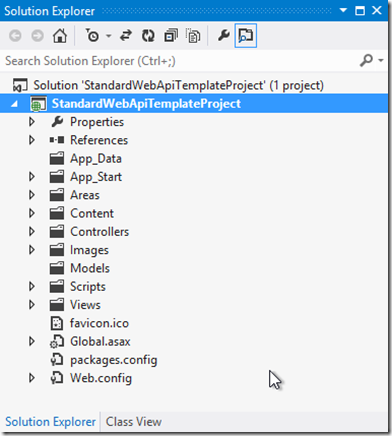
Lest you think I am dumping on the ASP.NET team, I am not. Far from it. The default WebApi project comes pre-fabbed with literally everything you need to jump-start a large and complex Web Service/API project, including self-updating, user-facing API Documentation (that’s the purpose of the full-formed MVC site that loads with the project). Just checking out the solution explorer tells a story about the size of project you are getting, when you consider that each of those folders is basically bulging with files:
However, if you want to start simple, there’s a lot to wade through here, and it can make figuring out what’s going on rather challenging. Here is how to fix that.
I. Get the Empty ASP.NET WebApi Project Template from Visual Studio Gallery
Nikos Baxevanis has authored a terrific installable template for WebApi projects which is really, really empty. It installs into VS and is available as an ASP.NET MVC 4 Template through the File/New Project Menu. Once you install the template into VS, you can create a very empty WebApi project. After we add a few helpful items back in, we still end up with a project with less than half the dependencies, and a small fraction of the files found in the standard VS WebApi template project.
- Download the Installer HERE
- Make sure all instances of Visual Studio are CLOSED
- Run the installer
II. Create an Empty WebApi Project
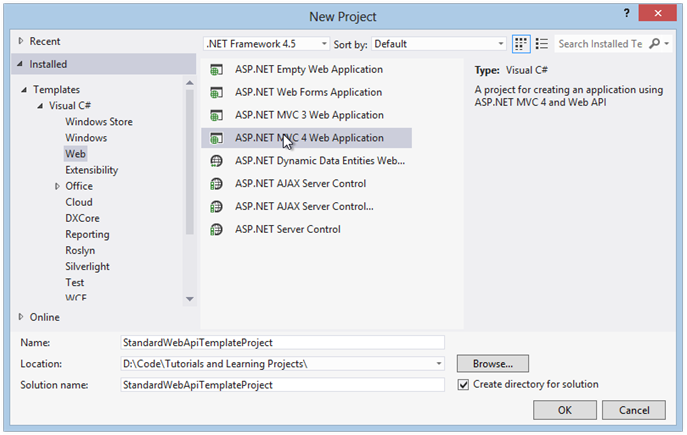
Now, Open Visual Studio. Go to File/New Project, and select the ASP.NET MVC 4 Web Application Template:
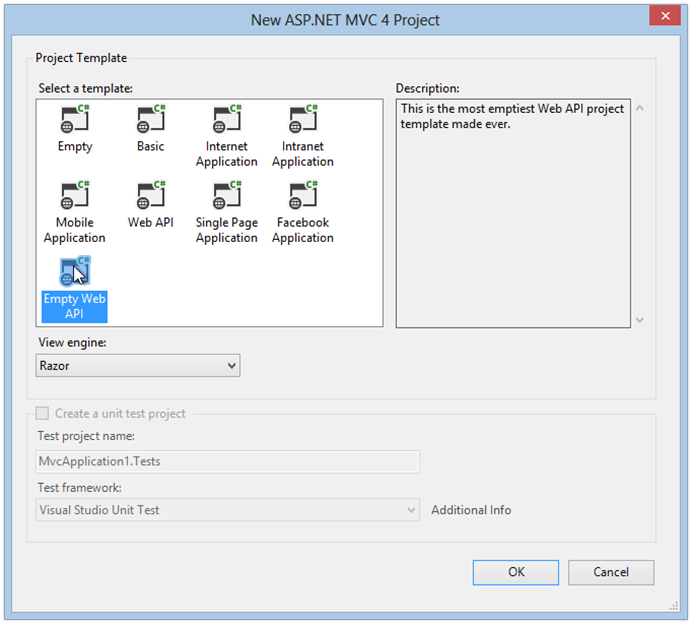
Then, once you name your project appropriately, and hit Ok, you will see the available templates for this project type. Notice, there is now an Empty WebApi Project template (this was not there before):
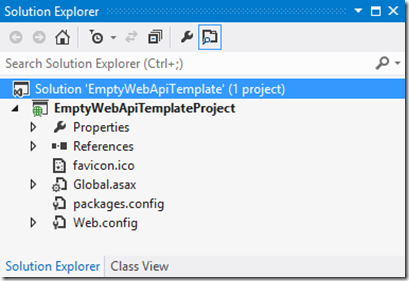
Once you hit Ok, VS will create a project with far fewer references, and none of the extra stuff that came with the standard WebApi project:
At this point, we are almost, but not quite, done.
III. Making it Work: Update the Nuget Packages for the Empty WebApi Template
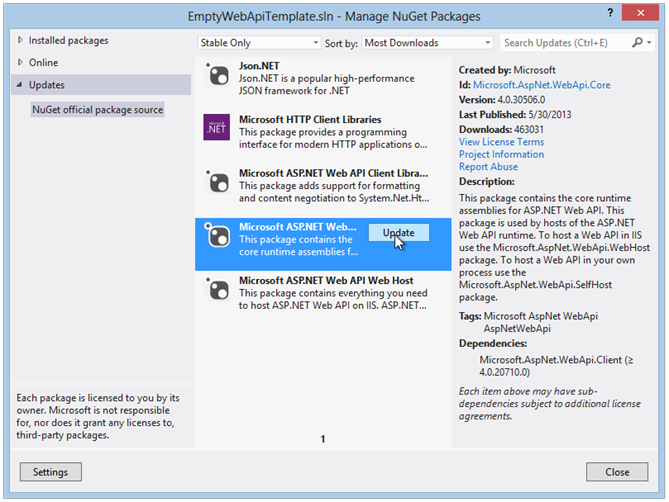
WebApi has been updated since the last time the Empty WebApi Template has been updated, so we need to update the packages used in our project. In the next steps, we will be adding some items to our project which depend on the most current packages for WebApi. in VS, go to the Tools Menu/Library Package Manager/Manage Packages for Solution:
Update all of the packages listed.
IV. Making it Work: Add the Microsoft.AspNet.WebApi.Tracing Package (Optional)
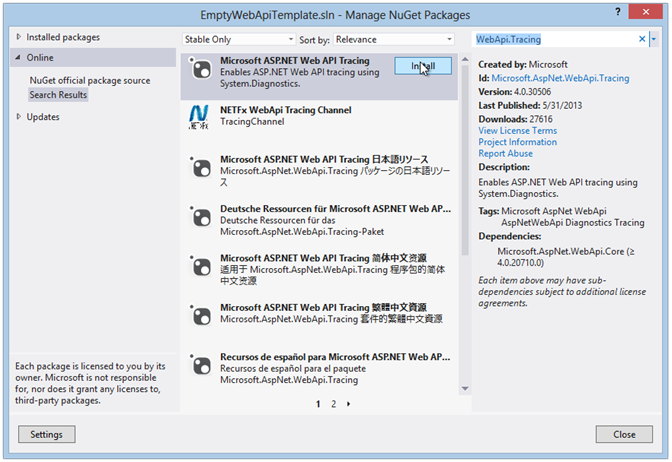
ASP.NET WebApi projects commonly include tracing to make debugging a little less unpleasant, via the Microsoft.AspNet.WebApi.Tracing package. While not a requirement, you may consider adding this package via Nuget. Once again, open Tools Menu/Library Package Manager/Manage Packages for Solution, then type WebApi.Tracing in the Search box. Select the Microsoft.AspNet.WebApi.Tracing package, and click Install:
V. Making It Work: Adding WebApi Routing and Filters
Now that you have a more streamlined starting point, you will likely want to add a few things back in. In order to take advantage of the awesome that the MVC Team has created with WebApi (and to follow the MVC philosophy emphasizing convention over configuration), we will want some routing, and probably (but not necessarily) we will want to adhere to some MVC conventions in our project organization.
Add a new folder to the project, and name it App_Start (similar to that in the default MVC and/or WebApi Project template). Then right-click on the folder and select “Add Class” and name it WebApiConfig.cs. Add the following code in place of the default code that VS creates in the class (note this is a static class). This class will set up the default routing convention similar to any other ASP.NET MVC Project. Note to replace the using statements at the top of the file as well as the code body:
Code for the WebApiConfig Class:
using System;
using System.Collections.Generic;
using System.Linq;
using System.Web.Http;
namespace EmptyWebApiProject.App_Start
{
    public static class WebApiConfig
    {
        public const string DEFAULT_ROUTE_NAME = "MyDefaultRoute";
        public static void Register(HttpConfiguration config)
        {
            config.Routes.MapHttpRoute(
                name: DEFAULT_ROUTE_NAME,
                routeTemplate: "api/{controller}/{id}",
                defaults: new { id = RouteParameter.Optional }
            );
            config.EnableSystemDiagnosticsTracing();
        }
    }
}
Now, Add another class, and name it FilterConfig.cs. Copy the following code in place of the VS-generated code (as before, make sure to add the using statements as well as the code body):
Code for the FilterConfig Class:
using System.Web;
using System.Web.Mvc;
namespace EmptyWebApiProject.app_start
{
    public class FilterConfig
    {
        public static void RegisterGlobalFilters(GlobalFilterCollection filters)
        {
            filters.Add(new HandleErrorAttribute());
        }
    }
}
VI. Making it Work: Update the Global.asax File to initialize Routes and Filters
Now that we have added the Routing and Filter files, we need to make sure we initialize them in our Global.asax file. Open that file and add the lines indicated to the existing code:
using System.Web;
using System.Web.Http;
using System.Web.Mvc;
//Add this Using Statement:
using EmptyWebApiTemplateProject.app_start;
namespace EmptyWebApiProject
{
    // Note: For instructions on enabling IIS6 or IIS7 classic mode,
    // visit http://go.microsoft.com/?LinkId=9394801
    public class WebApiApplication : HttpApplication
    {
        protected void Application_Start()
        {
            AreaRegistration.RegisterAllAreas();
            // Add these two lines to initialize Routes and Filters:
            WebApiConfig.Register(GlobalConfiguration.Configuration);
            FilterConfig.RegisterGlobalFilters(GlobalFilters.Filters);
        }
    }
}
VII. Add a Models Folder and a Controllers Folder to Maintain Convention
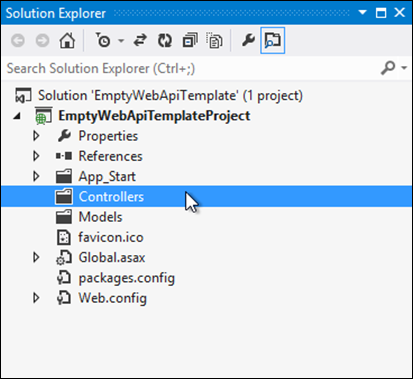
While not required, it makes sense to adhere to conventions established for ASP.NET/MVC by organizing the code in your project. In the case of an API project such as we are creating here, the Models will, as usual, represent our data. However, unlike a standard MVC project, the Controllers, in this case, will all inherit from System.Web.Http.ApiController instead of System.Web.Mvc.Controller. For the moment, add the folders as seen below, and we now have a greatly simplified WebApi project structure:
Solutions Explorer with Added Models and Controllers Folders:
VIII. Set Appropriate Start Action and Note the Server Properties
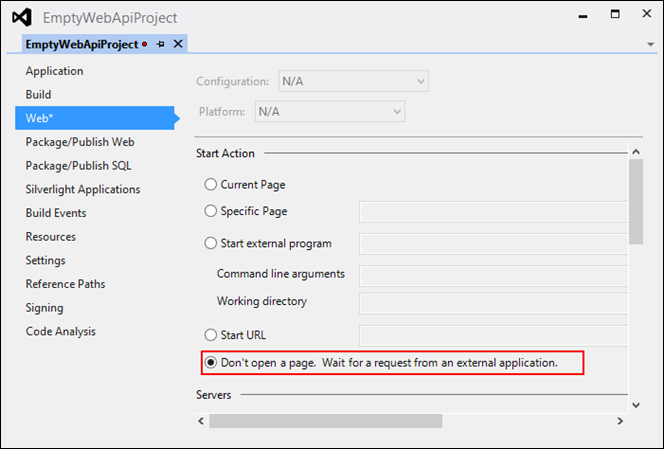
Since we are building a minimal API service and not a web site, we may want to modify what happens when we run our project in Visual Studio. Unless (or until) you plan to have your API project display a home page, you might consider setting the runtime property setting such that VS does not try to open your site in a local browser when debugging. While the project will still run properly on whichever development server you have configured in Visual Studio, your default browser will try to open the page and show an error, which can be distracting.
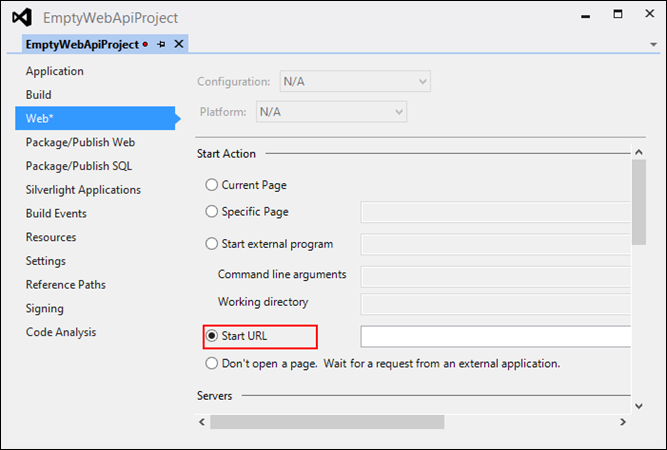
In the Solution Explorer, double-click the project Properties folder. This will open the Project settings. Click on the “Web” tab. Your default web settings will probably look something like this:
Default VS Start Action Settings:
Not the highlighted item. We don’t want a page to open (unless you are going to add one to the project), so we want to change that. Select the, “Don’t open a page . . .” option instead:
Modified VS Start Action Settings:
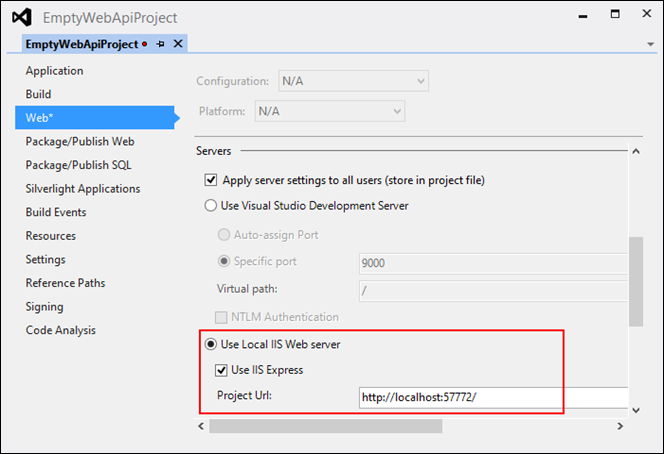
While you are here, scroll the window down, and take note of the Server Settings. The default will usually be to use the Local IIS Web Server/IIS Express installed with Visual Studio. This is fine, but note the Project URL and specifically, the port setting. You will need to use this when consuming your API externally while debugging. Or, you may choose to switch to the Visual Studio Development Server and specify a port manually. In either case, when you call into your API Project from an external project while debugging you will need to use this as the root URL.
Default Server Settings for Local Debugging:
Clone this Project from Source or Download as a Zip File
You can clone this ready-to-build-out project as we’ve put it together here from my Github Repo, or download the Zip file. Beware, the repo is a little kludgy (especially if you navigate into the “packages” directory), as I included all of the Nuget Packages required so that the project will be fully functional out of the box.
Note that cloning this project will not give you the installed template we examine in the post above. But you can clone this project, renamed appropriately, and build it out to suit. Also, if you find ways to improve on it, shoot me a pull request. I am capable of missing important stuff, and doing dumb things!
Ready to Build it Out?
To this point we have examined how to install the empty WebApi template, and add the minimal additional items such as routing, filters, and a familiar folder structure needed to get an MVC-conformant API project ready to build. Next, we’ll build out a basic example project using our streamlined WebApi Template.
Next: Building a WebApi Example with the Minimal WebApi Project
Additional Resources
- Routing Basics in ASP.NET MVC
- Routing Basics in ASP.NET Web API
- Customizing Routes in ASP.NET MVC
- Reverse-Engineering an Existing Database in your ASP.NET MVC Application Using Entity Framework Model/Database-First
- ASP.NET MVC: Configuring ASP.NET MVC 4 Membership with a SQL CE Database
Comments