Image by Infocux Technologies | Some Rights Reserved
Recently I needed to set up an ASP.NET MVC project to work with a SQL CE database. I also needed to use SQL CE as the backing store for the ASP.NET Membership feature. This was a simple, quick-and-dirty project for work, and the database requirements were very, very simple. I wanted to use SQL CE for all the data, and also use SQL CE for the membership function so that everything was nicely buttoned up within my site.
Turns out it was not 100% intuitive to make this work, but here is how I did it.
- Get the ASP.NET Provider via Nuget
- Configure the Profile, Membership, and Role Providers in Web.config
- Run the Project, and a SQL CE Membership Database will be Created
- Creating a Clean, Minimal-Footprint ASP.NET WebAPI Project with VS 2012 and ASP.NET MVC 4
- Building Out a Clean, REST-ful Web Api Service with a Minimal Web Api Project
Why Use SQL CE?
SQL CE is a great choice for applications which are not data-intensive, and/or for which deployment with minimal or no external dependencies is important. SQL CE is an embedded database, and includes all required runtime dependencies within the application. In other words, no need to install and configure SQL Server or SQL Express.
SQL CE was an ideal choice for my little work project, for which storage requirements were minimal, but for which I needed some level of membership/authorization. Once I had the configuration described below in place, development and (especially) deployment were a breeze, with no SQL Server configuration hassle.
The default configuration is for SQL Server Express
Out of the box, an ASP.NET MVC Project is configured to use SQL Server Express as the membership provider. If you do File –> New Project and choose an MVC 4 project type, your Web.config file will contain a <connectionStrings> element that looks something like this:
<connectionStrings>
<add name="DefaultConnection"
     connectionString="Data Source=(LocalDb)\v11.0;Initial
     Catalog=aspnet-ConfigureAspNetforSQLCeMembershipDb-20131006163451;Integrated
     Security=SSPI;AttachDBFilename=|DataDirectory|\aspnet-YourProject-20131006163451.mdf"
     providerName="System.Data.SqlClient" />
</connectionStrings>
If you run the out-of-the-box site and “register”, a YourProject.mdf file and an accompanying .log file will be created in the App_Data folder in the VS solution.
If we want to use SQL CE instead of SQL Server Express, we need to change some things up.
Get the Microsoft.AspNet.Providers.SqlCe Package using Nuget
First off, we need to install the Microsoft Universal Provider for SQL CE. There is a handy Nuget package for doing just this. We can either open the Nuget Package Manager Console and do:
Install Microsoft.AspNet.Providers.SqlCE from the Package Manager Console:
PM> Install-Package Microsoft.AspNet.Providers.SqlCE
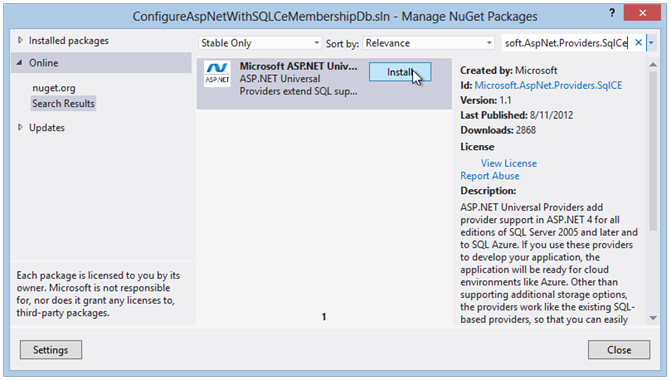
Or, we can go to the Solution Explorer, right-click on the solution, and select “Manage Nuget Packages for Solution. Then, select “Online” from the left-hand menu, and type Microsoft.AspNet.Providers.SqlCe in the search box:
Install Microsoft.AspNet.Providers.SqlCE from the Package Manager Console:
One you have done this, there will now be an extra entry in the <connectionStrings> element of your Web.config file:
Extra DefaultConnection in Web.config File:
<connectionStrings>
<add name="DefaultConnection"
     connectionString="Data Source=(LocalDb)\v11.0;Initial
     Catalog=aspnet-YourProject-20131006170652;Integrated
     Security=SSPI;AttachDBFilename=|DataDirectory|\aspnet-YourProject-20131006170652.mdf"
     providerName="System.Data.SqlClient" />
<add name="DefaultConnection"
   connectionString="Data Source=|DataDirectory|\aspnet.sdf"
   providerName="System.Data.SqlServerCe.4.0" />
</connectionStrings>
The new <add name= "DefaultConnection" . . . > node was added for us when we installed the SqlCe provider package. This will now conflict with the previous entry, so delete the original (where providerName = "System.Data.SqlClient" ).
That was easy. But we’re not done yet.
Configure the Profile, Membership, and Role Providers in Web.config
In order for SQL CE to work as the back-end store for the membership features of our MVC site, we need to do some tuning on the Profile providers section of our Web.config file as well. If you scroll down from the connectionStrings section, you will find the Profile, Membership, and Role nodes, which looks something like this:
Default Profile, Membership, and Role Provider Configuration in Web.config:
<profile defaultProvider="DefaultProfileProvider">
    <providers>
      <add name="DefaultProfileProvider" type="System.Web.Providers.DefaultProfileProvider, System.Web.Providers, Version=1.0.0.0, Culture=neutral, PublicKeyToken=31bf3856ad364e35" connectionStringName="DefaultConnection" applicationName="/" />
    </providers>
  </profile>
<membership defaultProvider="DefaultMembershipProvider">
    <providers>
       <add name="DefaultMembershipProvider" type="System.Web.Providers.DefaultMembershipProvider, System.Web.Providers, Version=1.0.0.0, Culture=neutral, PublicKeyToken=31bf3856ad364e35" connectionStringName="DefaultConnection" enablePasswordRetrieval="false" enablePasswordReset="true" requiresQuestionAndAnswer="false" requiresUniqueEmail="false" maxInvalidPasswordAttempts="5" minRequiredPasswordLength="6" minRequiredNonalphanumericCharacters="0" passwordAttemptWindow="10" applicationName="/" />
    </providers>
</membership>
<roleManager defaultProvider="DefaultRoleProvider">
    <providers>
       <add name="DefaultRoleProvider" type="System.Web.Providers.DefaultRoleProvider, System.Web.Providers, Version=1.0.0.0, Culture=neutral, PublicKeyToken=31bf3856ad364e35" connectionStringName="DefaultConnection" applicationName="/" />
    </providers>
</roleManager>
In order to use SQL CE for our Membership provider, we need to replace the above with the following:
Modified Profile, Membership, and Role Provider Configuration in Web.config:
<profile defaultProvider="DefaultProfileProvider">
  <providers>
    <clear />
    <add name="SimpleRoleProvider" type="WebMatrix.WebData.SimpleRoleProvider, WebMatrix.WebData" />
  </providers>
</profile>
<membership defaultProvider="SimpleMembershipProvider">
  <providers>
    <clear />
    <add name="SimpleMembershipProvider" type="WebMatrix.WebData.SimpleMembershipProvider, WebMatrix.WebData" />
  </providers>
</membership>
<roleManager enabled="true" defaultProvider="SimpleRoleProvider">
  <providers>
    <clear />
    <add name="SimpleRoleProvider" type="WebMatrix.WebData.SimpleRoleProvider, WebMatrix.WebData" />
  </providers>
</roleManager>
Once this is done, go to the App_Data folder, and if you originally ran the project and created a SQL Express Database (.mdf and .ldf files), delete those.
Run the Project, and a SQL CE Membership Database will be Created
In theory, that should be it. Once you run the project again, an .sdf file will be created in your App_Data folder and you should be off an running.
In reality, I had to do some fussing around. If you are using IIS Express for running your application in VS (this is the default), you may need to go to the system tray and Exit IIS Express, or at least stop the site, before you run again.
If you have any other issues, please feel free to let me know in the comments section. I really want to provide complete information here, even for simple things like this.
Other Resources
If you are newer to ASP.NET MVC, you might find some of the following helpful:
- Customizing Routes in ASP.NET MVC
- Routing Basics in ASP.NET MVC
- Building Out a Clean, REST-ful Web Api Service with a Minimal Web Api Project
- Creating a Clean, Minimal-Footprint ASP.NET WebAPI Project with VS 2012 and ASP.NET MVC 4

Comments