Image by Lucas | Some Rights Reserved
With the release of the Identity 2.0 framework in March of 2014, the Identity team has added a significant set of new features to the previously simple, but somewhat minimal ASP.NET Identity system. Some of the most visible, and in-demand features introduced with the new release are account validation and two-factor authorization.
The Identity team has created a terrific sample project/template which can effectively serve as the starting point for just about any ASP.NET MVC project you wish to build out with Identity 2.0 features. In this post, we will look at implementing email account validation as part of the account creation process, and two-factor authorization.
Previously, we took a very high-level tour of some of the new features available in Identity 2.0, and how key areas differ from the previous version 1.0 release. In this article, we’ll take a close look at implementing Email Account Validation, and Two-Factor Authentication.
- Set Up A Default Admin Account
- Account Validation: How it works
- Implementing the Email Service Using Your Own Mail Account
- Implementing the Email Service Using Sendgrid
- Testing Account Confirmation Using the Email Service
- Implementing the SMS Service
- Testing Two-Factor Authentication
- Remove the Demo Shortcuts
- Additional Resources and Items of Interest
Getting Started: Create the Sample Project Using Nuget
To get started and follow along, create an empty ASP.NET project in Visual Studio (not an MVC project, use the Empty project template when creating a new project). Then, open the Package Manager Console and type:
Install the Sample Project from Nuget:
PM> Install-Package Microsoft.AspNet.Identity.Samples -Pre
Once Nuget has done its thing, you should see a familiar ASP.NET MVC project structure in the Solution Explorer:
ASP.NET Identity 2.0 Sample Project in Solution Explorer:
This structure should look mostly familiar if you have worked with a standard ASP.NET MVC project before. There are, however, a few new items in there, if you look closely. For our purposes in this article, we are primarily concerned with the IdentityConfig.cs file, located in the App_Start folder.
If we open the IdentityConfig.cs file and scroll through, we find two services classes defined, EmailService and SmsService:
The Email Service and SMS Service Classes:
public class EmailService : IIdentityMessageService
{
    public Task SendAsync(IdentityMessage message)
    {
        // Plug in your email service here to send an email.
        return Task.FromResult(0);
    }
}

public class SmsService : IIdentityMessageService
{
    public Task SendAsync(IdentityMessage message)
    {
        // Plug in your sms service here to send a text message.
        return Task.FromResult(0);
    }
}
Notice the both EmailService and SmsService implement the common interface, IIdentityMessageService. We can use IIdentityMessageService to create any number of Mail, SMS, or other messaging implementations. We’ll se how this works momentarily.
Set Up A Default Admin Account
Before you go too much further, we need to set up a default Admin account that will be deployed when the site runs. The example project is set up so that the database is initialized when the project is run, and/or anytime the Code-First model schema changes. We need a default Admin user so that once the site runs, you can log in and do admin-type things, and you can’t do THAT until you have a registered admin account.
As with the previous version of Identity, the default user account created during on-line registration has no admin privileges. Unlike the previous version, the first user created when the site is run is NOT an admin user. We need to seed the database during initialization.
Take a look at ApplicationDbInitializer class, also defined in IdentityConfig.cs:
The Application Db Initializer Class:
public class ApplicationDbInitializer
    : DropCreateDatabaseIfModelChanges<ApplicationDbContext>
{
    protected override void Seed(ApplicationDbContext context) {
        InitializeIdentityForEF(context);
        base.Seed(context);
    }

    //Create User=Admin@Admin.com with password=Admin@123456 in the Admin role
    public static void InitializeIdentityForEF(ApplicationDbContext db)
    {
        var userManager =
            HttpContext.Current.GetOwinContext().GetUserManager<ApplicationUserManager>();

        var roleManager =
            HttpContext.Current.GetOwinContext().Get<ApplicationRoleManager>();

        const string name = "admin@admin.com";
        const string password = "Admin@123456";
        const string roleName = "Admin";

        //Create Role Admin if it does not exist
        var role = roleManager.FindByName(roleName);
        if (role == null) {
            role = new IdentityRole(roleName);
            var roleresult = roleManager.Create(role);
        }

        var user = userManager.FindByName(name);
        if (user == null) {
            user = new ApplicationUser { UserName = name, Email = name };
            var result = userManager.Create(user, password);
            result = userManager.SetLockoutEnabled(user.Id, false);
        }

        // Add user admin to Role Admin if not already added
        var rolesForUser = userManager.GetRoles(user.Id);
        if (!rolesForUser.Contains(role.Name)) {
            var result = userManager.AddToRole(user.Id, role.Name);
        }
    }
}
The lines highlighted in yellow define the default admin user that will be created when the application is run for the first time. Before we proceed, change these to suit your own needs, and ideally, include a live, working email address.
Account Validation: How it works
You are no doubt familiar with email-based account validation. You create an account at some website, and a confirmation email is sent to your email address with a link you need to follow in order to confirm your email address and validate your account.
If we look at the AccountController in the example project, we find the Register method:
The Register Method on Account Controller:
[HttpPost]
[AllowAnonymous]
[ValidateAntiForgeryToken]
public async Task<ActionResult> Register(RegisterViewModel model)
{
    if (ModelState.IsValid)
    {
        var user = new ApplicationUser { UserName = model.Email, Email = model.Email };
        var result = await UserManager.CreateAsync(user, model.Password);
        if (result.Succeeded)
        {
            var code = await UserManager.GenerateEmailConfirmationTokenAsync(user.Id);
            var callbackUrl = Url.Action(
                "ConfirmEmail",
                "Account",
                new { userId = user.Id, code = code },
                protocol: Request.Url.Scheme);

            await UserManager.SendEmailAsync(
                user.Id,
                "Confirm your account",
                "Please confirm your account by clicking this link: <a href=\""
                + callbackUrl + "\">link</a>");

            ViewBag.Link = callbackUrl;
            return View("DisplayEmail");
        }
        AddErrors(result);
    }

    // If we got this far, something failed, redisplay form
    return View(model);
}
Looking close at the above, we see a call to UserManager.SendEmailAsync where we pass in some arguments. Within AccountController, UserManager is a property which returns an instance of type ApplicationUserManager. If we take a look in the IdentityConfig.cs file in the App_Start folder, we find the definition for ApplicationUserManager. On this class, the static Create() method initializes and returns a new instance of ApplicationUserManager, and this is where our messaging services are configured:
The Create() Method Defined on the ApplicationUserManager Class:
public static ApplicationUserManager Create(
    IdentityFactoryOptions<ApplicationUserManager> options,
    IOwinContext context)
{
    var manager = new ApplicationUserManager(
        new UserStore<ApplicationUser>(
            context.Get<ApplicationDbContext>()));

    // Configure validation logic for usernames
    manager.UserValidator = new UserValidator<ApplicationUser>(manager)
    {
        AllowOnlyAlphanumericUserNames = false,
        RequireUniqueEmail = true
    };

    // Configure validation logic for passwords
    manager.PasswordValidator = new PasswordValidator
    {
        RequiredLength = 6,
        RequireNonLetterOrDigit = true,
        RequireDigit = true,
        RequireLowercase = true,
        RequireUppercase = true,
    };

    // Configure user lockout defaults
    manager.UserLockoutEnabledByDefault = true;
    manager.DefaultAccountLockoutTimeSpan = TimeSpan.FromMinutes(5);
    manager.MaxFailedAccessAttemptsBeforeLockout = 5;

    // Register two factor authentication providers. This application
    // uses Phone and Emails as a step of receiving a code for verifying the user
    // You can write your own provider and plug in here.
    manager.RegisterTwoFactorProvider(
        "PhoneCode",
        new PhoneNumberTokenProvider<ApplicationUser>
    {
        MessageFormat = "Your security code is: {0}"
    });

    manager.RegisterTwoFactorProvider(
        "EmailCode",
        new EmailTokenProvider<ApplicationUser>
    {
        Subject = "SecurityCode",
        BodyFormat = "Your security code is {0}"
    });

    manager.EmailService = new EmailService();
    manager.SmsService = new SmsService();
    var dataProtectionProvider = options.DataProtectionProvider;

    if (dataProtectionProvider != null)
    {
        manager.UserTokenProvider =
            new DataProtectorTokenProvider<ApplicationUser>(
                dataProtectionProvider.Create("ASP.NET Identity"));
    }
    return manager;
}
The lines highlighted in yellow show where we set the Email and SMS services on the ApplicationUserManager instance. Just above the highlighted lines, we see how we register two-factor providers for Email and SMS messages.
From the above, we can see that the Register() method of AccountController calls the SendEmailAsync method of ApplicationUserManager, which has been configured with an Email and SMS service at the time it is created.
Email validation of new user accounts, two-factor authentication via email, and two-factor authentication via SMS Text all depend upon working implementations for the EmailService and SmsService classes.
Implementing the Email Service Using Your Own Mail Account
Setting up the email service for our application is a relatively simple task. You can use your own email account, or a mail service such as Sendgrid to create and send account validation or two-factor sign-in email. For example, if I wanted to use an Outlook.com email account to send confirmation email, I might configure my Email Service like so:
The Mail Service Configured to Use an Outlook.com Host:
public class EmailService : IIdentityMessageService
{
    public Task SendAsync(IdentityMessage message)
    {
        // Credentials:
        var credentialUserName = "yourAccount@outlook.com";
        var sentFrom = "yourAccount@outlook.com";
        var pwd = "yourApssword";

        // Configure the client:
        System.Net.Mail.SmtpClient client =
            new System.Net.Mail.SmtpClient("smtp-mail.outlook.com");

        client.Port = 587;
        client.DeliveryMethod = System.Net.Mail.SmtpDeliveryMethod.Network;
        client.UseDefaultCredentials = false;

        // Creatte the credentials:
        System.Net.NetworkCredential credentials =
            new System.Net.NetworkCredential(credentialUserName, pwd);

        client.EnableSsl = true;
        client.Credentials = credentials;

        // Create the message:
        var mail =
            new System.Net.Mail.MailMessage(sentFrom, message.Destination);

        mail.Subject = message.Subject;
        mail.Body = message.Body;

        // Send:
        return client.SendMailAsync(mail);
    }
}
The precise details for your SMTP host may differ, but you should be able to find documentation. As a general rule, though, the above is a good starting point.
Implementing the Email Service Using Sendgrid
There are numerous email services available, but Sendgrid is a popular choice in the .NET community. Sendgrid offers API support for multiple languages as well as an HTTP-based Web API. Additionally, Sendgrid offers direct integration with Windows Azure.
If you have a standard Sendgrid account (you can set up a free developer account at the Sendgrid site), setting up the Email Service is only slightly different than in the previous example. First off, your network credentials will simply use your Sendgrid user name and password. Note that in this case, your user name is different than the email address you are sending from. in fact, you can use any address as your sent from address.
The EmailService Configured to Use Sendgrid:
public class EmailService : IIdentityMessageService
{
    public Task SendAsync(IdentityMessage message)
    {
        // Credentials:
        var sendGridUserName = "yourSendGridUserName";
        var sentFrom = "whateverEmailAdressYouWant";
        var sendGridPassword = "YourSendGridPassword";

        // Configure the client:
        var client =
            new System.Net.Mail.SmtpClient("smtp.sendgrid.net", Convert.ToInt32(587));

        client.Port = 587;
        client.DeliveryMethod = System.Net.Mail.SmtpDeliveryMethod.Network;
        client.UseDefaultCredentials = false;

        // Create the credentials:
        System.Net.NetworkCredential credentials =
            new System.Net.NetworkCredential(credentialUserName,sendGridPassword);
        client.EnableSsl = true; client.Credentials = credentials;

        // Create the message: var mail = new System.Net.Mail.MailMessage(sentFrom, message.Destination);
        mail.Subject = message.Subject;
        mail.Body = message.Body;

       // Send:
       return client.SendMailAsync(mail); } }
In the above, we see all we really had to change were our credentials, and the SMTP host string.
With that done, we can give our email service a quick trial run.
Testing Account Confirmation Using the Email Service
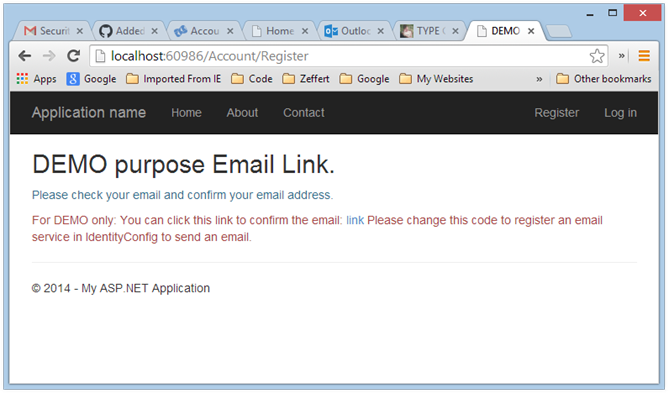
First, let’s run our application, and attempt to register a new user. User a working email address to which you have access. If all goes well you will be redirected to a view resembling the following:
Redirect to Confirmation Sent View:
As you can see, there is some language there indicating that you can click the link in the view to confirm account creation for the purpose of the demo. However, an actual confirmation email should have been sent to the address you specified when creating the account, and following the confirmation link will, in fact, confirm the account and allow you to log in.
Once we have our site working properly, we will obviously want to do away with the demo link, and also change the text on this view. We’ll look at that shortly.
Implementing the SMS Service
To use two-factor authentication with SMS/Text, you will need an SMS host provider, such as Twilio. Like Sendgrid, Twilio is quite popular in the .NET community, and offers a comprehensive C# API. You can sign up for a free account at the Twilio Site.
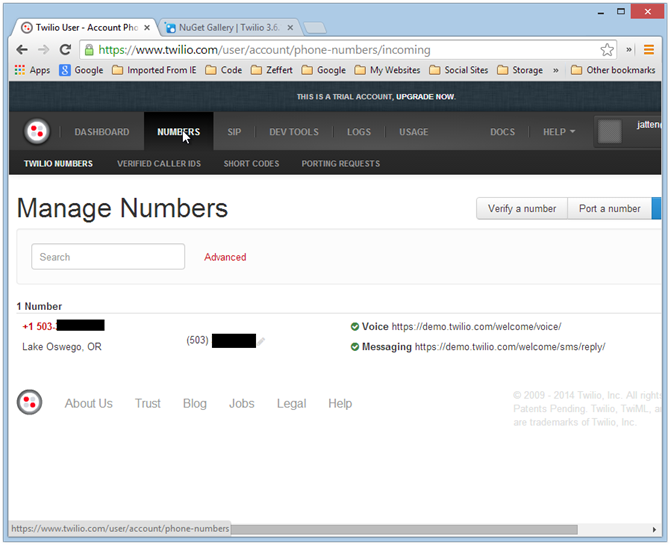
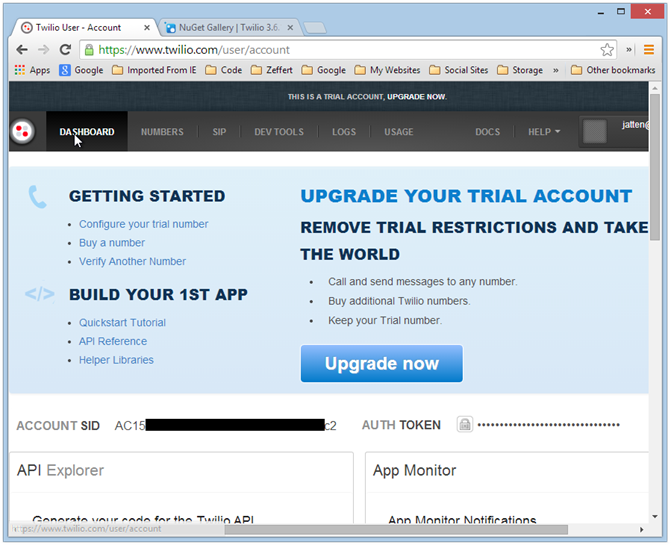
When you create a Twilio account, you will be issued an SMS phone number, an account SID, and an Auth Token. You can find your Twilio SMS phone number by logging into your account, and navigating to the Numbers tab:
Locate Twilio SMS Number:
Likewise, you can find your SID and Auth Token on the Dashboard Tab:
Locate Twilio SID and Auth Token:
In the above, see the little padlock icon next to the Auth Token? If you click that, your token will be visible, and can be copied for pasting into your code.
Once you have created an account, in order to use Twilio from within your application, you will need to get the Twilio Nuget package:
Add the Twilio Nuget Package Using Package Manager Console:
PM> Install-Package Twilio
That done, we can add Twilio to the using statements at the top of our IdentityConfig.cs file, and then implement the SMS service as follows:
The SMS Service Using Twilio:
public class SmsService : IIdentityMessageService
{
    public Task SendAsync(IdentityMessage message)
    {
        string AccountSid = "YourTwilioAccountSID";
        string AuthToken = "YourTwilioAuthToken";
        string twilioPhoneNumber = "YourTwilioPhoneNumber";

        var twilio = new TwilioRestClient(AccountSid, AuthToken);

        twilio.SendSmsMessage(twilioPhoneNumber, message.Destination, message.Body);

        // Twilio does not return an async Task, so we need this:
        return Task.FromResult(0);
    }
}
Now that we have both an email service and an SMS service configured, we can see if our two-factor authentication works as expected.
Testing Two-Factor Authentication
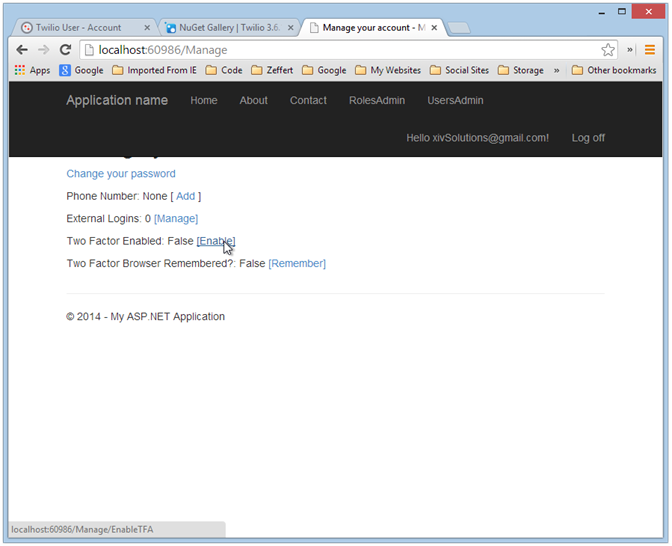
The example project is set up so that two-factor authentication is an “opt-in” feature per user. To see if everything is working properly, log in using either your default admin account, or the account you created previously when testing out the email validation feature. Once logged in, navigate to the user account area by clicking on the user name displayed top right in the browser view. You should see something like this:
The Manage User Account View:
In the above window, you will want to enable two-factor authentication, and add your phone number. When you go to add your phone number, you will be sent an SMS message to confirm. If we have done everything correctly so far, this should only take a few seconds (sometimes it can be more than a few seconds, but in general, if 30 or more seconds goes by, something is probably wrong . . .).
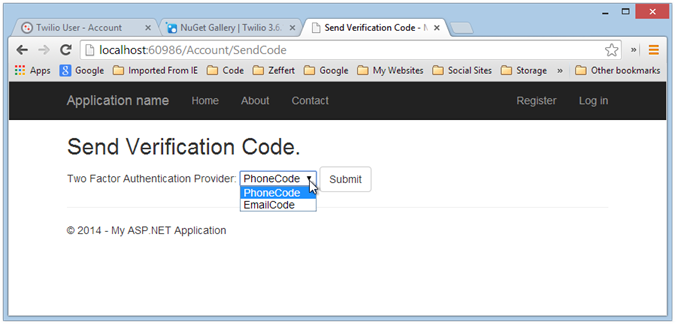
Once two-factor auth is enabled, you can log out, and try logging in again. You will be offered a choice, via a drop-down menu, where you can choose to receive your two-factor code via email or SMS:
Select Two-Factor Authentication Method:
Once you make your selection above, the two-factor code will be sent to your selected provider, and you can complete the login process.
Remove the Demo Shortcuts
As mentioned previously, the example project comes with some shortcuts built-in so that, for development and testing purposes, it is not necessary to actually send or retreive the two-factor code (or follow the account validation link from an actual email) from an email or SMS account.
Once we are ready to deploy, we will want to remove these shortcuts from the corresponding views, and also the code which passes the links/codes to the ViewBag. For example, if we take another look at the Register() method on AccountController, we can see the following code in the middle of the method:
if (result.Succeeded)
{
    var code = await UserManager.GenerateEmailConfirmationTokenAsync(user.Id);
    var callbackUrl =
        Url.Action("ConfirmEmail", "Account",
            new { userId = user.Id, code = code }, protocol: Request.Url.Scheme);

    await UserManager.SendEmailAsync(user.Id, "Confirm your account",
        "Please confirm your account by clicking this link: <a href=\"" + callbackUrl + "\">link</a>");

    // This should not be deployed in production:
    ViewBag.Link = callbackUrl;
    return View("DisplayEmail");
}
AddErrors(result);
The highlighted lines should be commented out or deleted in production.
Likewise, the View that is returned by the Register() method, DisplayEmail.cshtml, will need some adjustment as well:
The DisplayEmail View:
@{
    ViewBag.Title = "DEMO purpose Email Link";
}
<h2>@ViewBag.Title.</h2>
<p class="text-info">
    Please check your email and confirm your email address.
</p>
<p class="text-danger">
    For DEMO only: You can click this link to confirm the email: <a href="@ViewBag.Link">link</a>
    Please change this code to register an email service in IdentityConfig to send an email.
</p>
In a similar manner, the controller method VerifyCode() also pushes the two-factor code out into the view for ease of use during development, but we absolutely don’t want this behavior in production:
The Verify Code Method on AccountController:
[AllowAnonymous]
public async Task<ActionResult> VerifyCode(string provider, string returnUrl)
{
    // Require that the user has already logged in via username/password or external login
    if (!await SignInHelper.HasBeenVerified())
    {
        return View("Error");
    }

    var user =
        await UserManager.FindByIdAsync(await SignInHelper.GetVerifiedUserIdAsync());

    if (user != null)
    {
        ViewBag.Status =
            "For DEMO purposes the current "
            + provider
            + " code is: "
            + await UserManager.GenerateTwoFactorTokenAsync(user.Id, provider);
    }
    return View(new VerifyCodeViewModel { Provider = provider, ReturnUrl = returnUrl });
}
Also, as with the Register() method, we want to make suitable adjustments to the VerifyCode.cshtml View:
The VerifyCode.cshtml View:
@model IdentitySample.Models.VerifyCodeViewModel
@{
    ViewBag.Title = "Enter Verification Code";
}

<h2>@ViewBag.Title.</h2>

@using (Html.BeginForm("VerifyCode", "Account", new { ReturnUrl = Model.ReturnUrl }, FormMethod.Post, new { @class = "form-horizontal", role = "form" })) {
    @Html.AntiForgeryToken()
    @Html.ValidationSummary("", new { @class = "text-danger" })
    @Html.Hidden("provider", @Model.Provider)
    <h4>@ViewBag.Status</h4>
    <hr />
    <div class="form-group">
        @Html.LabelFor(m => m.Code, new { @class = "col-md-2 control-label" })
        <div class="col-md-10">
            @Html.TextBoxFor(m => m.Code, new { @class = "form-control" })
        </div>
    </div>
    <div class="form-group">
        <div class="col-md-offset-2 col-md-10">
            <div class="checkbox">
                @Html.CheckBoxFor(m => m.RememberBrowser)
                @Html.LabelFor(m => m.RememberBrowser)
            </div>
        </div>
    </div>
    <div class="form-group">
        <div class="col-md-offset-2 col-md-10">
            <input type="submit" class="btn btn-default" value="Submit" />
        </div>
    </div>
}
Again, the highlighted line could prove troublesome, and should be removed.
Keep Mail and SMS Account Settings Secure
The examples in this article have account user names and passwords, Auth tokes, and such hard-coded into the methods in which they are used. It is unlikely we would want to deploy this way, and equally unlikely we would even want to push our code into source control with these things exposed in such a manner (ESPECIALLY to Github!!).
Far better to put any private settings in a secure location. See Keep Private Settings Out of Source Control for more information.
The Tip of the Iceberg
ASP.NET Identity 2.0 has introduced a number of exciting new features previously not available as “out-of-the-box” features available to ASP.NET developers. Email account validation and two-factor authentication are but two of the most visible, and easily implemented (at least, within the framework of the example project provided by the Identity team!).
New features such as these have added greatly to the security arsenal available to the average developer, but have also added complexity to development of sites which utilize Identity 2.0. The Identity 2.0 team has provided some powerful security tools, but it may be easier to introduce new and harder to find security holes if we are not careful.
Additional Resources and Items of Interest
- ASP.NET MVC and Identity 2.0: Understanding the Basics
- ASP.NET MVC: Keep Private Settings Out of Source Control
The Following Focus on Identity 1.0:
- Extending Identity Accounts and Implementing Role-Based Authentication in ASP.NET MVC 5
- ASP.NET MVC 5 Identity: Extending and Modifying Roles
- ASP.NET MVC 5 Identity: Implementing Group-Based Permissions Management
Comments
 Nat Krishnan
AuthorExcellent article. One thing to point out.. this article uses the word “Authorization”, instead of “Authentication” in 3 or 4 places. Two Factor Authentication not Authorization. Authorization is a completely different beast and you have various standards and frameworks, such as OAuth, RBAC, ABAC, etc.
 Robert Smith
AuthorHello,
Excellent article, as are your others, which I have been relying on while trying to learn Identity. I am very new to this, however, so please excuse the simplicity of my question:
From what I understand, we are not supposed to hard code credentials (ie. username/password) into source code. I understand the necessity of doing this to seed the database, but shouldn’t we remove it prior to deployment? Would it go into some kind of ‘secrets’ file, or once it is seeded you can simply remove the reference and have the Admin role be in the database?
Again, I’m fairly certain this is obvious which could explain why I haven’t found any commentary on this issue (ie. it’s too obvious).
Thank you,
Robert
 Belal Shaat
Author// => this line in The EmailService Configured to Use Sendgrid:
System.Net.NetworkCredential credentials =
new System.Net.NetworkCredential(credentialUserName, pwd);
// => Should be
System.Net.NetworkCredential credentials =
new System.Net.NetworkCredential(sendGridUserName, sendGridPassword);
thanks
 John Atten
AuthorFIxed, with thanks, sir! Cheers!
 Dov Miller
AuthorIs there a web form example?
 jatten
AuthorI can't try running it right now, but here is the Nuget repo:
https://www.nuget.org/packages/Microsoft.AspNet.Identity.Samples
 George Young
AuthorJohn, thank you so much for writing about this subject. I tried to get the NuGet package using your instructions (above) but I receive this error:
Install-Package : Unable to find package 'Microsoft.AspNet.Identity.Samples'.
Googling didn't help me find the correct package name. In fact, it seems that it has been removed from NuGet's repository.
Do you know where I can get the samples?
Thank you,
George
 jatten
AuthorFar as I know, Identity 2.0 doesn't offer a "Call" option. The code for sending an SMS Text, as described in the post, works properly if you have set up a Twilio Account.
 Ibrahim Shaib
AuthorThanks for sharing again.