Image by Hammad Ali | Some Rights Reserved
One of the coolest things about Windows Azure Websites is the integration with source control, and the automated deployment hooks Azure offers. However, there are a number of small gotcha’s related to deployment, chief among these is the protection of confidential configuration items such as database connection string.
In this post, we are going to look specifically at the vexing situation I ran into deploying from source control with an application using Entity Framework’s “Model-First” strategy (everything here is pretty much applicable to “Database-First” as well, since in terms of the conceptual modeling of the database within the application, they are the same).
NOTE: If you are an MSDN Subscriber, you can access free Azure benefits. If you are not an MSDN subscriber, you can still have up to 10 Windows Azure Websites for free. Additionally, anyone can take advantage of an introductory free 30 day trial to check out the rest of the Azure platform.
If you wish to take advantage of Windows Azure Websites Deployment from Source Control feature, and your application uses Entity Framework’s Model-or-Database-First approach, there are some non-intuitive set-up concerns that need to be addressed before your deployment will work properly.
- Windows Azure Databases, Website Deployment, and Connection Strings
- The Model-First Connection String Pattern for Windows Azure
- Filling in the Example Azure Connection String Settings
- Troubleshooting
- Azure EF Model-First Connection String Pattern on Github
- Deploying an Azure Website from Source Control
EF Model-First Connection String Meta-Data
When you use Entity Framework to either build a database based upon the model you create in the VS Entity Designer, or use EF to reverse-engineer a conceptual model from an existing database, EF creates a bunch of meta-data mappings used to manage the interaction of your application with the database.
Unlike the “Code-First” approach, in which much of the meta-data exists as annotations on your model classes which EF then uses to create and map the relations of your classes to the database, the Model-First paradigm leaves you with straight POCO (“Plain Old CLR Objects” or, alternately, “Plain Old Class Objects”) classes.
In order for EF (and thus, your application) to work properly in a Model-First approach, it needs to know where all this meta-data lives, and this is evident in the connection string created by EF in your Web.config file:
EF Model First Connection Strings in Web.config:
<connectionStrings>
<add name="DefaultConnection"
connectionString="Data Source=(LocalDb)\v11.0;
Initial Catalog=aspnet-AzureModelFirstExample-20131020060646;
Integrated Security=SSPI;
AttachDBFilename=|DataDirectory|\aspnet-AzureModelFirstExample-20131020060646.mdf"
providerName="System.Data.SqlClient" />
<add name="ExampleDbEntities"
connectionString="metadata=res://*/Models.ExampleEntities.csdl
|res://*/Models.ExampleEntities.ssdl|res://*/Models.ExampleEntities.msl;
provider=System.Data.SqlClient;
provider connection string="data source=XIVMAIN\XIVSQL;
initial catalog=ExampleDb;integrated security=True;
MultipleActiveResultSets=True;App=EntityFramework""
providerName="System.Data.EntityClient" />
</connectionStrings>
In the above, the first XML node in <connectionStrings> , named “DefaultConnection” is the connection string for the standard Forms Membership feature included out of the box with the default MVC project template.
The second node, for the connection string named “ExampleDbEntities” is what you get when you create an Entity Framework Model First implementation of the actual domain database your application will consume. All that metadata=res: stuff essentially tells EF where to find the meta data it needs to properly relate your generated model classes to database tables, and to keep track of the relationships between them.
In the example above, the membership database exists in the App_Data folder of the project. The ExampleEntities database is hosted on my local development server. As a result, both connections are able to use Windows Integrated Security, and no confidential connection information is persisted in the Web.config file.
When deploying a website to Windows Azure Websites, there are any number of variations with respect to how the two-database application above might be implemented. You might create a separate membership database on your Azure account, as well as an application database, similar to the above.
More likely, you might decide to combine the two such that all of your application data is served by the same Azure SQL Database instance. For this article, we are going to look at the free Websites tier, which allows one free Azure SQL Database (<= 20 Mb) for use by all of your free websites. We will also assume that you must (for whatever reason) develop your application against an existing database schema, such that the Model/Database First approach is indicated.
Windows Azure Databases, Website Deployment, and Connection Strings
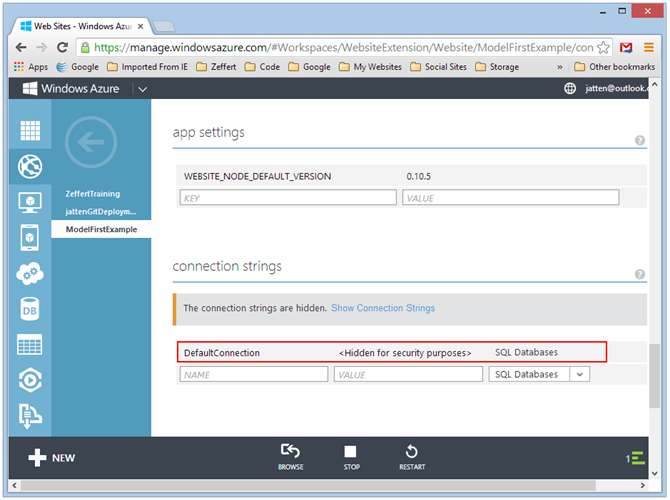
In the configuration section of the Azure Website Management Portal, there is a section specifically for setting up connection strings. Azure connection strings are key/value pairs where the NAME field (the Key) is the name of the connection string as defined in our Web.config file, and the VALUE represents the actual connection string to be used to connect to our Azure SQL Database instance.
Connection String Management in the Windows Azure Websites Portal
The above is from the Configuration portal for an example I set up. I have an existing Azure SQL Database set up, and when I created the example site, the DefaultConnection string called out in red was associated with that database.
When we deploy our site from source control, Azure maps the connection string names defined in our Web.config file to the correspondingly-named connection strings defined here. This preserves the privacy of our confidential Azure database connection information, since it does not need to be committed to our source control repo.
Recall from the previous section that our Membership database on our local machine also uses a connection string named “DefaultConnection.” Since for our example we are presuming that in deployment the Membership tables actually reside in the same database as the rest of our application data, the connection string above is appropriate. Of course, we need to make sure to migrate our Membership tables into this database (or assume they are already there).
In any case, this connection string should point to wherever our membership tables live. As it sits currently, the DefaultConnection is a standard Azure SQL Database connection. If we click on the “Show Connection Strings” link, we see that with a few small exceptions, the Azure connection string closely resembles a standard SQL Server connection string:
Default Azure Connection String for a Linked Azure SQL Database
Data Source=tcp:yourAzureServerName.database.windows.net,1433;
    Initial Catalog=ModelFirstExampleDb;
    User ID=yourDbUserName@yourAzureServerName;
    Password=YourPassword
This should work properly with the membership functions of our application out of the box, so long as the Membership data resides in the target database to which this connection string points.
Now we come to the issue of our application database. Since our Entity Framework models expect a Model-First implementation, they will be looking for that funky, meta-data-laden second connection string we saw in our Web.config file.
The Model-First Connection String Pattern for Windows Azure
In order for Windows Azure to work with our EF Model-First Deployment, we need to set up the second connection string very specifically. First off, we need to name it to match the name defined for our application data connection string in Web.config. Second, we need to use the following pattern, and carefully substitute all of the <angleBracketed> values with our proper values (the angle brackets are not part of the connection string – remove those when putting your own values in):
The Model-First Connection String for Windows Azure SQL Database:
metadata=res://*/Models.<EFModel>.csdl|res://*/Models.<EFModel>.ssdl|res://*/Models.<EFModel>.msl;
provider=System.Data.SqlClient;
provider connection string=
"data source=tcp:<AzureServer>.database.windows.net;
initial catalog=<AzureDatabaseName>;
Persist Security Info=True;
User ID=<UserLogIn>@<AzureServer>;
Password=<UserPassword>"
Obviously, this should actually be a single line, but I have condensed it here as much as was reasonable for readability. You can find the unmodified template at my Github repo.
- The value for
<EFModel>is the name of the Entity Framework Model in your project - The value for
<AzureDatabaseName>is obviously, the name of your deployed Azure SQL database. - When you initially set up your SQL Database, you will have created the values for
<UserLogIn>and<UserPassword>. Replace those bracketed items with the values you created with the database. - To find the value to use for
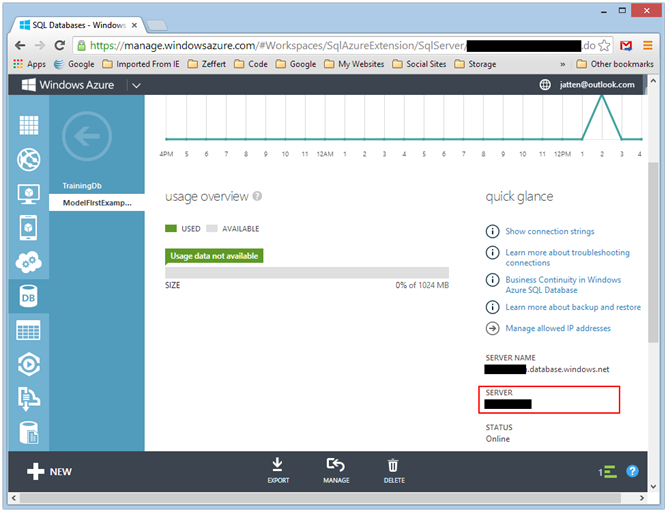
<AzureServer>, navigate to your Azure SQL Database management area in the Azure Portal SQL Databases => Database Name => Dashboard. Replace<AzureServer>with the value from your own configuration called out (but redacted) in red below:
Find the Value for <AzureServer> in SQL Database Dashboard:
Filling in the Example Azure Connection String Settings
So, that all seems like a lot to have read just to get to this, but here goes . . . Your DefaultConnection is already defined, and points directly at your Azure SQL Database. Assuming your ASP.NET Membership tables are all defined in your one application database, all we need to do is paste in our EF Model-First connection string, once we have replaced the placeholders with the values for our own SQL Database, and configure the rest of the connection string (again, it is important that the NAME value here match the name defined for this connection in Web.config).
In the case of our initial example from the beginning of this post:
- The NAME is ExampleDbEntities
- The Connection String for the example at the beginning of the post is (Remember this actually needs to be all in a single line, not formatted with line returns like this)::
metadata=res://*/Models.ExampleEntities.csdl|res://*/Models.ExampleEntities.ssdl|res://*/Models.ExampleEntities.msl;
provider=System.Data.SqlClient;
provider connection string=
"data source=tcp:MyAzureServer.database.windows.net;
initial catalog=ModelFirstExampleDb;
Persist Security Info=True;
User ID=MyUserLogin@MyAzureServer;
Password=MySuperSecretPassword"
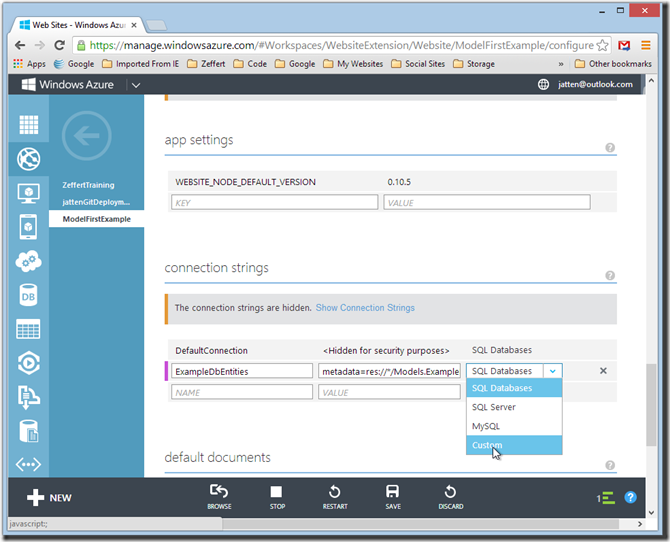
Lastly, there is a drop-down selector for the provider type. The default is SQL Databases, but for Entity Framework, we want to select the “Custom” option.
If we were configuring the example from the beginning of this post, the configuration settings on the Azure portal would look something like this:
Once you have entered all these values, Click the Save icon at the bottom of the window. \
Troubleshooting
There are a lot of places for this to go just slightly wrong, thus borking your connection. For example, if you are developing against a local development database, and it is named slightly different than your Azure SQL Database, your will get an exception if this is not correctly addressed in the Azure Connection string. Also, there are simply a lot of places where a typographical error might creep in when replacing the values in the connection string template with your actual values.
Another area to keep an eye on is that your production database on Azure is identical to your development database. While we are working under the premise that the database is driving our development, it is possible that changes may be introduced to one and not the other.
Unfortunately, when we work in the Model-First approach, we don’t get the easy database creation during deployment. Therefore, it is important to keep the database schema’s in sync.
Windows Azure offers a number of helpful features in this regard. I will take a closer look at the overall building out data-backed websites on Windows Azure in an upcoming post.
Additional Resources and Items of Interest
- Reverse-Engineering an Existing Database in your ASP.NET MVC Application Using Entity Framework Model/Database-First
- Deploying an Azure Website from Source Control
- ASP.NET MVC: Configuring ASP.NET MVC 4 Membership with a SQL CE Database
- Building Out a Clean, REST-ful Web Api Service with a Minimal Web Api Project
- Creating a Clean, Minimal-Footprint ASP.NET WebAPI Project with VS 2012 and ASP.NET MVC 4
- C#: Query Excel and .CSV Files Using LinqToExcel


Comments