NOTE: I do a LOT of handholding in this article. I wanted to be sure someone who is less-than-familiar with the Linux Command Line Interface and/or SSH would have no trouble understanding what is going on. Here are some navigation links to more readily find what you need:
- Install OpenSSH on your Linux Machine
- Install PuTTY on Your Windows Machine
- Create Public/Private Key pairs with PuTTYGen
- Configure PuTTY for Initial Login to Your Linux Machine
- Your First Login Using Password-based Authentication
- Add Your Public Key to the Linux Authorized Keys List
- Configure PuTTY for Key-Based Authentication
- Connect to Your Linux Machine using Key-Based Authentication
- Set Key File Permissions
- Increase Security by Editing the SSH Configuration File to allow Key-Based Authorization ONLY
Getting to Know Linux
I have recently undertaken to learn how to develop on the Linux platform. I grew up in the Windows world, and decided it was time to expand my horizons. After all, the vast bulk of the web runs on some variant of Linux, and some of today’s most in-demand web application development occurs in Ruby on Rails, which is most at home on a Linux machine.
What I have found so far is that there is a whole lot to like about this strange new OS, and the underlying philosophies and tools which form the core of the Linux experience.
One of the very first things I wanted to do was learn how to access a Linux box remotely from my Windows desktop. The first step in this process was understanding how to set up a Secure Shell (SSH) connection. At first it might seem this is a little redundant, since my Linux machine sits about 9 feet away from my Windows development box. However, this is a necessary first step in order to eventually be able to:
- Spin up a Linux VM instance on a IAAS/cloud service such as Amazon EC2 and/or Windows Azure, and control/access/utilize it from my windows desktop.
- Set up and manage a hosted Linux server for deployment of web applications/sites
- Understand remote access in a Linux environment
Of course, on top of those items in the list above, this was also a good exercise to get me started doing useful things with my new Linux machine!
Minor Linux Familiarity Required
We will need to perform some Linux commands via the Bash Command Line Interface (CLI), both on our Linux machine, and through our remote connection once we get it set up. If, like myself, you are new to Linux, you may want to review some Bash basics. While the posts linked to below are parts of a series on using Git version control, each of the following focus on basic Bash commands used to navigate and manipulate files in a Linux system.
Review Basic Bash Navigation:
- Getting Started with Git for the Windows Developer (Part II) – Get Acquainted with Bash
- Getting Started with Git for the Windows Developer (Part III) – Working with Files Using Bash
Setting up the Linux Machine
I am using Linux Mint for my first forays into the Linux world. Mint is built atop Ubuntu, and features a friendly GUI for those of us just getting started. However, for me, the GUI is mainly for those “oh shit, I don’t know what to do” moments. One of my main purposes in setting up this machine was to utilize the Bash terminal as much as possible, and master this aspect of this new platform. In fact, we are going to perform this entire exercise using the Bash terminal when interacting with the Linux box.
For this post, I am dealing with a local Linux machine, on my home network behind a router. In another post, I will discuss exposing the machine to the outside world via the internet.
Installing OpenSSH on your Linux Machine
Having recently installed a fresh Mint OS, the first thing we have to do is install an SSH server. Your Linux Distro may or may not come pre-configured with OpenSSH, which I understand is the SSH server of choice in Linux-land.
Linux distro’s based on Debian-flavored Linux use the apt-get install newSotwareTitle to find and download software packages, and/or confirm and update existing installations if they are already present on your machine. So, let’s use apt-get to download OpenSSH on our Linux machine (note – this post assumes you have super-user/administrative permissions on your Linux machine):
Install OpenSSH:
Open the Bash terminal on your Linux machine, and type the following command and hit enter. Since you are using sudo to perform this action, be ready to enter your password prior to execution:
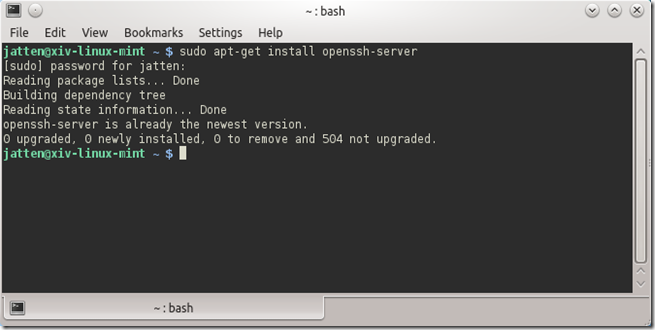
Install OpenSSH Server:
$ sudo apt-get install openssh-server
In my case, OpenSSH was already present on the system, so my terminal output looks like this:
If your machine did not have OpenSSH Server installed, the terminal will ask that you confirm installation/update of any number of packages. Type “Y” and hit enter. You will then see the terminal window populate with the actions taken and packages added.
Now, we could do some of the SSH server configuration right now at our Bash terminal. However, instead, I am going to move over to the Windows side, and do the rest of the configuring from there, by way of an SSH connection.
The Most Common SSH Client for Windows – PuTTY (no, that is not a typo)
Use of the SSH protocol is less common in the Windows universe then in Linux. However, the most popular SSH client for use on a windows machine is PuTTY, an open source terminal emulator which can act as a client for SSH, Telnet, and other protocols. To get started setting up your SSH client on Windows, visit the PuTTY download page, download and install putty on your machine. The easiest way to go is to download the putty-0.62-installer.exe package, which includes everything required for our purposes:
Once the download completes, run the installer.
Use PuTTYGen to Create a Public/Private key pair for your Windows client machine
SSH utilizes Key-based authorization to ensure the security of a connection. A simple description of how this works (From Wikipedia):
SSH uses public-key cryptography to authenticate the remote computer and allow it to authenticate the user, if necessary.[1] Anyone can produce a matching pair of different keys (public and private). The public key is placed on all computers that must allow access to the owner of the matching private key (the owner keeps the private key secret). While authentication is based on the private key, the key itself is never transferred through the network during authentication.
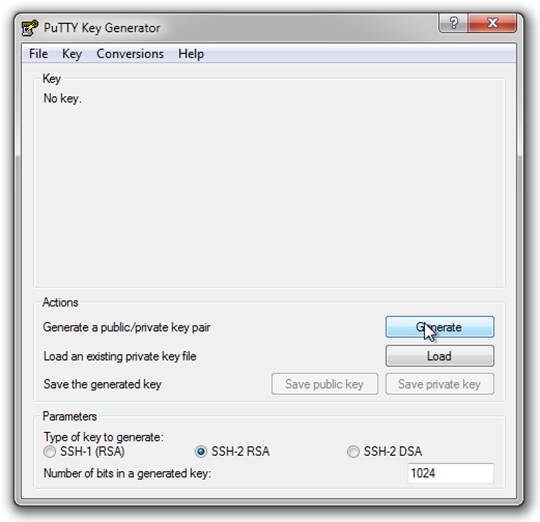
For our purposes, we will use the Handy PuTTYGen utility installed with our PuTTY package to create our keys. Open PuTTYGen (Start Menu –> PuTTY (Folder) –> PuTTYGen (application)) and you should see the following:
PuTTYGen, Ready to Create a Public/Private Key Pair:
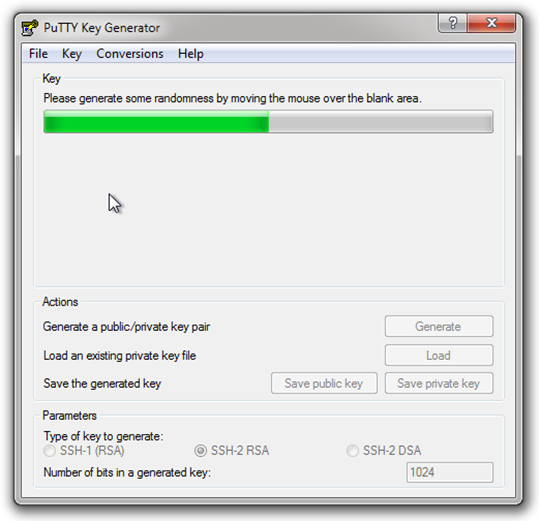
Leave the settings at their defaults, and click the “Generate” button. PuTTYGen will request that you move your cursor about in the large empty area in order to ad some “randomness” to the process (and in fact will pause generation until you DO):
When key generation is complete, you will be presented with some additional settings to complete before saving your keys:
Complete the Following Items in the Generator Form as follows:
- Key Comment can technically be anything you like, but convention is to use your email address
- The Key Passphrase is not required, but is strongly recommended as an additional level of security, just in case anyone were to get hold of your private key. Use a reasonably strong (but easy to remember) pass word here.
Once you have completed these items, it is time to save your keys. First, I would create a directory (folder) in your Windows User Folder named “SSH Keys” in which to store your private keys. Then, click the “save private key” button and save the key there.
NOTE: Don’t use the “Save Public Key” feature. OpenSSH expects the public key in a slightly different format than PuTTYGen provides, so instead, we are going to copy the key as presented in the PuTTYGen window straight into our authorized_keys file once we log into our Linux machine.
ALSO NOTE: It is not necessary to save the public key which corresponds to the private key we just made, because we can use the PuTTYGen “Load” button to load our private key, which will then also load the proper public key data back into the Public Key Window for copying once again.
Leave the PuTTYGen Window open, and lets configure PuTTY for our first login.
Configure PuTTY for the Initial Login
The first time we log in to our Linux machine, we will use plain old password authentication, so that we can pass our public SSH key directly over the (relatively) secure connection, and avoid exposing it in a way which might result in someone else getting ahold of it. This is also good practice in a number of different ways.
Open the PuTTY application (Start Menu –> PuTTY (folder) –> PuTTY (application))
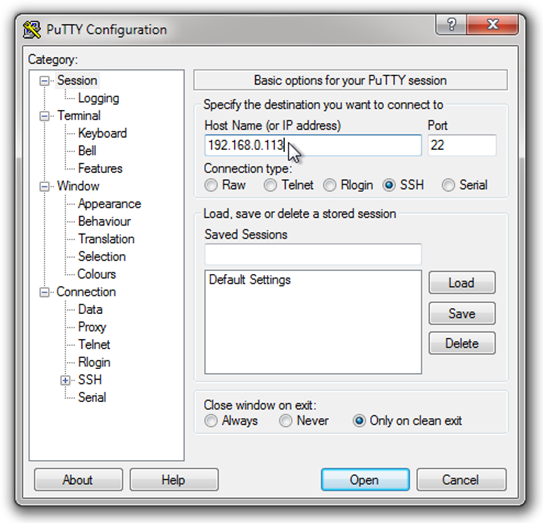
Enter the IP Address of your Linux Machine:
As you can see in the picture above, enter the IP Address of the Server machine (your Linux box). If you don’t know what the IP address of your Linux machine is, follow this link:
Leave the port specification as the default value of 22 (this is the standard port used for SSH logins). While there are potential security reasons to change this later, for now it will do.
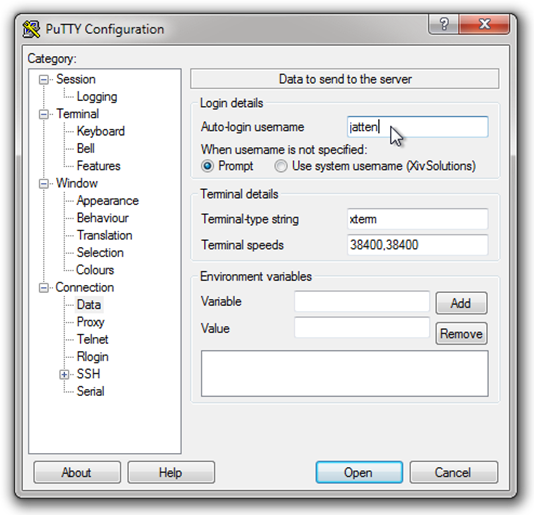
Next, in the tree menu to the left, select the Connection/Data node and enter your user name you use to log in to the Linux machine (REMINDER – we are assuming your user profile includes super-user permissions):
Enter your User Name in the Connection/Data node form:
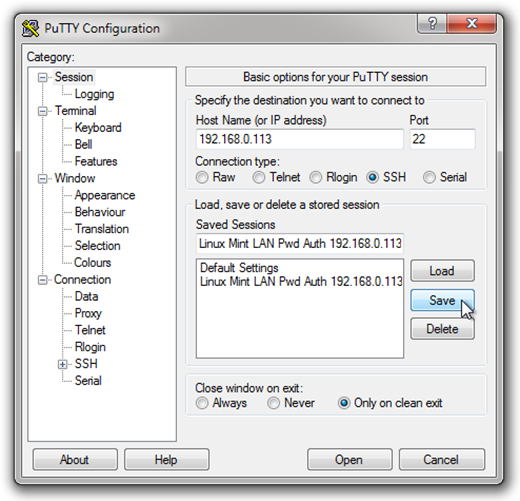
Leave the rest of the settings at their default values (as shown above). Now, go back to the Session node, and enter a name for this configuration in the “Saved Sessions” space, then click “Save. In my case, I saved this session configuration using the IP address, and a brief description of the configuration:
First Remote Login to your Linux computer with Password Authentication
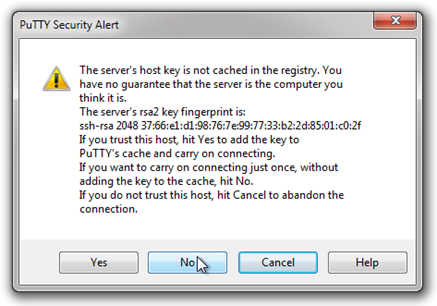
Ok, with those details tended to, click on the “open” button. This first time we log in, you will likely be presented with a warning dialog telling you that there are no keys cached for the server you are attempting to connect to, and do you wish to cache them now:
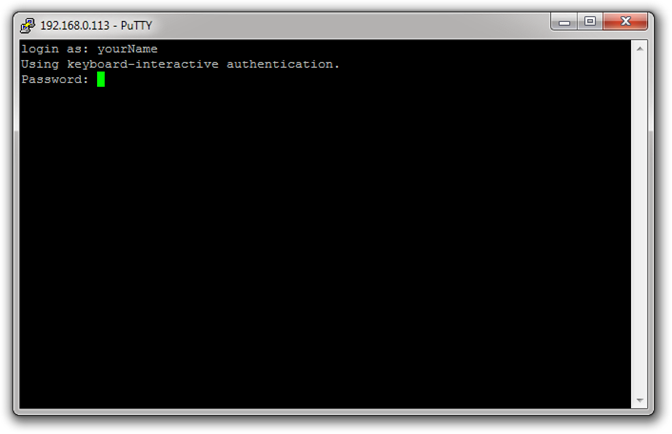
Since we know this machine is on your LAN go ahead and click “Yes.” You should be presented with a terminal window that looks like this:
Next, enter the password you use to log in to your Linux machine and hit enter (note that in the terminal here, the cursor does not move, nor are standard obfuscated password placeholders used – in other words, as you type your password, it will appear as if nothing is happening). Your terminal should now resemble this:
Congratulations – you have now logged into your Linux terminal from your Windows computer. However, we are not yet using SSH, and in fact this method is not a very secure way to remotely access another machine. Next we need to set up our key-based authentication. Once we have confirmed all is well with that, we will disable the Username/Password-based authentication we are using now in favor of the much stronger key-based security.
Add Your Public Key to the Linux Machine
Your Linux system stores public SSH keys for client machines in a directory within your Linux home user folder (the .ssh directory), in the authorized_keys file. Your next step depends upon whether there is already an .ssh directory on your machine, and whether or not there is already an authorized_keys file present. We can find this out quickly enough by attempting to navigate into a directory named .ssh from within our home folder (our terminal should have opened within our home folder.
If you are not familiar with navigation and basic file manipulation in Bash (the Linux terminal), have a quick look at these two articles I wrote. The articles are part of a series on using Git, but these two focus on basic Bash shell commands useful for file and directory navigation:
- Getting Started with Git for the Windows Developer (Part II) – Get Acquainted with Bash
- Getting Started with Git for the Windows Developer (Part III) – Working with Files Using Bash
First, let’s attempt to navigate into the .ssh directory on our remote Linux box. Type the following into the terminal window (note – the “$’” symbol is not typed – this is the command “prompt” and indicates that the terminal is ready for command input):
$ cd .ssh
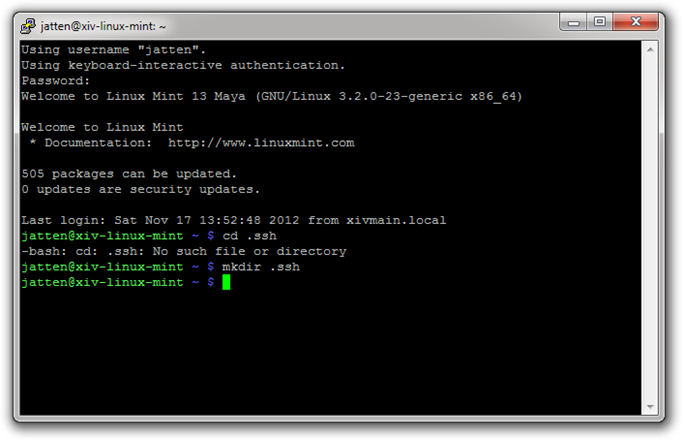
If there is not already a directory named .ssh in your user folder, your terminal window should look like this:
If this is the case, we need to create a new .ssh directory. Type the following:
$ mkdir .ssh
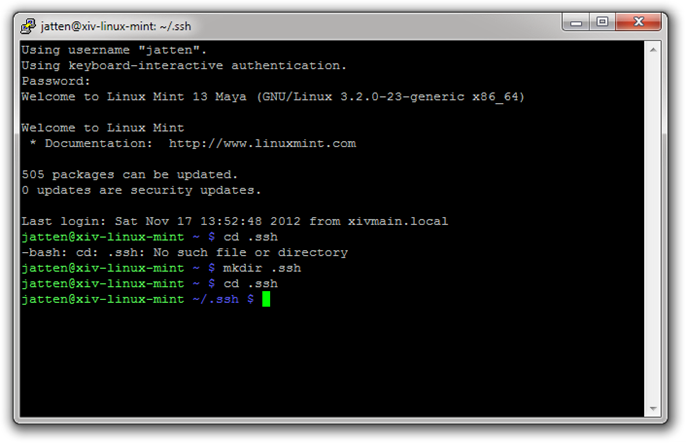
Now your terminal should look like this:
Now let’s try navigating into the new directory:
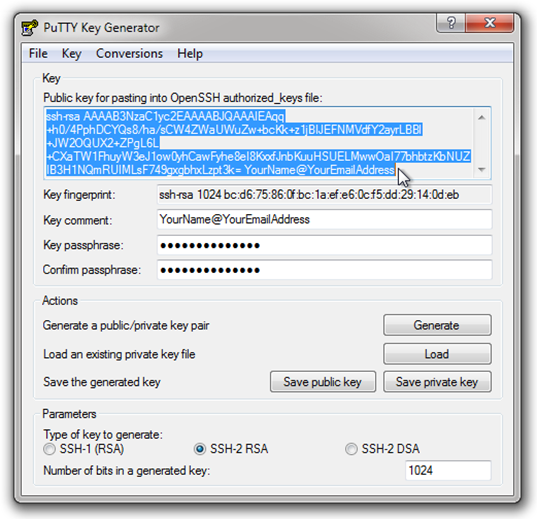
That’s more like it! Next, since there was no .ssh directory to begin with, we also need to create our authorized keys file. We are going to create a new file, and add our new public key all in one fell swoop. Go to the PuTTYGen window (still open on your Windows desktop), and select and copy the entire public key visible in the space labeled “Public key for pasting into OpenSSH authorized_keys file”:
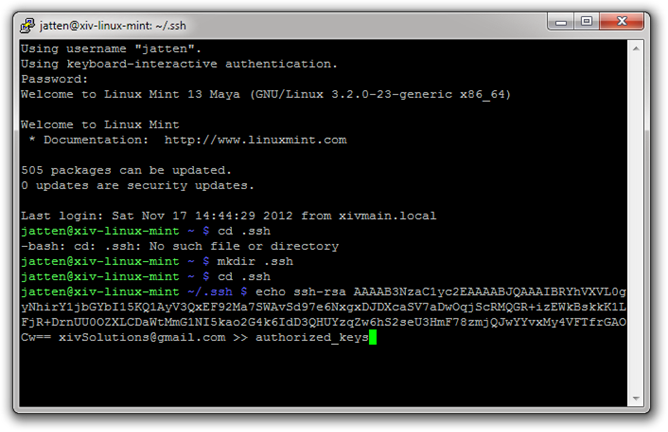
Now we will use the echo command to create the new authorized_keys file, and insert the Public key for our Windows machine. The syntax of our echo command is as follows:
echo YourPublicKey >> authorized_keys
This command will append YourPublicKey to the file authorized_keys. If the file does not exist, it will be created (ours doesn’t exist yet. If yours DOES, don’t do this this way).
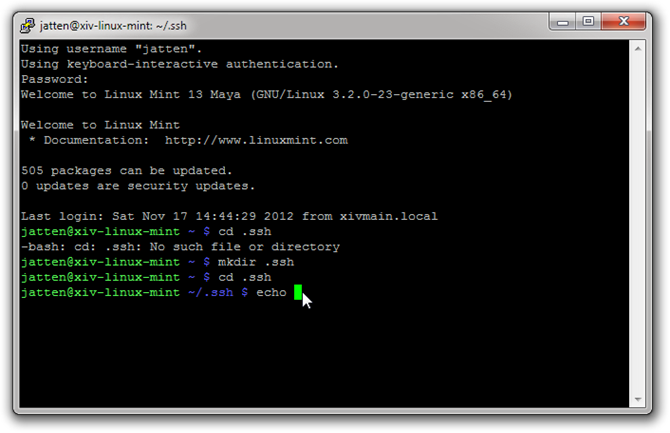
First, type the echo command into the Linux remote terminal like this:
Then, if you right click your mouse pointer at the terminal cursor, the contents of your clipboard (containing your newly created public key for your Windows machine) will automatically paste into the current line.
Then add the >> authorized_keys to the end, and hit the Enter key:
Now that we have added our public key to the Linux machine, lets end our PuTTY session, and see if we can log back in using Public/Private key authentication. If this works, we will then modify our OpenSSH server configuration on the Linux box to ONLY allow this type of authorization. Go back to the Putty window, and close it. This will end the session.
Configure PuTTY for Public/Private Key Authorization
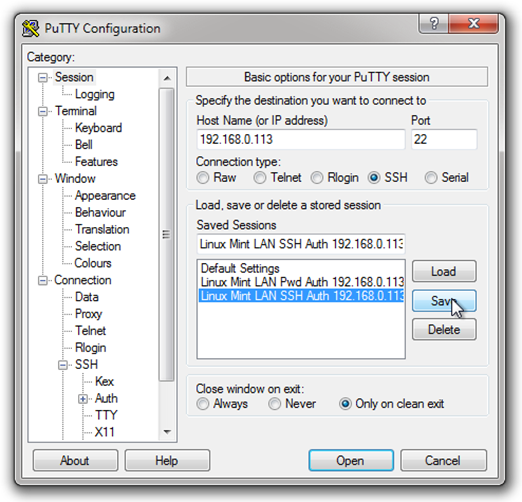
Now, open PuTTY again, and in the tree control to the left, load your previously saved session configuration, select the Connection/SSH/Auth node. Browse to find your private key you created using PuTTYGen, and select it for use. Leave the rest of the settings at their default values for now:
Next, return to the Session configuration node, and type a new name for this modified configuration. As previously, I used the IP address, in conjunction with brief configuration details. Then click “Save”:
Connect to Linux/OpenSSH Server using Public/Private Key Authorization
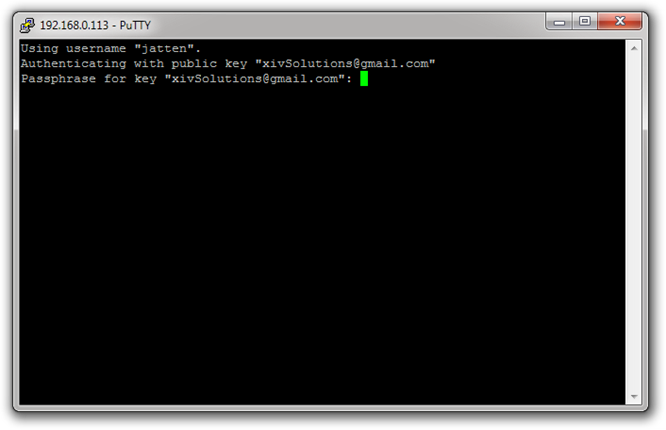
Ok, let’s try connecting now, using our new configuration. Click on the Open button on the PuTTY interface. You should see something like this:
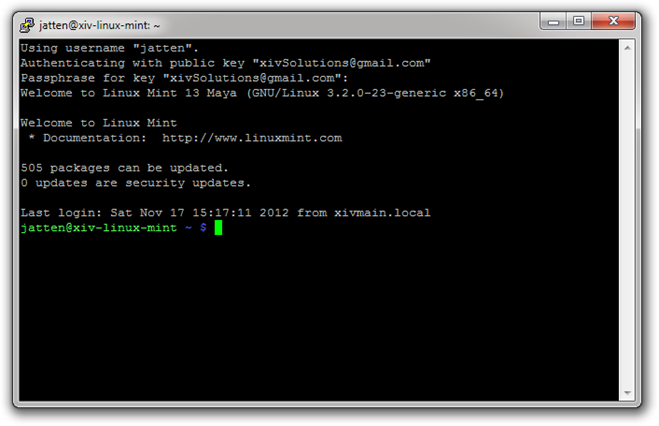
Notice that this time, PuTTY tells us it is attempting to log in using public key authentication, and prompts us for the password we associated with our key when we created it. Enter the password you used when creating the key (again, the cursor will remain still while you do this), and hit Enter:
Congratulations! You have now logged in to your Linux machine using Public/Private key authentication. While we are connected remotely, let’s tidy up a few loose ends.
Set Permissions on Keys File to Owner/Read-Only
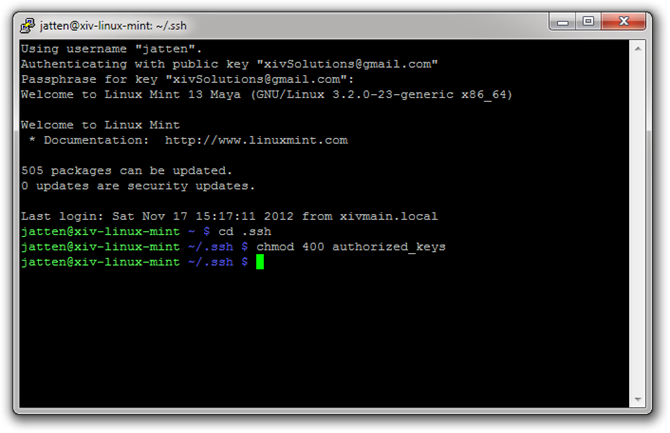
Now that we know our keys are working properly, let’s protect the authorized_keys file on our Linux machine so that we don’t accidentally modify or delete it. Navigate into the .ssh directory, and type the following command into the Bash terminal:
chmod 400 authorized_keys
This sets the permissions on our authorized_keys file so that the current user, and only the current user has read-only permissions, and no one else can even access the file (that specific user can make the file writeable for themselves again by using chmod 700).
Edit the OpenSSH Configuration File to Disable Password Authentication
Now that we have a working key-based authentication scheme, we have no more need for the less-then-secure password-only security we used previously. In fact, our next step will be to edit the OpenSSH configuration file on our Linux machine to NOT allow that, and to ONLY accept key-based authentication.
First, let’s make a backup copy of the configuration file. Type cd to navigate back to your home directory (entering cd with no options or destination path returns you to the home directory by default), then create a folder in your home directory to store backups like this:
$ mkdir ssh_config_backup
Then, use the following command to make a copy of the configuration file in the new directory we just created (note: Since we are using sudo, we will be prompted for the user password we use on the Linux machine):
$ sudo /etc/ssh/sshd_config ~/ssh_config_backup
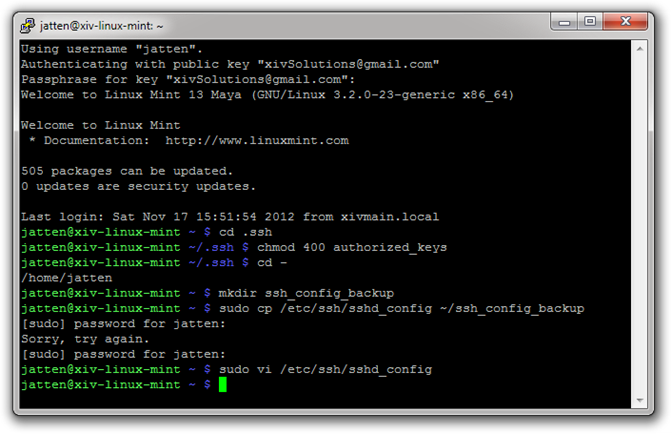
Next, we will open the sshd_config file using vi in terminal mode. Type the following:
$ sudo vi /etc/ssh/sshd_config
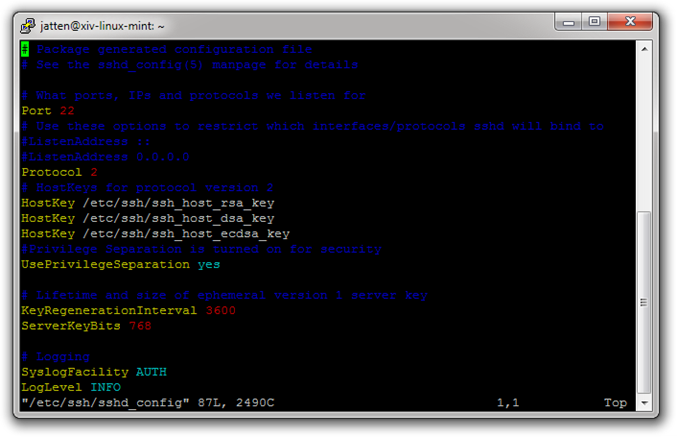
Again, you will be promoted for your password on the Linux machine. You should see something like this after hitting the Enter key:
A few things to note:
- I recognize it is difficult to see the dark blue text here. It will be easier to read on your actual screen
- Notice that we are no longer in the Bash terminal per se, but instead looking at the text of the sshd_config file within the terminal.
- At the moment, you cannot edit anything – vi is in command mode.
We will use a few (very few) basic vi commands to get this done. The Commands we need to edit this document are:
- Use the up/down/left/right arrow keys to navigate within the document, and to position your cursor within a line of text.
- If vi is in Command Mode, type i (lowercase i) to enter Insert mode.
- If vi is in Insert mode, press the Esc key to return to Command Mode.
- When you are finished editing, type :wq (colon then lowercase w the lowercase q) to save and exit the document, returning to the Bash Terminal proper.
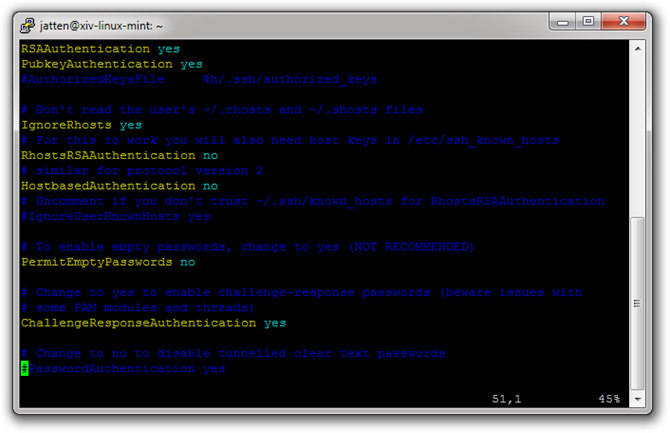
Now, using your down arrow key, move down the document a ways until you find this line:
#PasswordAuthentication yes
We want to change it to:
PasswordAuthentication no
The hash symbol at the beginning of this line means that it has been “commented out” (meaning it is ignored when the OpenSSH server refers to this file during configuration). In addition, note its value is set to yes:
First, type lowercase i to enter Insert mode, and delete the hash symbol. Then, use your right arrow key to move to the end of the line, and change the yes to no. Now press the Esc key to return to Command mode.
You would think this would be the end of it. However, at least in my current Linux Mint system, we also have to disable the Password Authentication Modules (PAM) portion of the config file (this is usually the last line in the file). To do this, use your down arrow key to navigate through the document until you find the following line:
UsePAM yes
We want to change it to:
UsePAM no
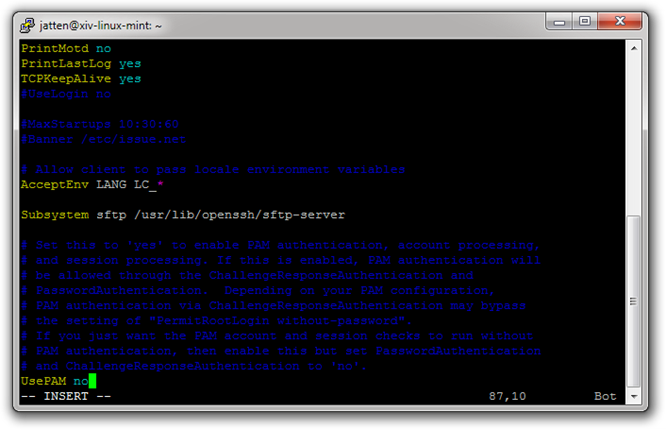
Your screen should look like this: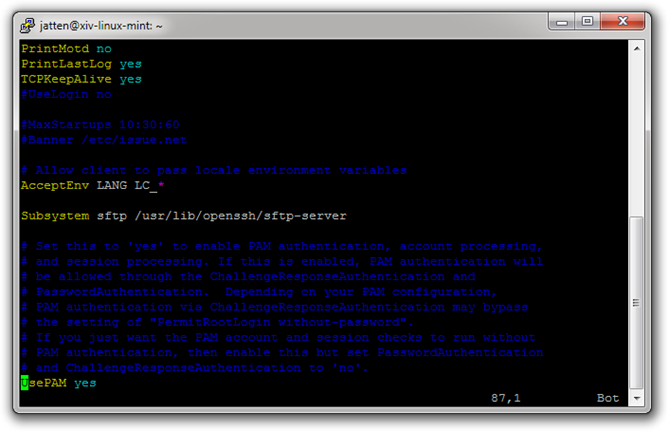
Use your Right-Arrow key to move to the end of that line, and type I to enter Insert Mode. Change the yes to no, then press the Esc key to return to Command Mode:
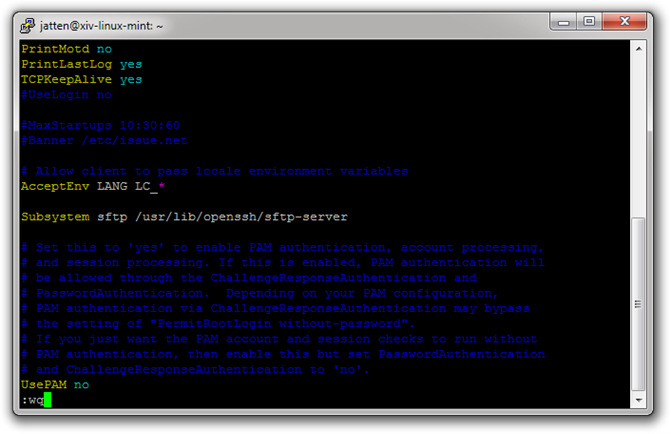
Now, once safely back in Command mode, type the following:
:wq
As you type, this command will appear at the bottom of the vi screen.
Once you hit enter, the modified file will be saved, and you will be returned to the Bash terminal:
Restart the SSH Server
As a final step, we need to re-start the SSH Server on the Linux machine in order that the configuration changes we just made a reflected in the service. Type the following command into the terminal and hit enter:
$ sudo service ssh restart
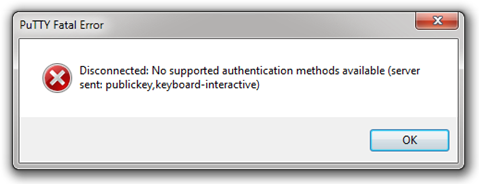
Ok, now exit the current PuTTY session by closing the PuTTY window. Let’s see if we have succeeded in denying access for those seeking to login using simple password authentication. Re-open PuTTY, and load your original session configuration, which we set up without the key-based authentication using only our user name, and attempt to log in. If we have done everything correctly, you should be greeted with THIS unpleasant artifact:
Hopefully, this has helped some of you get started using OpenSSH and PuTTY to connect to your Linux machine from a Windows box remotely. Of course, this is of limited usefulness when like me, your two machines are in the same room. In a future post I will discuss using SSH to connect to your Linux machine from the internet at large, and in conjunction with VNC to create a very secure Remote Desktop Connection.
Additionally, I began exploring this because my next goal is to utilize cloud services such as Amazon EC2 and Windows Azure. In that context, I want to be able to spin up a cloud-hosted Virtual Machine (VM) and perform this type of administrative stuff.
Please feel free to leave constructive feedback, and especially, to bust me where I have made a mistake or am propagating bad information. Comments are greatly appreciated!
![PuTTY-Key-Generator-Comment--Passwor[2] PuTTY-Key-Generator-Comment--Passwor[2]](/wp-content/uploads/imported/PuTTY-Key-Generator-Comment--Passwor%5B2%5D_thumb.png)
![PuTTY-First-Login-Terminal-Logged-In[2] PuTTY-First-Login-Terminal-Logged-In[2]](/wp-content/uploads/imported/PuTTY-First-Login-Terminal-Logged-In%5B2%5D_thumb.png)
![Navigate-to-ssh-directory-not-exists[2] Navigate-to-ssh-directory-not-exists[2]](/wp-content/uploads/imported/Navigate-to-ssh-directory-not-exists%5B2%5D_thumb.png)
![PuTTY-Configuration-Load-Private-Key[2] PuTTY-Configuration-Load-Private-Key[2]](/wp-content/uploads/imported/PuTTY-Configuration-Load-Private-Key%5B2%5D_thumb.png)
Comments
 Rob Connacher
AuthorHi, I know this is an old post, but if your still “listening”, just wanted to say thanks. I am a newbie at this Linux stuff and am trying to set up a headless Ubuntu build to run my 3D Printer. I had previously used SSH run it, but was not aware that it was not very secure not using the “keys”, i just used the password authentication. Thank you very much for enlightening me. Also, I had a bit of trouble with the “copy” command.. Wish I had read the comments, would have saved me some internet searches.. lol Live and learn. Otherwise, thanks again for a great guide!
 Jeff Fontenot
AuthorI get “Server refused our key” in putty on your step “Connect to Linux/OpenSSH Server using Public/Private Key Authorization”. Any suggestions?
 Bitabond
AuthorGreat article, thanks!
I believe you’re missing the “cp” command in one of your steps:
$ sudo /etc/ssh/sshd_config ~/ssh_config_backup
should be
$ sudo cp /etc/ssh/sshd_config ~/ssh_config_backup
Cheers
 John Atten
AuthorArgh. Thanks – yeah, there are a few areas on the linux stuff I’ve written about that need some attention – thanks for taking the time to comment