Compile for Distinctly Different Environment Configurations
NOTE: Source code for the example project in this article can be found at my Github repo.
I already understand most of this. Take me straight to the code!
I am currently working on a boring, enterprise-ey database application. You know the type – We needed it yesterday, it was built on the fly with minimal up-front design time, and pressure from on high to deliver SOMETHING right away, even if it sucks, they say, it will be better than what we have now. You KNOW, if you have read this far, that you have worked on projects such as I describe here as well. Probably many. You just don’t want to admit it. It’s OK. Admit it, and move forward. You’ll feel better.
Yes, yes, I know. This is where I am supposed to set management straight on the error of their ways, sell them on the idea of investing in an iterative design cycle, Agile/Test-Driven development methodology, the works.
Not gonna happen here, unfortunately.
SO. As the code progressed and bits and pieces of this monstrosity entered live testing and production, I am having to continue work on the rest of the application, adding features, fixing bugs, etc. Unfortunately, this application must be able to run in a couple of different scenarios:
- On my Dev machine at home (locally).
- On my Dev machine at work (locally).
- On a test server at work (Database and file persistence via LAN)
- On the production server at work (LAN, again)
- On a remote laptop with no LAN connection – files and data persisted locally until home
The database connection information is different for each of these scenarios. Also, this application persists copies of photographs and other files and stashes the directory information in a database record. The actual file location is different in each scenario as well (and hidden from the user). File access is performed through the application. In all cases, the settings required to achieve all this should NOT be available to the user (although ultimately, some level of admin functionality might be incorporated. But not right now . . . ).
My Solution – Set Application Settings at Compile Time
I will say right here that this is most likely a hack solution to what is ultimately an application design issue. I have heard it said that the use of conditional compilation is often a strong code “smell” indicating a potential area for redesign. However, in my case, I needed a fast answer.
I have identified five possible environments within which the application must run, each of which require the same code base, but different application settings. For this example, I will leave the default Debug and Release configurations as they are, and simply create two additional configurations, LIVE and TEST. Once I have done this, I can define Conditional Compilation symbols, and load different application settings depending upon which build configuration is running.
Set Up Build Configurations Using Build Configuration Manager
First, I will use the Build Configuration Manager within Visual Studio to create my Build Configurations. Configuration Manager allows you to create, customize, and manage build settings for all projects within the current solution. For this example, there is only a single project. Open Build/Configuration Manager . . .

From the drop-down menu in the Configuration Manager, select <New>:

I create a new Build Configuration named LIVE, and copy settings from the default Release configuration:

I then repeat these steps to create a TEST configuration (and as many others as I might need).
Since I am creating a simple example project for this post, there is only one project visible in the Configuration Manager list. However, if there were additional projects within this same solution, I would be able to assign different configurations to each, an indicate specific projects within the solution to build or not.
Define Conditional Compilation Symbols for Each Build Configuration
Now we need to define Conditional Compilation symbols for each build configuration. Open the Project Properties window from the solution explorer, and select the “Build” tab. in the dropdown list of available configurations, you will now see the default Debug and Release options, as well as your newly defined LIVE and TEST configurations. First we will select the LIVE configuration, and add a Conditional Compilation symbol in the space provided. Because I like to keep things simple, we’ll use “LIVE” as our symbol:

Then select the TEST configuration from the drop-down menu, and repeat the same steps, typing “TEST” into the Conditional compilation symbols space.
We have now defined a symbol for each of our two build options. Now let’s look at how we can use these in our application to load build specific application settings at compile time.
Define Version-Specific Resources, and General Application Settings
Ok. Here’s the meat and potatoes of the whole thing. First, we need to define our application settings. One of the reasons I chose to take this approach is that application settings can be accessed and modified without having to recompile the application. Same with resource files. For ease of making changes to a compiled application which is being used for production, I am going to define a couple of output file paths, and save them as resource files. I will also create a string message for each version, which we will use for illustrative purposes in this example.
First, create text files with the following text, either in your preferred text editor, or using the “Add New Text File” option in the Resource Manager:
| File Name: | Text Content: |
| LiveOutputFolderPath.txt |
C:\LiveOutputFolder\ |
| TestOutputFolderPath.txt |
C:\TestOutputFolder\ |
| LiveVersionMessage.txt |
This is the LIVE version of the Application |
| TestVersionMessage.txt |
This is the TEST version of the application |
Add the resource files to your project in the Resource Designer:

Next, define version-agnostic Application Settings using the Settings Designer like so (leave the values empty – these will be set at compile-time). Make sure to set the scope for each setting to “Application” and not “User”. Name one setting “BuildVersionMessage” and the other “OutputFolderPath”:

Ok. See that “View Code” menu item near the top of the Settings Designer window? Click on that. You should see a code file open to display a partial class file for the Settings Designer. This is where we get down to business.
Code: Setting Application Settings Values at Compile Time
When the Settings.cs file first opens, you will see some VS-generated code in the file. I deleted all that – we’re not using it here. Replace it with the following code (the complete source code for this example project is available from my Github repo):
8/19/2012 8:00 AM – UPDATE: I added similar code for the default “Debug” and “Release” configurations to the example project in my Github repo. The only difference is that these two methods explicitly specify Environment.CurrentDirectory as the root directory instead of using a resource file to grab the directory path. If you run the following code as-is under the Debug or Release build configurations, things won’t work the way you expect!
 using System.Diagnostics;

 namespace WindowsFormsApplication1.Properties
 {

     internal sealed partial class Settings
     {
         public Settings()
         {
             // Each method corresponds to a build version. We call both methods, because
             // the conditional compilation will only compile the one indicated:
             this.SetLiveApplicationSettings();
             this.SetTestApplicationSettings();
         }

         [Conditional("LIVE")]
         private void SetLiveApplicationSettings()
         {
             // Set the two Settings values to use the resource files designated
             // for the LIVE version of the app:
             this["BuildVersionMessage"] = Resources.LiveVersionMessage;
             this["OutputFolderPath"] = Resources.LiveOutputFolderPath;
         }

         [Conditional("TEST")]
         private void SetTestApplicationSettings()
         {
             // Set the two Settings values to use the resource files designated
             // for the TEST version of the app:
             this["BuildVersionMessage"] = Resources.TestVersionMessage;
             this["OutputFolderPath"] = Resources.TestOutputFolderPath;
         }
     }
 }
Note the use of the Conditional Attribute For the SetLiveApplicationSettings and SetTestApplicationSettings methods. Because we have used this attribute, and made reference to our version-specific Compilation Symbols for each, the code for either of these methods will only be compiled for that specific version identified in the Conditional Attribute. We call both methods from the Settings() constructor, so that whichever version is compiled will be called during initialization.
What is important here is to get the string representations for each of the Compilation Symbols correct, as well as the Setting names, used as keys to access the specific Settings properties. Misspellings here will cause the code to fail.
Demonstration of Conditional Compilation
To demonstrate how this works, create a simple Form in the designer, like this:

Name the Label “lblHeader” and the Button “btnCopyFile” (yes, I still go a little Hungarian with my control names. Makes them easier to find with Intellisense, dammit . . .).
Now, use this code in the form (the complete source code for this article is available at my GitHub repo):
using System;
using System.Collections.Generic;
using System.ComponentModel;
using System.Drawing;
using System.Text;
using System.Windows.Forms;
using System.IO;

namespace WindowsFormsApplication1
{
    public partial class Form1 : Form
    {
        public Form1()
        {
            InitializeComponent();
            this.btnCopyFile.Click += new System.EventHandler(this.btnCopyFile_Click);
        }

        private void Form1_Load(object sender, EventArgs e)
        {
            // The BuildVersionMessage setting will be set at compile time:
            this.lblHeader.Text = Properties.Settings.Default.BuildVersionMessage;
        }

        private void btnCopyFile_Click(object sender, EventArgs e)
        {
            this.CopyFile();
        }

        private void CopyFile()
        {
            // The correct output file path will be defined at compile time,
            // and made available through the settings file:
            string outputDirectory = Properties.Settings.Default.OutputFolderPath;

            // Make sure the directory exists:
            if (!Directory.Exists(outputDirectory))
            {
                Directory.CreateDirectory(outputDirectory);
            }

            using (var fileDialog = new OpenFileDialog())
            {
                fileDialog.InitialDirectory =
                    Environment.GetFolderPath(Environment.SpecialFolder.MyDocuments);
                fileDialog.Multiselect = false;

                if (fileDialog.ShowDialog() == System.Windows.Forms.DialogResult.OK)
                {
                    string oldFullFileName = fileDialog.FileName;
                    string safeFileName = fileDialog.SafeFileName;

                    // Create a new File Name using the output directory
                    // defined at compile time:
                    string newFullFileName = outputDirectory + safeFileName;

                    // Check to see if a file with the same name already exists:
                    if (File.Exists(newFullFileName))
                    {
                        // File.Copy won't let us overwrite. Since the user has no knowledge
                        // of this directory, we just delete the old, and save the new:
                        File.Delete(newFullFileName);
                    }

                    // Copy the file into our secret hidden directory:
                    File.Copy(oldFullFileName, newFullFileName);

                    // ...
                    // Add code here to persist the file path and other information
                    // to the data store for access within the application . . .
                    // ...
                }
            }
        }
    }
}
Now, build and run the application under each of the LIVE and TEST Build Configurations. When we set the build configuration to TEST and run, the form opens as follows:
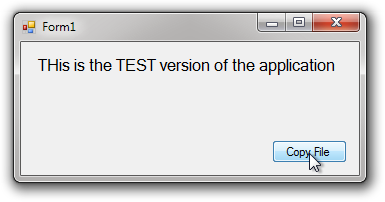 If we press the Copy File button, select a file, and hit OK, the file will be saved in the directory specified in the file we named TestOutputDirectory.txt. We can go to that directory in Windows Explorer and sure enough, there is a copy of the original file. Likewise, the text displayed in the form label is the text we saved in the TestVersionMessage.txt file.
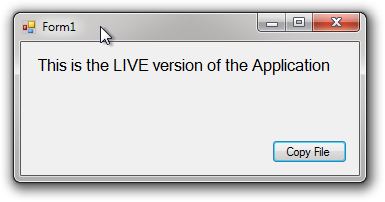
When switch to the LIVE build configuration, we see similar results. What’s cool here is that if we needed to, we could open the text files which serve as out string resources and modify the directory paths or message text, save, and these changes would be incorporated into our running application without recompiling. While this is not a new thing, we still maintain the integrity of our build-specific settings – the LIVE version will load those settings specific to that build, and likewise the TEST version.
Wrapping up
While this example has been simplified for the purpose of explaining what I did, the reality is that I was able to address the varying database connection and output folder requirements of my distinct application versions and tailor each to the environment in which it would run. When I compile and run the application on my home machine, I simply select the HOME build configuration. No messing about setting database connection settings or file directories. Likewise when I have added some new features to the production build. I simply select the PRODUCTION build configuration, and the network serve database connection and LAN network shares are all appropriately set so that code which requires those settings simply works.
Useful Links:
More information on Conditional Compilation and Conditional Methods in C#/VS:
- Pre-Processing Directives (MSDN)
- Conditional Compilation Directives (MSDN)
- Conditional Methods (MSDN)
Source code for example project:

Comments
 ThatsMe
AuthorThx for the explanations – helped ma a lot
 arul pushpam
AuthorNice Article!!
 Oxie
Oxie
AuthorHello John
I was wondering if it is possible to change MVC data annotations based on build configuration that have nothing to do with localisation?
For example, if I have build configurations BC1 and BC2, and I have a data annotation for an object property:
[Display(Name = “Asset”)]
public int Asset { get; set; }
I need to replace the word “Asset” with “VIN” for BC1 and “Order” for BC2.
Is it possible ?
Thanks,
Oxie