Having represented this site as a technology blog with a focus on programming and software development, I find myself starting off with a tutorial on Excel basics instead. Somehow, I thought it was going to be more glamorous than this . . . This is driven by my need to prepare a training for my staff at work, and in keeping with the DRY principle (Don’t Repeat Yourself) I am killing two birds with one stone. Anyone hoping to read programming stuff is just going to have to wait . . .
If you do not have Microsoft Excel on you machine, or if you are using an older version (I use Excel 2010 throughout this series) you might consider purchasing a copy. You can find many deals on-line, or even support my efforts with this site by using the links above to buy directly from Microsoft. I STRONGLY recommend against purchasing software from Craigslist or EBay. There is significant risk of purchasing illegal or pirated software from those sites.
If You’re Happy and You Know It, Clap Your Hands . . .
How many times have you wished you could do something with a column of data in your spreadsheet like say:
If the value in the first cell is “Happy” then display “Clap” in the current Cell. Otherwise, display “Don’t Clap”
A more concise way to put this might be:
If Cell1 = “Happy”, Then display “Clap” in this cell. Otherwise, display “Don’t Clap” in this cell.
To put this more generally, we might say:
If Some Condition is TRUE Then Do something. Otherwise Do Something Else.
Happily, Excel gives us a built-in function for just this purpose! But first, a quick review, for those not familiar with Excel’s function syntax . . .
Recall that in Excel, you use a built-in function by writing an expression using the function by name, and providing arguments between the parentheses where they are required. Some of the arguments may be optional (meaning you CAN provide them, but if you don’t Excel will use a default value instead). Arguments for a function are separated by commas.
Assistance Please?
Excel 2010 provides some assistance with using built-in functions. If you type an equals sign followed by the beginning of a function name into a cell, excel will pop up with a list of built-in functions which match the partial text you have typed. If you click on one of the functions available in the list, Excel will provide you with a brief description of what the function does:
Syntax Helper
If you select a particular function, and then type the opening paren, Excel will display a syntax helper which informs you about required and optional parameters used by that function. Required arguments are displayed in regular type, and optional arguments are displayed in regular type, but enclosed in square brackets:
A Silly Example of the IF Function
The syntax for using the IF function in MS Excel is as follows:
=IF(logical_test, [Value if True], [Value if False])
In which the first argument, Logical Test is bold. The logical_test specifies a logical (or Boolean) condition which evaluates to TRUE or FALSE. The other two arguments, [Value if True] and [Value if False] are in brackets, and in standard text, meaning they are optional. These arguments allow you to specify what your function should return for each case set forth by the logical_test.
Note that logical_test is a required argument. We must provide an expression of some sort which returns TRUE or FALSE in order for the function to work. However, we are NOT required to provide both of the other two arguments (although we DO need to provide one or the other). However, if we do not provide a value for either [value_if_true] or [value_if_false] the function will return plain old TRUE or FALSE respectively (depending upon how the logical_test evaluates), as default values.
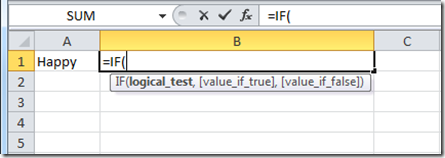
Note that if we type the beginning of our function into a cell, the syntax helper will remind us of this:
Now, let’s finish typing our function into the cell. We want to test the contents of Cell A1. If Cell A1 contains the text “Happy”, we want to display the text “Clap” in the current cell. If Cell A1 contains any value OTHER than the text “Happy”, we want to display “Don’t Clap” in the current cell. NOTE:when we specify strings of text as arguments, we enclose the text in double quotes.
Typing the IF Function:
In the image above, our logical test begins after the opening paren, and takes the form A1 = “Happy”.
- The value we wish to return if the test is TRUE, “Clap”, follows the comma after our logical_test.
- The value we wish to return if the test is FALSE, “Don’t Clap”, follows the comma after the value_if_true argument
- Then we make sure to type the closing paren, and hit enter:
The result:
Now, select Cell B1 again, right-click and select “copy” from the context menu. Then select cell B2, and use “Paste” from your right-click menu to paste the function into cell B2. Hit enter:
Paste into the cell below and hit enter:
Congratulations! You have just created your first conditional Function in Microsoft Excel!
What is Conditional Logic?
The capability to evaluate a pre-defined logical condition and respond one specific way if the condition is true, and another way if the condition is false, is known as Conditional Logic. When we discussed Data Types in Excel, we touched briefly upon the Logical Data Type, but only to lightly cover the bare essentials.
There is an entire branch of mathematics known as Boolean Algebra which examines logical operations. We are not going to go that deep here, but it is important to recognize that there is a core set of logical operations which can be effectively viewed as mathematics of two values, TRUE and FALSE (known by your computer, at the very lowest level as the numbers 0 and 1).
For the purpose of our discussion of Conditional Logic in MS Excel, there are three logical operations: IF, AND, and OR. Each of these functions works as you might expect, so long as you remember that the computer is literal, and applies no judgment to the evaluation. Also we must remember that in evaluating logical functions, the semantics we use depart slightly from the manner we might employ these devices in natural language.
In this post, we are going to take a more detailed look at the IF function. We will expand the discussion to include AND and OR in the next post.
IF is the most basic logical function, and the easiest to understand. IF Some Condition is met the result of an IF statement will be TRUE. In all other cases, the result will be FALSE. The following are valid examples of a logical IF statement in purely mathematical terms:
- IF 1 > 2 returns FALSE
- IF (2 = (1+1)) returns TRUE
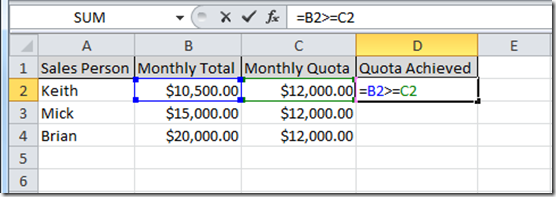
Within Excel, if we seek only to return a TRUE or FALSE, we do not need to use the IF function. We can simply test the validity of a statement be evaluating equality (or inequality) within an expression. For example, we might wish to know which sales people have met a specific sales quote for the month:
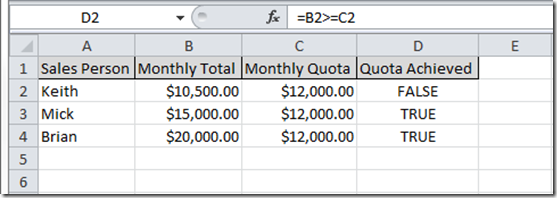
If we copy the formula above into the other cells in the column, our results look like this:
Nesting Expressions Within the IF Function
The previous example was somewhat trivial. Let’s examine something a little more complex. We might wish to award a bonus to those sales people who exceed their monthly quota by a certain amount or more. We decide that those who exceed the monthly sales quota by at least 20% will receive a bonus equal to 10% of the amount over the quota monthly quota. To put our problem into English, we might say:
If the Monthly Total is at more than 20% greater than the Monthly Quota, display a bonus equal to 10% of the difference between that Total Sales and The Monthly Quota. Otherwise display zero.
From this, we can see that our Logical Test is:
Monthly Total – Monthly Quota > Monthly Quota x .20
We can also see that, if the Logical test is TRUE, we want to display the result of the following statement:
(Monthly Total – Monthly Quota) x .10
If the Logical Test is FALSE, we want to display zero (no bonus).
If we type the formula above into our spreadsheet, then copy the formula into the remaining cells in column D, we see the following results:
Clearly, our compound function worked. We were able to nest some expressions into one or both of the output conditions and return a useful result indicating the proper bonus amount for each employee.
The IF function in Microsoft Excel adds an entire new layer to the possibilities for evaluating and manipulating our data. The syntax can take a little getting used to, and it is easy to miss a closing parenthesis when nesting other expressions as value_if_true and value_if_false. But IF is a powerful tool in your arsenal when creating spreadsheets, and I consider the IF function and its cousins AND and OR to be a must-have.
In my next post we will take a look at setting up more complex conditional expressions in Excel by adding the logical functions AND and OR into the mix.
_thumb.png)
_thumb.png)


Comments