Having represented this site as a technology blog with a focus on programming and software development, I find myself starting off with a tutorial on Excel basics instead. Somehow, I thought it was going to be more glamorous than this . . . This is driven by my need to prepare a training for my staff at work, and in keeping with the DRY principle (Don’t Repeat Yourself) I am killing two birds with one stone. Anyone hoping to read programming stuff is just going to have to wait . . .
Spreadsheets are misunderstood by the majority of people who use them. For many people a spreadsheet is nothing more than a handy way to create and organize lists. Some people use spreadsheets to present and layout data in a pleasing grid-like manner, and to apply pretty colors and formatting. If you are one of these people, you are missing out, and most likely working much harder than you need to.
As an additional consideration, employees who demonstrate a facility with data manipulation and analysis know-how increase their desirability and value to employers. While many applicants claim to possess some level of proficiency or familiarity with Excel, the truth is that many are merely familiar with the program, know how to create lists, and possibly add a few numbers together. The good news is that it does not take a science degree to become proficient with the more advanced features of Excel, nor is such proficiency beyond the grasp of most users.
In this post we will take a high-level look at the structure of the basic Excel application, workbooks, worksheets, and how they all relate together. This post is targeted at entry-level users with minimal familiarity with the program, and we will be covering some very basic concepts related to the structure of a Workbook, some essential navigation items, and core menus required to use the program.
If you do not have Microsoft Excel on you machine, or if you are using an older version (I use Excel 2010 throughout this series) you might consider purchasing a copy. You can find many deals on-line, or even support my efforts with this site by using the links above to buy directly from Microsoft. I STRONGLY recommend against purchasing software from Craigslist or EBay. There is significant risk of purchasing illegal or pirated software from those sites.
Because this post is rather long, I have provided some navigation aids here and at the end of each section to save you (and your mouse wheel) from excessive scrolling.
Navigation Menu
The Microsoft Excel Workbook
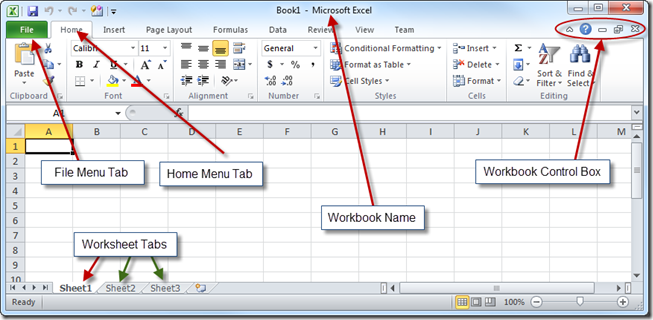
The Workbook is the basic container for the work you do in Microsoft Excel. Each Workbook you create contains one or more Worksheets. All of the core functionality we associate with the Excel application occurs within the Workbook. When you save an Excel file, the Workbook is what you are saving. While there are a lot of menus, buttons, and icons available when you look at the default workbook window, for now there are only a few important ones we will focus on.
If you are using a different version of MS Excel than Excel 2010, some of the items called out in the image above may appear different, or in different locations. Most of the functionality is the same, however.
Important Workbook Items
The Home Menu – This is where you land by default when you open a workbook (and what you see in the image above). The active Worksheet is displayed in the main window area, and the most commonly used controls are displayed in the “Ribbon” (That is the area between the menu tabs at the top and the main worksheet area. The one cluttered with icons . . .). Most of the time when you are working in Excel, you will be in the Home area.
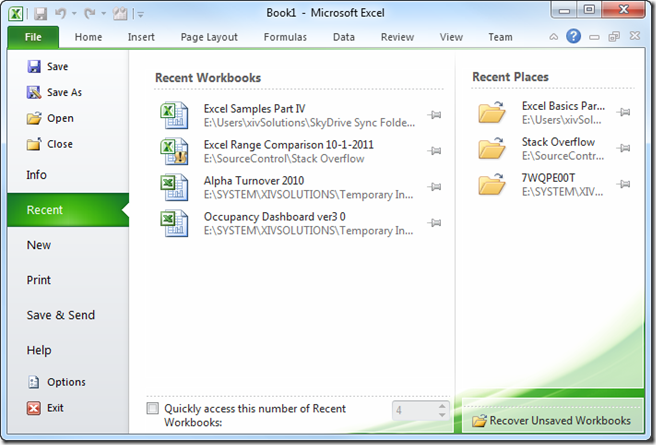
The File Menu – This is where you will find the New, Save, Save As, Open, and Print items for working with Excel Files (among other things). New, Save, Save As, and Open operate on entire Workbooks. The print menu offers options as to what to print (Entire Workbook, Active Worksheets, Selected area of Worksheet, Etc.).
Save As versus Save – While less true today than it was a few years back, many people still miss the distinction between “Save As” and “Save”. “Save As” allows you to save the current document (be it an Excel Spreadsheet, text file, Word Document, what have you) under whatever name you choose. This creates a new file on your hard drive. Even if the current active document has already been saved as, say “My First Document”, if you choose the “Save As’ item from the file menu after making some edits to the document, you will be prompted to select a location (the default will be the same folder or directory the original document was in) and specify a file name. If you type a new file name in, such as “My Second Document”, and hit the Save button, a new file will be created, and the original document will not be changed.
Likewise, if you open a document, make a few edits, then hit “Save”, the changes are reflected in that file. No new file is created. If you use File/New to create a new Workbook, things behave only slightly differently. Since the new Workbook has never BEEN save to disk, if you use the simple “Save” command, you will still be prompted with a Save As Dialog, because Excel “knows” it needs to create a new file on disk instead up updating an existing file.
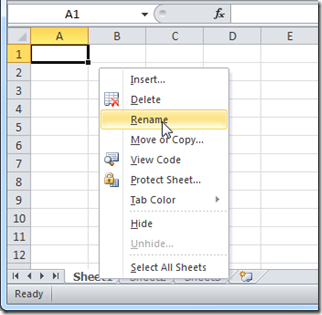
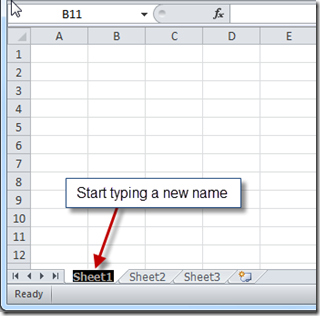
The Worksheet Tabs – The tabs at the bottom left of the Worksheet area represent the collection of Worksheets which make up the Workbook. They are named Sheet1, Sheet2, Sheet3, Etc. by default, but you can change the name of a worksheet by right-clicking on the tab and selecting “Rename” from the context menu. You can also double-click on the tab itself to place it in edit mode and then type a new name in. In Excel 2007 and 2010, you can add a new Worksheet to the Workbook by clicking on the Insert Worksheet Tab to the right of the rightmost Worksheet Tab (The little half-tab with the orange star).
The Workbook Name – A Seemingly minor thing, but important. In the top of the Main Excel window, right in the center, is the name of the Workbook itself, followed by a dash, and then the name of the application (in this case, as we already know, that would be “Microsoft Excel”) This is a standard Windows mechanism for providing the user with sufficient information in the top portion of the window that they can identify a specific window amongst many, and the host application. If you have multiple Excel Workbooks open at the same time (this WILL happen, as you become a more proficient user), you need look no further than the top of the window to know which one you are currently in.
If you have just opened a fresh Workbook, then the name will be Workbook1, Workbook2, etc. The very first thing you should do when creating a new Excel Workbook is go straight to the “Save As” menu (via the “File” tab, as we just learned) and “Save As” some distinctive name which will help you identify the file later (sometimes MUCH later). Once you have saved the workbook with the new name, you will see THAT name in the top of the window. You will also want to be aware of WHERE you are saving the Workbook within your file system. MS Excel (and most Windows/Macintosh programs) default to the current User’s “Documents” folder.
We will discuss file naming (and more importantly, naming conventions) in a later post. Suffice it to say that when you save an Excel Workbook, or any other file on your machine, you want to provide enough information in the file name that you don’t have to go on a mad hunt later to find the one you are looking for. You will find that how you name your file also affects how Windows and Macintosh organize them in the Windows Explorer/Macintosh Finder. Good choice of names helps keep your files organized.
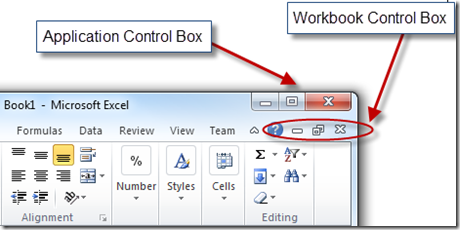
The Workbook Control Box – Not to be confused with the Excel Application Control Box, the workbook control box presents the Minimize, Maximize, and Exit controls for the current Workbook. The Workbook itself is minimized, Maximized, or closed within the Excel application window, which remains unaffected. The equivalent items in the Application Control Box perform the same functions for the Excel application itself.
The Excel Worksheet
If the Workbook is the container for your work, then the Worksheet represents your workbench, so to speak. A Workbook can contain one or more Worksheets, which can be named and can function independently of one another. The model Microsoft has chosen is apt, with Worksheets becoming the virtual “pages” within your virtual “Workbook”.
The Excel Worksheet consists of a grid of columns and rows. The cells within the grid represent the basic unit of storage within a spreadsheet, and the alphabetical column names and numbered rows form unique “addresses” for each cell. We delve into what this means, and the workings of Rows, Columns, and Cells in another post. For now, lets consider that the grid of columns and rows represents the “business end” of a worksheet and move on to examine a few other important items related to using the Worksheet itself. (Most of these are or will be covered in greater detail in another post. I have linked where appropriate, and will update as subsequent posts become available).
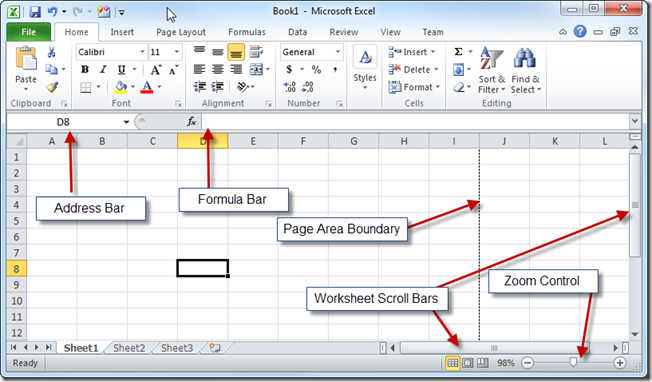
The Address Bar – This displays the address of the currently selected Cell. The Letter represents the column index, and the number represents the Row Number. In the example above, the cell in Column D, Row Number 8 is selected. If more than one cell is selected, then the address of the upper-left cell is displayed. There is more to it than this (there is an alternate addressing notation for example, called R1C1, that can be used by adjusting some optional settings. We aren’t going to worry about that right now), but in general, the address bar will let you know which cell is currently selected within your Worksheet.
The Formula Bar – When you select a cell, the value stored in the cell is displayed in the formula bar. The contents of a given cell might be discrete data, or the cell might contain a formula. In either case, the actual cell contents are displayed here, and can be edited by clicking in the Formula Bar and typing. Note that you can also edit cell contents directly in the cell either by selecting and typing (which will overtype anything already in there) OR by selecting the cell and then double-clicking, which will place it in “edit mode”. Then you can selectively edit the item in the cell.
Page Area Boundary – The boundary which defines what will appear on a printed page. This does not appear until you open the “Print” dialog (from the File Menu Tab – remember?), because Excel cannot determine this until you have selected a printer (different printers have different minimum print areas and such). If the contents of the portion to the left of the dotted line extend past it, they will be printed on another page. There is a similar boundary defining the bottom of each page (not visible here).
We will examine setting up to print in more detail later. For now, realize that you should pay attention to this dotted line before you print. You can also use the “Print Preview” option from the File/Print to see more exactly what your document will look like in print.
Worksheet Scrollbars – Self-explanatory, but important nonetheless. As you become more proficient working with spreadsheets, you will find that they can sometimes become . . . wide. We all use the mouse wheel for vertical scrolling, and that horizontal scroll bar does not, by default, traverse the entire lower edge of the window, so it is easily lost or forgotten about by new users.
Zoom Control – Allows zooming in or out on the active Worksheet within the Workbook window. Often, when the becomes wide, tall, or both, it can be handy to zoom out for a more macroscopic view, then zoom back in again. Sometimes users have their own preferences about screen magnification. In any case, this control zooms in and out, if you are more comfortable using the GUI controls. Zooming can also be accomplished by holding down the Ctrl key (Control+Shift in Mac) and using the mouse wheel to zoom.
NOTE: The zoom control does not appear in the Macintosh version of Excel. Instead, there is a drop-down box in the top of the window, with percentage values to select from (or type in).
OOOPS! As an aside, if ever you attempt to use the mouse wheel to SCROLL, and suddenly find your spreadsheet zoomed way in or way out, the odds are good you accidentally held the Ctrl key down while doing so (this is less likely on the Mac, where two keys must be held down simultaneously). Since the Ctrl key is integral to many Windows keyboard shortcuts, this is easy to do on a Windows machine.
Summary
The foregoing has been a very, very basic introduction to the core components of a Microsoft Excel Workbook. There is more to learn, but hopefully this has given you a basic orientation. We will explore in more detail as I add to this series, but I felt it might be helpful for some to examine the overall structure of the Workbook model, and some essential features which may not be obvious to the beginner. We covered the following ideas in this post:
- A Workbook contains a collection of one or more Worksheets, and is the primary container for your work in an Excel File.
- The Home Menu is the default menu tab I an Excel Workbook (in Excel 2010). When this tab is selected, the most commonly used controls are are available in the ribbon, and the Active Worksheet is available in the main screen area.
- The File Menu Tab contains the menus for most file operations such as Save, Save As, New, and Print. Most file operations affect the entire workbook.
- Save As Creates a new file on disk, for which you will be prompted to specify a name and location. Save simply updates the existing file to reflect any changes since the last save operation.
- The Worksheet Tabs allow you to select which Worksheet is active in the Workbook window. You can right-click on a tab to access a context menu and change the name of the tab.
- The Workbook Control Box allows you to Minimize, Maximize, and Exit a particular Workbook without affecting the status of the Excel application window itself.
- The Worksheet consists of a grid composed of rows and columns, which define Cells. The Cell is the basic unit of storage within a spreadsheet. The Worksheet is where the actual work you do within MS Excel is performed.
- The Address Bar displays the address of the currently selected cell, usually with a letter for the current column, and a number representing the current cell, The top-left cell in a Worksheet would have the address A1 (Column A, Row 1).
- The Formula Bar displays the value stored within the selected cell. This can be an actual data value, or it can be a formula. The cell contents may be edited in the formula bar, or directly within the cell.
- The Page Area Boundary indicated the horizontal and vertical boundaries for printed output. The location of these boundaries is dependent upon printer settings, which are not available to Excel until the Print Dialog is used, or Print Preview is used.
- Worksheet Scroll Bars allow horizontal and vertical scrolling of the active Worksheet within the Workbook window.
- Worksheet Zoom Control allow you to zoom in or out on the active Worksheet within the Workbook window.
Comments