Working in Visual Studio, we often find ourselves needing to rename our project and/or solution and the directories they live in. In particular, when we clone a project from Github, what we end up with the a complete, workable solution, but named other than what we would like.
As an example, I recently posted articles on Creating a Stripped-down ASP.NET Web Api Solution,as well as an article on Extending Identity Accounts and Implementing Role-Based Security in ASP.NET MVC 5. In both cases, I linked to example projects on my Github repo which not only serve as examples for the article content, but in fact present the workable start for your own solution.
Except, they are named “YadaYadaYadaExample.”
NOTE: I go into what may seem like excruciating detail in this article. Experienced users may wonder what the fuss is about, that it should take this much space to explain how this works. This is targeted at those newer to Visual Studio who may be running into this for the first time.
The history of people struggling with project and solution renaming in Visual Studio is long. While experienced users generally understand how to do this (or how to figure it out), the first time you run into it, it can be confusing. Especially since VS allows you to rename your project and solution even from within VS, but the directory names remain unchanged.
- Open and build the project in VS
- Changing the Project and Solution Names in Visual Studio
- Update the Namespacing Used on the Project Files
- Changing the Name of the Project Directories in Windows Explorer
- Rename the Solution File
- Editing the Solution File
- Additional Resources and Items of Interest
Let’s take a quick walkthrough. We will see where the problem starts, and how to quickly address it and move on with building out our project. Our example will start off by cloning a project from Github, but the manner in which we modify the project, solution, and directory names after that is applicable to any project. If you are a new user and not familiar with Git or Github, just download the zip file from the Github page instead, and extract into the directory of choice on your local machine.
We’ll start by simply cloning the example project on Github that I used in the article on Extending Identity Accounts. Navigate to the directory where you want to create your new project, and clone:
Clone the Example Project from the Github Repo:
$ git clone https://github.com/xivSolutions/AspNetRoleBasedSecurityExample
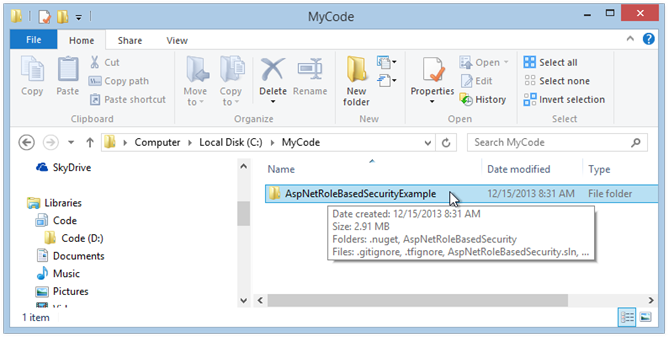
You should now find the cloned project in target directory:
The Visual Studio Solution Cloned into the Target Folder:
Open and build the project in VS
Let’s open this project in Visual Studio.
NOTE ABOUT THE EXAMPLE PROJECT: The first time you open this specific project after cloning, you will see a host of errors in the VS Error List window. This is because in order to host the source code for this project on Github, I enabled Nuget Package Restore for the project, so that I didn’t need to also host all the Nuget Packages attendant to an MVC solution. Using Nuget Package Restore, the required packages are downloaded and updated on build. For more info see Keep Nuget Packages Out of Source Control with Nuget Package Manager Restore.
Changing the Project and Solution Names in Visual Studio
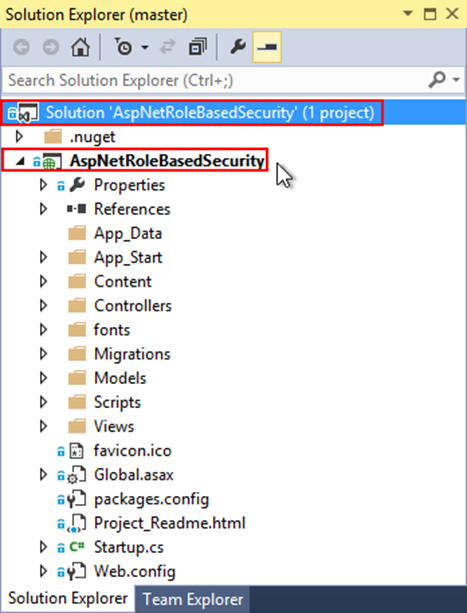
Just within VS, there are a number of items we probably want to change in order to name the cloned project appropriately for our needs. Let’s say we have cloned this solution from Github with the intention of using it as the starting point for our own company website. When we first open the project, we see that everything is names consistently with the name of the Github project, and with the folder we found in our local directory after cloning:
The Solution and Project Structure in Visual Studio After Cloning:
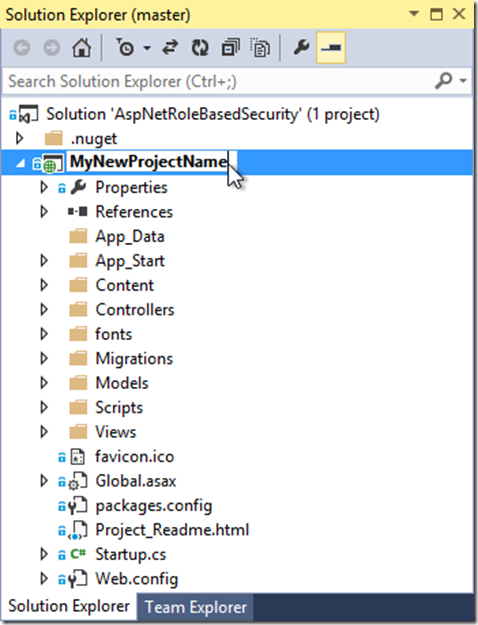
In Solution Explorer, we can easily rename the project and the Solution simply by clicking on the current name and editing. This part, most can figure out on their own:
Renaming the Project and Solution in Solution Explorer:
You can do the same thing for the Solution Name.
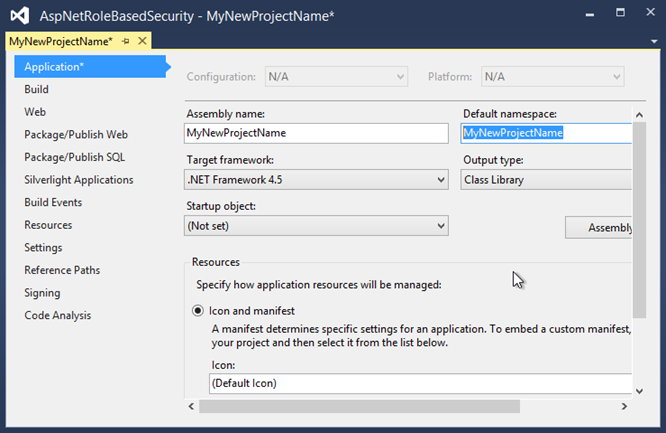
This is only the beginning, though. Now, we most likely want to rename the assembly and the default namespace. To do this, we go open the project Properties designer and type the new project name into the Assembly name field, and also into the Default namespace field (unless we want our default namespace to be other than our project name, in which case type whatever name you want to be your default namespace):
Changing the Assembly and Default Namespace in Project Properties Designer:
Update the Namespacing Used on the Project Files
Ok, so now you have changed the default project namespace. However, all of the files included in the project when you cloned it still contain the old namespace, For example, if we open the AccountContoller file, we see the following:
using Microsoft.AspNet.Identity;
using Microsoft.AspNet.Identity.EntityFramework;
using Microsoft.Owin.Security;
using System.Collections.Generic;
using System.Linq;
using System.Threading.Tasks;
using System.Web;
using System.Web.Mvc;
using AspNetRoleBasedSecurity.Models;
namespace AspNetRoleBasedSecurity.Controllers
{
    [Authorize]
    public class AccountController : Controller
    {
        public AccountController()
            : this(new UserManager<ApplicationUser>(new UserStore<ApplicationUser>(new ApplicationDbContext())))
        {
        }


        public AccountController(UserManager<ApplicationUser> userManager)
        {
            UserManager = userManager;
        }

        // . . . MORE CODE (ommitted for brevity)
    }
}
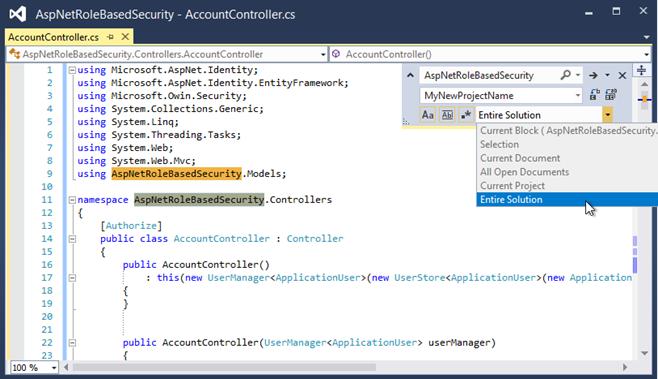
See the namespace AspNetRoleBasedSecurity.Controllers declaration there at the top? More than likely, we don’t want that as our default namespace for our new project. So we should do a global replacement on our solution and replace all instances of the AspNetRoleBasedSecurity with MyNewProjectName.
IMPORTANT NOTE: Be careful here. This may not always be the best approach if there is any chance that the old namespace also matches other items in the project you do not wish to rename. Sometimes you may need to handle this on a file-by-file basis. Just be aware the global find/replace across the entire solution requires some forethought!
To do this, select the existing namespace, then hit Ctrl-h to open the find/replace window. Type the new namespace into the “replace” field, and make sure to select “Entire Solution” in the drop-down. Then click the “replace all” icon:
Replace Existing Namespace in Entire Solution:
Up to this point, everything in our project still works fine (or, it should, anyway). The project should build and run properly. However, there is still the issue of the project and solution directory folders, and this is where the trouble usually starts.
Changing the Name of the Project Directories in Windows Explorer
Usually, we would like the directory name for our solution to reflect the overall solution or project. In our current example, we probably don’t want our newly renamed project and solution to live in a folder named AspNetRoleBasedSecurity (or whatever the original name of the solution in question is).
To change the directory names, close visual studio. Also, if you used Git to clone the project, close the terminal (or whatever open applications might be referencing the project).
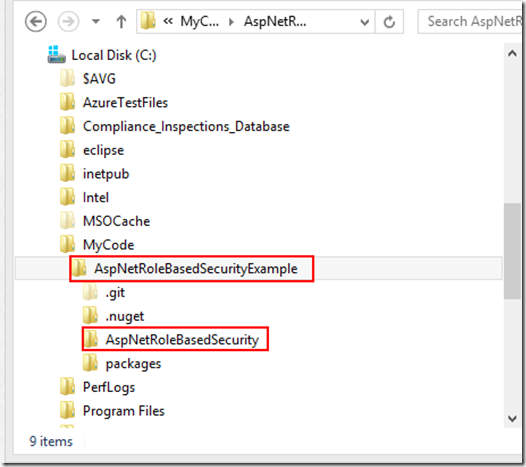
We have two directories here that need new names – the outer solution directory, and the project directory itself. Rename each to match your new solution and project names respectively:
Solution Folder Structure with Folders Which Need to be Renamed:
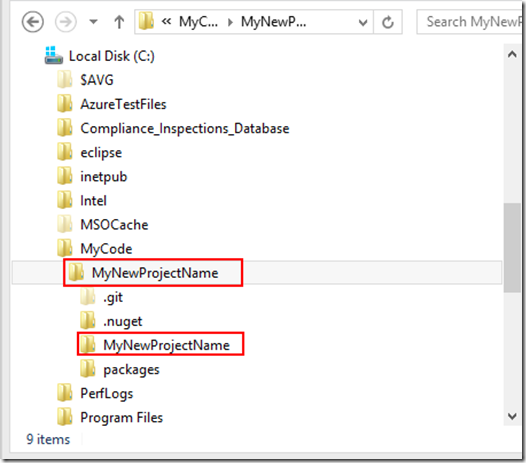
Once we have changed the Solution and Project folder names, our directory structure looks like this:
Directory Structure After Renaming Project and Solution Folders
Rename the Solution File
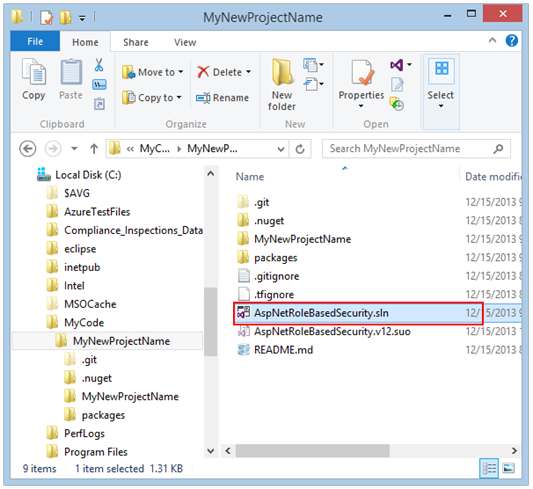
If we open the solution folder, we find that the actual VS solution file is still named for our old project (the solution file is the one with the .sln extension):
The VS Solution File Before Renaming:
Rename this to also match our newly chosen solution name.
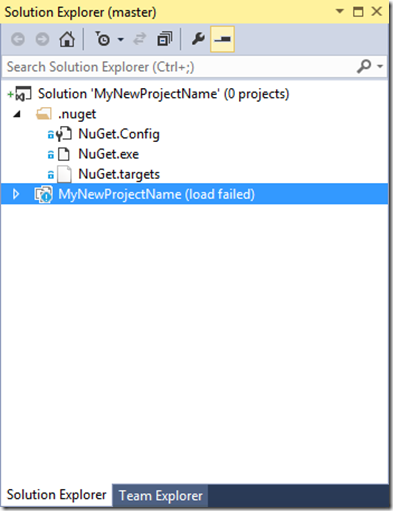
Having done that, let’s open our solution again, and see what happens.
Uh oh:
Project Load Fails After Renaming:
Everything we have done up to this point has been rather rudimentary, hardly worth the length of the post. I have included the previous steps for those who are brand-new to Visual Studio, but in reality most of us know how to rename projects, namespaces, and directories.
What is not obvious is that restoring our renamed project to full-functionality involves editing the solution file, to point things back where they belong.
Editing the Solution File
This is where most people get hung up on the solution renaming process. The next step is actually fairly trivial in execution, it’s just not obvious to the uninitiated.
Navigate into the solution directory and open the solution file using your preferred text editor (I use Sublime Text or Notepad++, but any standard text editor will do). Right-Click on the solution file and select “Open with” your text editor. You should see something resembling this (note – if the solution contains multiple projects, you will see each of them listed instead of just one as below):
Microsoft Visual Studio Solution File, Format Version 12.00
# Visual Studio 2013
VisualStudioVersion = 12.0.21005.1
MinimumVisualStudioVersion = 10.0.40219.1
Project("{FAE04EC0-301F-11D3-BF4B-00C04F79EFBC}") = "MyNewProjectName", "AspNetRoleBasedSecurity\MyNewProjectName.csproj", "{D7ADA016-6E82-4F70-B6CF-B687A3B6F6EA}"
EndProject
Project("{2150E333-8FDC-42A3-9474-1A3956D46DE8}") = ".nuget", ".nuget", "{6DCF7BBA-8C8E-4E64-A6F0-3CB2A778DA69}"
    ProjectSection(SolutionItems) = preProject
        .nuget\NuGet.Config = .nuget\NuGet.Config
        .nuget\NuGet.exe = .nuget\NuGet.exe
        .nuget\NuGet.targets = .nuget\NuGet.targets
    EndProjectSection
EndProject
Global
    GlobalSection(SolutionConfigurationPlatforms) = preSolution
        Debug|Any CPU = Debug|Any CPU
        Release|Any CPU = Release|Any CPU
    EndGlobalSection
    GlobalSection(ProjectConfigurationPlatforms) = postSolution
        {D7ADA016-6E82-4F70-B6CF-B687A3B6F6EA}.Debug|Any CPU.ActiveCfg = Debug|Any CPU
        {D7ADA016-6E82-4F70-B6CF-B687A3B6F6EA}.Debug|Any CPU.Build.0 = Debug|Any CPU
        {D7ADA016-6E82-4F70-B6CF-B687A3B6F6EA}.Release|Any CPU.ActiveCfg = Release|Any CPU
        {D7ADA016-6E82-4F70-B6CF-B687A3B6F6EA}.Release|Any CPU.Build.0 = Release|Any CPU
    EndGlobalSection
    GlobalSection(SolutionProperties) = preSolution
        HideSolutionNode = FALSE
    EndGlobalSection
EndGlobal
Note the highlighted line. See how it is still looking for the newly-named project file in the OLD directory?
Change this:
Change the Path to the Project file(s) in the Solution File:
"AspNetRoleBasedSecurity\MyNewProjectName.csproj"
to this:
Modified Path to the Project file(s) in the Solution File:
"MyNewProjectName\MyNewProjectName.csproj"
If you are working with a solution which contains multiple projects, you will need to repeat the previous modification for each project within the solution (or do find . . . replace all)
Now, save the modified solution file, and try opening your project once again. If all has gone well, everything should now be fine, and work as expected.
Additional Resources and Items of Interest
- Keep Nuget Packages Out of Source Control with Nuget Package Manager Restore
- Building Out a Clean, REST-ful Web Api Service with a Minimal Web Api Project
- C# – Generate and Deliver PDF Files On-Demand from a Template Using iTextSharp
- C#: Query Excel and .CSV Files Using LinqToExcel
- C#: Create and Manipulate Word Documents Programmatically Using DocX
Comments