Image by Sergio Quesada | Some Rights Reserved
I recently had to throw together an application for work allow users to send email to recipients selected from a list. The application in question is used to manage attendees at trainings, and, when the training is complete, send an email to each attendee containing a link to download a personalized certificate.
In this article we will look at a building out a simplified version of the mail-sending component.
The goal here is two-fold. For one, if you have a specific need to send email from your web application, this will at least get you pointed in the right direction. Also, I am going to attempt to look at the specific problems we need to solve, and some possible approaches to solving them.
Because this article got a little long, I am breaking it up into two parts. in this first installment, we will examine our requirements, and build out our basic application structure, including necessary Models, Views, and creating our database using EF Migrations.
In the next installment, we will build out the SendMail() controller action, and create the additional pieces needed to send a personalized message to multiple recipients from within our MVC application.
You can follow along with the article, and you can also grab the source from my Github repo.
- Create an ASP.NET Application with Restricted, Internal-Only Access
- Adding Required Model Classes
- Create the Mail Recipients Controller and Associated Views
- Editor Templates and View Models for the Index Method
- Modifying the Code for the Index Controller Method
- The Index View – Selecting Recipients and Sending Email
- Run EF Migrations to Create the Database
- Running the Application
- Additional Resources and Items of Interest
The Problem
Again, I have simplified things here to keep focused. Our example application has the following requirements:
- Access to the application is restricted to authenticated, internal users only.
- The application should be able to maintain a database of Mail Recipients, and allow the basic CRUD operations to be performed.
- Users should be able to update the list of mail recipients, then select one or more to which they wish to send a personalized email, and, er, send email to those recipients.
- The mail sent should contain a personalized message for each recipient, based on a template of some sort.
- The application should track the messages sent, and display the most recent date that each recipient was sent a mail message.
Like I said, pretty simple. In fact, so simple that in and of itself, the application we create here is not good for much except demonstrating the concepts involved. But I will endeavor to point out where functionality might be added to make a real-world implementation more functional.
All right, let’s get started, and look at our requirements one at a time.
Create an ASP.NET Application with Restricted, Internal-Only Access
We need an ASP.NET MVC application which is essentially closed to all but authenticated (logged-in) users authorized by our application administrator. We have looked at this in a previous post, in which we created an MVC 5 application, removed all of the external registration options, and implemented some basic Role-Based Authentication. In that post, we also extended the basic ASP.NET Identity model to include some custom user properties such as email addresses.
In building out the example project for this post, I simply cloned the ASP.NET Role-Based Security Example project and used that as my starting point for this example. Once I had cloned the basic project, I had to go through the relatively painless (but never-the-less annoying) process of renaming the VS project, namespaces, and such.
If you are following along instead of simply cloning the source for this article, you will need to do the same. Also, don’t go and run the EF Migrations to build out the database yet. We will be adding to our models, and updating migrations can be painful.
Note that if you clone the either the source for this project, or the original ASP.NET Role-Based Security Example project, you will need to Enable Nuget Package Restore in order to get things working properly (you should have this set up anyway!).
Pull the Db Context Out into its Own Class
We are already utilizing a Code-First approach here from setting up our custom Identity Management. We will go ahead and continue along those lines. However, we want to do a little housekeeping first.
Our original project (and indeed, the default ASP.NET MVC Project) is set up so that the Entity Framework ApplicationDbContext is tucked into a file named IdentityModels.cs. ApplicationDbContext is the primary point of data access for our application, and I don’t like it tucked into the IdentityModels.cs file. So the first thing I am going to do is move it our of there and into its own class.
Here is what the IdentityModels.cs file looks like before we modify the code:
The Identity Models Code File Before Modification:
using Microsoft.AspNet.Identity.EntityFramework;
using Microsoft.AspNet.Identity;
using System.ComponentModel.DataAnnotations;
using System.Collections.Generic;

namespace AspNetRoleBasedSecurity.Models
{
    public class ApplicationUser : IdentityUser
    {
        [Required]
        public string FirstName { get; set; }

        [Required]
        public string LastName { get; set; }

        [Required]
        public string Email { get; set; }
    }


    public class ApplicationDbContext : IdentityDbContext<ApplicationUser>
    {
        public ApplicationDbContext()
            : base("DefaultConnection")
        {

        }
    }


    public class IdentityManager
    {
        public bool RoleExists(string name)
        {
            var rm = new RoleManager<IdentityRole>(
                new RoleStore<IdentityRole>(new ApplicationDbContext()));
            return rm.RoleExists(name);
        }

        // ...
        // A bunch of other code related to Identity Management . . .
        // ...
    }
}
As we can see, right there in the middle is our ApplicationDbContext class. Let’s pull that out into its own class file, just so we can keep better track of things. Add a new class, name it ApplicationDbContext.cs, then add the following code (we need to bring all the required namespaces along with us):
The new ApplicationDbContext Class File:
using Microsoft.AspNet.Identity.EntityFramework;
using Microsoft.AspNet.Identity;
using System.ComponentModel.DataAnnotations;
using System.Collections.Generic;
namespace AspNetEmailExample.Models
{
    public class ApplicationDbContext : IdentityDbContext<ApplicationUser>
    {
        public ApplicationDbContext()
            : base("DefaultConnection2")
        {

        }
    }
}
Adding Required Model Classes
Now, let’s get down to business. First, our requirements indicate that we should probably have a MailRecipient model, to persist our target mail recipient data. Also, it looks like we will need a SentMail model, since we are also going to be persisting a record of each mail sent. Each sent mail will refer to a parent MailRecipient, and each MailRecipient will have zero or more SentMail items.
Following is the code for a basic Mail Recipient model class:
Create the Mail Recipient Model
The Mail Recipient Model:
using System;
using System.Collections.Generic;
using System.ComponentModel.DataAnnotations;
using System.Linq;

namespace AspNetEmailExample.Models
{
    public partial class MailRecipient
    {
        public MailRecipient()
        {
            this.SentMails = new HashSet<SentMail>();
        }

        [Key]
        [Required]
        public int MailRecipientId { get; set; }

        [Required]
        public string LastName { get; set; }

        [Required]
        public string FirstName { get; set; }

        public string Email { get; set; }

        public string Company { get; set; }

        public string FullName
        {
            get
            {
                return string.Format("{0} {1}", this.FirstName, this.LastName);
            }
        }


        public DateTime? getLastEmailDate()
        {
            var top = (from m in this.SentMails
                       orderby m.SentDate descending
                       select m).Take(1);
            if (top.Count() > 0)
            {
                return top.ElementAt(0).SentDate;
            }
            else
            {
                return null;
            }
        }

        public virtual ICollection<SentMail> SentMails { get; set; }
    }
}
In the above notice that we have added a method, getLastEmailDate(). This is going to provide for our requirement that we display the last date on which a particular recipient was sent mail. We have also added a FullName property, which return a concatenation of the first and last names of the recipient as a convenience. Also note, we have included the appropriate attribute decorations so that Entity Framework can build out our database based on this model.
Create the Sent Mail Model
Now we need to build out the SentMail model (another fairly simple exercise):
The Sent Mail Model:
namespace AspNetEmailExample.Models
{
    using System;
    using System.Collections.Generic;
    using System.ComponentModel.DataAnnotations;

    public partial class SentMail
    {
        [Key]
        [Required]
        public int MailId { get; set; }

        [Required]
        public int MailRecipientId { get; set; }

        [Required]
        public string SentToMail { get; set; }

        [Required]
        public string SentFromMail { get; set; }

        [Required]
        public System.DateTime SentDate { get; set; }

        public virtual MailRecipient Recipient { get; set; }
    }
}
Once again, we have made sure to add all of the EF-required attribute decorations for a successful code-first scaffolding.
Create the Mail Recipients Controller and Associated Views
In thinking through what we need our simple application to do, our requirements indicate that, at a minimum, we need to be able to:
- View a list of mail recipients, and select one or more specific recipients to send a personalized message to
- Add new recipients to the database
- Edit/Update recipient information
- Delete recipients from the database
- Send Email to the recipients selected by the user.
So we need a controller with the following methods:
- Index (Displays a list of recipients with a checkbox to select for mailing)
- Create
- Edit
- Delete
- SendMail
We can let Visual Studio do a lot of the heavy lifting for us here, although we will need to modify the generated code afterwards. But let’s go ahead an build out our controller and views using VS and Entity Framework.
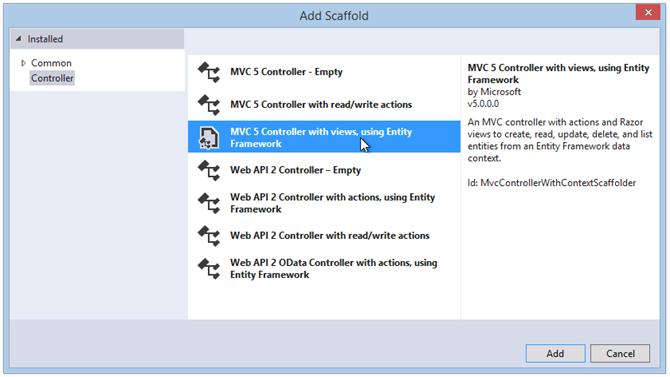
First, right click on the Controllers folder, and select Add => Controller. Then, from the dialog, select MVC 5 Controller with Views, using Entity Framework:
Add the Mail Recipients Controller Using Entity Framework:
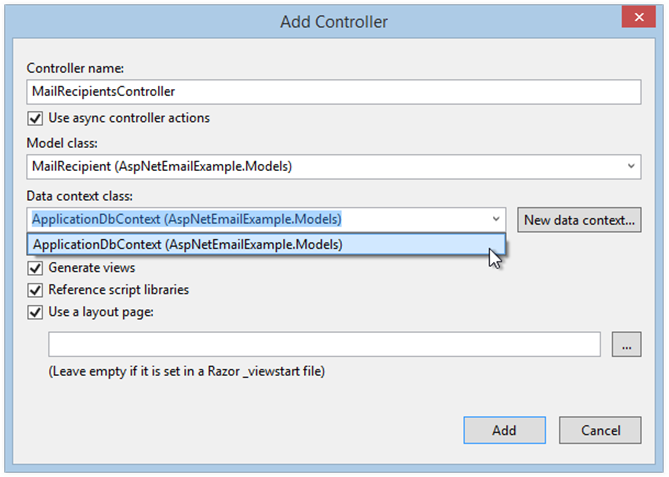
Next, Name the Controller MailRecipientsController, and select the MailRecipient model from the dropdown list of available models. Select the ApplicationDbContext class from the dropdown for the Data Context class, and hit Add:
Set the Controller Configuration:
Once the controller and Views are created, open the newly created MailRecipientsController class. You should see code which looks something like this (I removed all the comments VS automatically includes, because I don’t like the noise in my code):
The Generated MailRecipientsController:
using System;
using System.Collections.Generic;
using System.Data;
using System.Data.Entity;
using System.Linq;
using System.Threading.Tasks;
using System.Net;
using System.Web;
using System.Web.Mvc;
using AspNetEmailExample.Models;

namespace AspNetEmailExample.Controllers
{
    public class MailRecipientsController : Controller
    {
        private ApplicationDbContext db = new ApplicationDbContext();


        public async Task<ActionResult> Index()
        {
            return View(await db.MailRecipients.ToListAsync());
        }


        public async Task<ActionResult> Details(int? id)
        {
            if (id == null)
            {
                return new HttpStatusCodeResult(HttpStatusCode.BadRequest);
            }
            MailRecipient mailrecipient = await db.MailRecipients.FindAsync(id);
            if (mailrecipient == null)
            {
                return HttpNotFound();
            }
            return View(mailrecipient);
        }


        public ActionResult Create()
        {
            return View();
        }


        [HttpPost]
        [ValidateAntiForgeryToken]
        public async Task<ActionResult> Create([Bind(Include="MailRecipientId,LastName,FirstName,Email,Company")] MailRecipient mailrecipient)
        {
            if (ModelState.IsValid)
            {
                db.MailRecipients.Add(mailrecipient);
                await db.SaveChangesAsync();
                return RedirectToAction("Index");
            }
            return View(mailrecipient);
        }


        public async Task<ActionResult> Edit(int? id)
        {
            if (id == null)
            {
                return new HttpStatusCodeResult(HttpStatusCode.BadRequest);
            }
            MailRecipient mailrecipient = await db.MailRecipients.FindAsync(id);
            if (mailrecipient == null)
            {
                return HttpNotFound();
            }
            return View(mailrecipient);
        }


        [HttpPost]
        [ValidateAntiForgeryToken]
        public async Task<ActionResult> Edit([Bind(Include="MailRecipientId,LastName,FirstName,Email,Company")] MailRecipient mailrecipient)
        {
            if (ModelState.IsValid)
            {
                db.Entry(mailrecipient).State = EntityState.Modified;
                await db.SaveChangesAsync();
                return RedirectToAction("Index");
            }
            return View(mailrecipient);
        }


        public async Task<ActionResult> Delete(int? id)
        {
            if (id == null)
            {
                return new HttpStatusCodeResult(HttpStatusCode.BadRequest);
            }
            MailRecipient mailrecipient = await db.MailRecipients.FindAsync(id);
            if (mailrecipient == null)
            {
                return HttpNotFound();
            }
            return View(mailrecipient);
        }


        [HttpPost, ActionName("Delete")]
        [ValidateAntiForgeryToken]
        public async Task<ActionResult> DeleteConfirmed(int id)
        {
            MailRecipient mailrecipient = await db.MailRecipients.FindAsync(id);
            db.MailRecipients.Remove(mailrecipient);
            await db.SaveChangesAsync();
            return RedirectToAction("Index");
        }


        protected override void Dispose(bool disposing)
        {
            if (disposing)
            {
                db.Dispose();
            }
            base.Dispose(disposing);
        }
    }
}
As we can see, VS created some basic code for four of the five controller methods we need. However, they don’t quite do what we need yet. As is most often the case, we will need to adapt them to our needs a little bit.
Modifying the Create Method for the Mail Recipients Controller
We will start by addressing the Create method. The first thing I notice is that the generated code includes a Binding for the MailRecipientId property of our model. The problem here is that MailRecipientId will be an auto-incrementing integer field in our database, and will not be a field on our input form. So we need to remove MailRecipientId from the Binding in the Create method signature.
Also note that, because access to our site is restricted to authenticated, internal users only, we have added the [Authorize] attribute to both overrides for the Create method. In fact, we will be adding this important attribute to all of the methods on MailRecipientController.
The modified Create method should now look like this:
The Modified Create Method for Mail Recipient Controller:
[Authorize]
public ActionResult Create()
{
    return View();
}


[HttpPost]
[Authorize]
[ValidateAntiForgeryToken]
public async Task<ActionResult> Create([Bind(Include="LastName,FirstName,Email,Company")] MailRecipient mailrecipient)
{
    if (ModelState.IsValid)
    {
        db.MailRecipients.Add(mailrecipient);
        await db.SaveChangesAsync();
        return RedirectToAction("Index");
    }

    return View(mailrecipient);
}
The Edit and Delete methods work decently “out of the box” so far as our application is concerned, although we do still want to add the [Authorize] attribute to each of these as well.
Now let’s take a look at our Index method.
Editor Templates and View Models for the Index Method
We need to make some significant changes to the way our Index controller method works, but first, we need a few more items. In our Index View, we want to display a list of potential Mail Recipients, along with checkboxes for each allowing us to select one or more recipients from the list for a personalized email. For this, we will need to pass a list of Mail recipients to our view.
To achieve this we will need to implement an HTML form including a table with checkboxes, as well as the required View Models and Editor Templates this requires. For more detail on this, see Display an HTML Table with Checkboxes in ASP.NET.
As we learned in the article linked above, we will need to create a custom Editor Template in order to display rows in our table with checkboxes associated with the data in each row. Also, we will need an Editor View Model to match the Editor Template, and one more View Model to wrap the Editor View Model items in. Confused? It’s not too bad.
First, let’s create what we will call the SelectRecipientEditorViewModel. This will provide the model for our row Editor Template, and will include a Selected property to represent the checked status of the checkbox for each row.
Add a new class to the Models folder, and name it SelectRecipientEditorViewModel. Then add the following code:
The Select Recipient Editor View Model Class:
public class SelectRecipientEditorViewModel
{
    public bool Selected { get; set; }
    public SelectRecipientEditorViewModel() { }
    public int MailRecipientId { get; set; }
    public string FullName { get; set; }
    public string Company { get; set; }
    public string Email { get; set; }
    public string LastMailedDate { get; set; }
}
Next, we need a “wrapper” class, MailRecipientsViewModel to contain our list of recipients. Add another new class to the Models folder:
The Mail Recipients View Model Class:
public class MailRecipientsViewModel
{
    public List<SelectRecipientEditorViewModel> MailRecipients { get; set; }
    public MailRecipientsViewModel()
    {
        this.MailRecipients = new List<SelectRecipientEditorViewModel>();
    }


    public IEnumerable<int> getSelectedRecipientIds()
    {
        return (from r in this.MailRecipients
                where r.Selected
                select r.MailRecipientId).ToList();
    }
}
In a manner similar to the linked article about displaying checkboxes, we have added a method to our class which will conveniently return an IEnumerable<int> containing the Id’s of the selected items in our table.
Now, we just need an Editor Template for our SelectRecipientEditorViewModel. If you don’t already see a subfolder in the Views => Shared directory, add a new View named EditorTemplates.The naming here is critical, so no typos. Now, add a new empty View to Views => Shared => EditorTemplates, named SelectRecipientEditorViewModel (yes, it is named exactly the same as the View Model we created, except for the .cshtml suffix on the view file vs. the .cs suffix on the Model class file). Then add the following code:
The Select Recipient Editor Template View:
@model AspNetEmailExample.Models.SelectRecipientEditorViewModel
<tr>
    <td style="text-align:center">
        @Html.CheckBoxFor(model => model.Selected)
    </td>
    <td>
        @Html.DisplayFor(model => model.FullName)
    </td>
    <td>
        @Html.DisplayFor(model => model.Company)
    </td>
    <td>
        @Html.DisplayFor(model => model.Email)
    </td>
    <td>
        @Html.DisplayFor(model => model.LastMailedDate)
    </td>
    <td>
        @Html.HiddenFor(model => model.MailRecipientId)
    </td>
    <td>
        @Html.ActionLink("Edit", "Edit", new { id = Model.MailRecipientId }) |
        @Html.ActionLink("Details", "Details", new { id = Model.MailRecipientId }) |
        @Html.ActionLink("Delete", "Delete", new { id = Model.MailRecipientId })
    </td>
</tr>
For more details on how this works, see the linked article above.
Modifying the Code for the Index Controller Method
Now we have what we need to modify our Index() controller method, such that is can pass to the Index view a list of selectable mail recipient data. Update the code for the Index() method on MailRecipientsController to match the following:
Modified Code for the Index Controller Method:
[Authorize]
public async Task<ActionResult> Index()
{
    var model = new MailRecipientsViewModel();

    // Get a list of all the recipients:
    var recipients = await db.MailRecipients.ToListAsync();
    foreach(var item in recipients)
    {
        // Put the relevant data into the ViewModel:
        var newRecipient = new SelectRecipientEditorViewModel()
        {
            MailRecipientId = item.MailRecipientId,
            FullName = item.FullName,
            Company = item.Company,
            Email = item.Email,
            LastMailedDate = item.getLastEmailDate().HasValue ? item.getLastEmailDate().Value.ToShortDateString() : "",
            Selected = true
        };

        // Add to the list contained by the "wrapper" ViewModel:
        model.MailRecipients.Add(newRecipient);
    }
    // Pass to the view and return:
    return View(model);
}
As we can see, the Index() method now retrieves a list of all the recipients from the data store, iterates over the list, and creates an instance of SelectRecipientsViewModel for each (in this case, setting the Selected property to true for each, although this is optional. The default value of Selected may vary with the needs of your application).
Add a Send Mail Method Stub to the Index Controller
For the moment, we won’t get into the nitty gritty of actually sending email – We’ll look at that in the next post. For now, let’s just add a method stub with a delay that simulates a long-running process such as sending a bunch of email, then returns the refreshed Index view again.
Add the following code to the end of the Index Controller:
Code Stub for the Send Mail Method:
[HttpPost]
[Authorize]
public ActionResult SendMail(MailRecipientsViewModel recipients)
{
    // Mail-sending code will happen here . . .
    System.Threading.Thread.Sleep(2000);
    return RedirectToAction("Index");
}
The Index View – Selecting Recipients and Sending Email
Here again, we refer to concepts discussed in Display an HTML Table with Checkboxes in ASP.NET. We need to modify the Index.cshtml file created by Visual Studio to accommodate our special need for checkboxes. We will also be adding a Select All option, and a “Send Mail” button to, well, send email once we have selected some recipients form the list.
The generated code produced by VS looks like this:
Code Generated by Visual Studio for the Index View:
@model IEnumerable<AspNetEmailExample.Models.MailRecipient>

@{
    ViewBag.Title = "Index";
}

<h2>Index</h2>

<p>
    @Html.ActionLink("Create New", "Create")
</p>
<table class="table">
    <tr>
        <th>
            @Html.DisplayNameFor(model => model.LastName)
        </th>
        <th>
            @Html.DisplayNameFor(model => model.FirstName)
        </th>
        <th>
            @Html.DisplayNameFor(model => model.Email)
        </th>
        <th>
            @Html.DisplayNameFor(model => model.Company)
        </th>
        <th></th>
    </tr>

@foreach (var item in Model) {
    <tr>
        <td>
            @Html.DisplayFor(modelItem => item.LastName)
        </td>
        <td>
            @Html.DisplayFor(modelItem => item.FirstName)
        </td>
        <td>
            @Html.DisplayFor(modelItem => item.Email)
        </td>
        <td>
            @Html.DisplayFor(modelItem => item.Company)
        </td>
        <td>
            @Html.ActionLink("Edit", "Edit", new { id=item.MailRecipientId }) |
            @Html.ActionLink("Details", "Details", new { id=item.MailRecipientId }) |
            @Html.ActionLink("Delete", "Delete", new { id=item.MailRecipientId })
        </td>
    </tr>
}

</table>
This view expects a Model of type MailRecipient, and will display an overly cluttered table, with a column for every property. Instead, we would like to simplify the table layout, as well as consume a different Model – our MailRecipientViewModel, and the list of potential recipients it contains.
Replace the code above with the following:
Replacement Code for the Index View:
@model AspNetEmailExample.Models.MailRecipientsViewModel
@{
    ViewBag.Title = "Email";
}
<h2>Send Email to Selected Recipients</h2>
<p>
    @Html.ActionLink("Create New", "Create")
</p>
@using (Html.BeginForm("SendMail", "MailRecipients", FormMethod.Post, new { encType = "multipart/form-data", name = "myform" }))
{
    // Add a "Check All" checkbox above the table:
    <div>
        <input type="checkbox" id="checkall" /><span>Check All</span>
    </div>

    // Wrap the table in a named <div> so we can refer to it from JQuery:
    <div id="checkboxes">
        <table class="table">
            <tr>
                <th>
                    @*This column will contain our checkboxes:*@
                    Select
                </th>
                <th>
                    @*This column will now hold a concatenation of the first/last names:*@
                    Name
                </th>
                <th>
                    Company
                </th>
                <th>
                    Email
                </th>
                <th>
                    Last Sent
                </th>
                <th></th>
            </tr>
            @* Our Table rows will be populated in the EditorTemplate: *@
            @Html.EditorFor(model => model.MailRecipients)
        </table>
    </div>
    <hr />
    <br />

    //Add a submit button to the bottom of the form:
    <input type="submit" name="operation" id="email" value="Email Selected" />
}
<div id="divProcessing">
    <p>Processing, please wait . . . <img src="../../Content/ajax-loader.gif"></p>
</div>
    @section Scripts {
        @Scripts.Render("~/bundles/jqueryval")
        <script type="text/javascript">
            function toggleChecked(status) {
                $("#checkboxes input").each(function () {
                    $(this).prop("checked", status);
                });
            }
            $(document).ready(function () {
                // Grab a reference to the checkall checkbox:
                var checkAllBox = $("#checkall");
                var divProcessing = $("#divProcessing");
                // Hide the animated Gif when page loads:
                divProcessing.hide();
                checkAllBox.prop('checked', true);
                // Attach a handler for the checkAllBox click event:
                checkAllBox.click(function () {
                    var status = checkAllBox.prop('checked');
                    toggleChecked(status);
                });
                $('#email').click(function () {
                    // Required hack to get animated gif to run in IE:
                    setTimeout(function () {
                        divProcessing.show();
                    }, 100);
                    $('myform').submit();
                });
            });
        </script>
    }
In the code above, we have made substantial changes to the View. First, the View is now based on our MailRecipientsViewModel, instead of a List<MailRecipient> as before. Also, we have added a new table column layout, with a checkbox as the first column, and a single column for displaying the name.
Instead of iterating over each item in a list to populate our table, we simply pass the MailRecipients property of our MailRecipientsViewModel to our Editor Template, which then takes care of rendering our list.
Also notice, we have added some JavaScript and additional HTML elements to provide a “Check All” checkbox at the top of the table. In addition, we have added some extra elements and some JavaScript to display an animated GIF Busy indicator after the user clicks the submit button to send mail (see the linked article for more about how this works – you will need to add an GIF to the Content folder if you did not clone this project from source).
Finally, note where we declare our HTML form. Specifically, in the BeginForm() method we set our submit arguments to create an HTTP POST request against the SendMail() action of the MailRecipients controller.
Add a Mail Recipients Tab to the Layout
Now, so that we can get to our Mail Recipient functionality, let’s add a tab to the main layout. Open the Views => Shared => _Layout.cshtml file. In the middle of the file, add a tab that links to the Index method of our MailRecipientsController:
Add a Tab for Mail Recipients:
<div class="navbar-collapse collapse">
    <ul class="nav navbar-nav">
        <li>@Html.ActionLink("Home", "Index", "Home")</li>
        <li>@Html.ActionLink("About", "About", "Home")</li>
        <li>@Html.ActionLink("Contact", "Contact", "Home")</li>
        <li>@Html.ActionLink("Admin", "Index", "Account")</li>
    </ul>
    @Html.Partial("_LoginPartial")
</div>
For now, we are just leaving the default Home/About/Contact views as they are. in reality, we would remove these and replace them with our own and probably use [Authorize] to restrict access to most of our application in keeping with our requirement for internal, authorized-only access.
** If you cloned the project from Github, these are already removed**
At this point, we have everything we need to run our project, make sure everything is working properly, and make any adjustments if needed. Well, almost. First, we need to run Entity Framework Migrations to create our database.
Run EF Migrations to Create the Database
If you have cloned this project from Github, you should be all set to go. The migration is already defined, although you may want to open the Configuration file in the Migrations folder and swap out my sample user name for your own. Simply open the Package Manager Console and do:
Update Database -F
I have found I sometimes need to do this twice to get the Seed() method to run.
If you need more information on this part of the process, see Configuring Db Connection and Code-First Migration for Identity Accounts in ASP.NET MVC 5 and Visual Studio 2013.
Running the Application
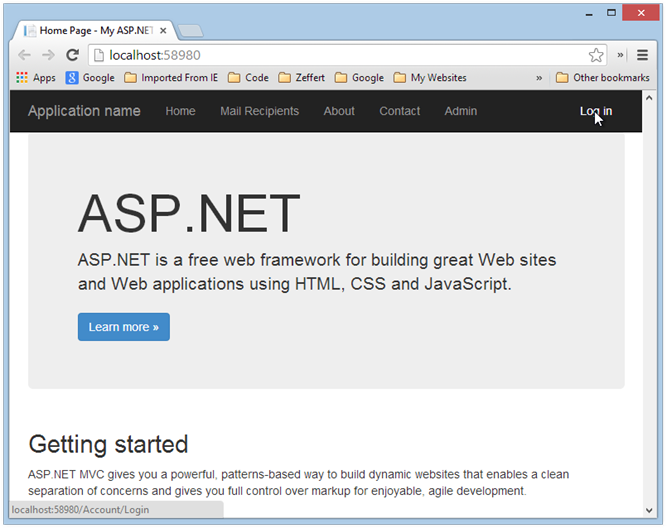
Ok. If everything has gone well, you should be able to run the application. You will need to log in using the user name and password you created in the Seed() method, otherwise you won’t be able to access the Mail Recipients tab (remember, this is an internal access application, with no public registration).
The Application Main Page at Startup:
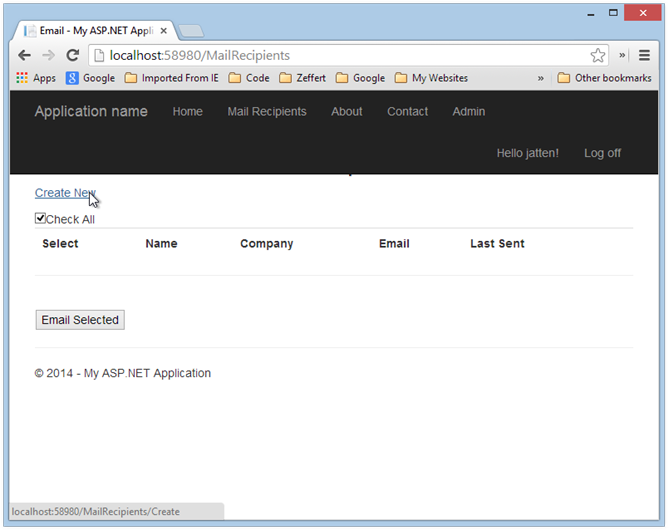
Once logged in, navigate to the Mail Recipients tab. Not much to see here yet, as we have no recipients yet:
The Mail Recipients Page (Empty):
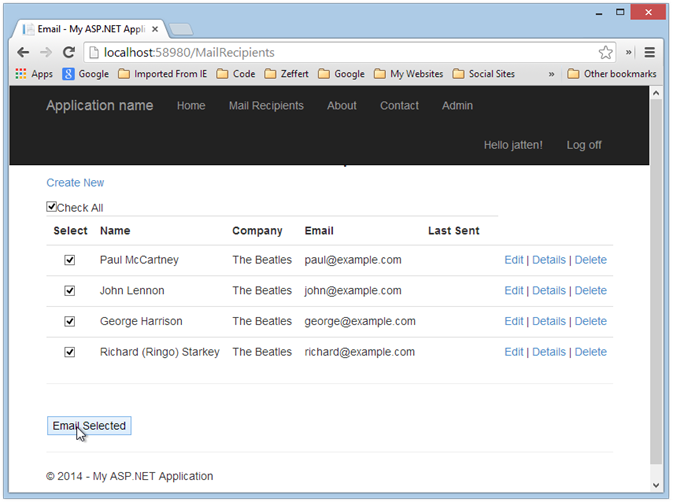
Click the Create New link to add a recipient. When done, you should see something like this:
The Mail Recipients Page (with data):
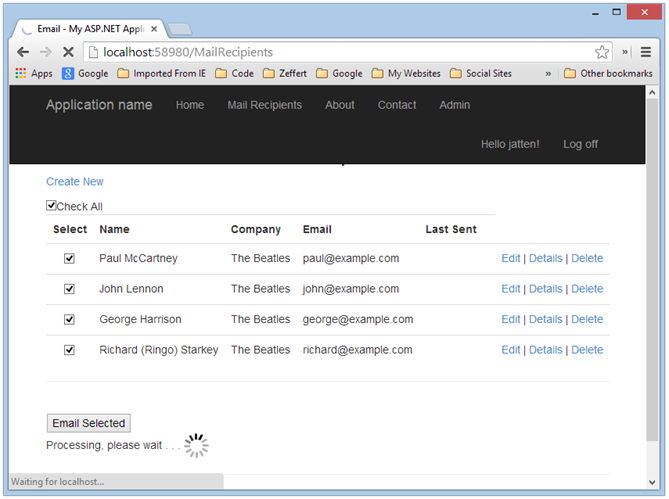
Now, if we click the Email Selected button, we should see our “busy” spinner while our method stub runs down the clock on the Thread.Sleep() call we are using to mock sending our emails:
Pretending to Send Mail:
Because this is getting a little long, I’m going to address the actual mail sending in the next post.
For now, we have built out a fairly basic front-end, providing a surface for the user interaction. At the same time, we have addressed our requirement the mailing list portion of the application be restricted to internal, authorized access.
Up Next: Adding the Mail Sender and Filling in the SendMail() Method
Additional Resources and Items of Interest
- Part II: Adding the Mail Sender and Filling in the Send Mail Method
- Get the Source Code from Github
- Extending Identity Accounts and Implementing Role-Based Authentication in ASP.NET MVC 5
- Configuring Db Connection and Code-First Migration for Identity Accounts in ASP.NET MVC 5 and Visual Studio 2013
- ASP.NET MVC Display an HTML Table with Checkboxes to Select Row Items
- SP.NET MVC: Show Busy Indicator on Form Submit using JQuery and Ajax
- C# – Generate and Deliver PDF Files On-Demand from a Template Using iTextSharp
Comments
 Jamie
Jamie
AuthorHi, i did the checkbox in this method and would like to send emails to participants based on this checkbox. I would need help if the item is checked, an email will be sent to them. How do i go about doing that? Thank you for ur help.
$(document).ready(function () {
$(‘#checkBoxAll’).click(function () {
if ($(this).is(“:checked”))
$(‘.chkCheckBoxId’).prop(‘checked’, true);
else
$(‘.chkCheckBoxId’).prop(‘checked’, false);
});
});
@TempData[“Msg”]
@if (ViewBag.ButtonText == “Send Reminder Email”)
{
First Name
Last Name
Email
Select All
 Chris
Chris
AuthorOn MailRecipient.cs (class) the public MailRecipient() throws an error saying method must have a return type. Can’t find what is going wrong….
 John Atten
AuthorHard to tell without some context. Can you include more info (like, what line the error occurred on? From the above, it sounds like something you are calling in the constructor is not coded correctly. What version of ASP.NET are you using?
 Axphey
AuthorThis is something which could solve my problem.
Kudos to the developer !!