Having represented this site as a technology blog with a focus on programming and software development, I find myself starting off with a tutorial on Excel basics instead. Somehow, I thought it was going to be more glamorous than this . . . This is driven by my need to prepare a training for my staff at work, and in keeping with the DRY principle (Don’t Repeat Yourself) I am killing two birds with one stone. Anyone hoping to read programming stuff is just going to have to wait . . .
Spreadsheets are misunderstood by the majority of people who use them. For many people a spreadsheet is nothing more than a handy way to create and organize lists. Some people use spreadsheets to present and layout data in a pleasing grid-like manner, and to apply pretty colors and formatting. If you are one of these people, you are missing out, and most likely working much harder than you need to.
Microsoft Excel, and other spreadsheets, are powerful data analysis tools. First and foremost, they are purpose-built to crunch numbers, twist, and manipulate information. A properly set up spreadsheet can make fast work out of calculations which would be laborious a few decades ago. While not really intended for this purpose, a spreadsheet can also serve as a small ad hoc database if no better alternative is available.
For even the most casual of users, properly understanding how a spreadsheet works, and how it handles the information you put into it will provide an almost immediate payoff. You do not have to be a “computer whiz” to get impressive results. Most importantly, you can save yourself time and pain by letting the spreadsheet do the heavy lifting for you. But before you can do that effectively, it is important to understand how Excel stores and works with information.
Rows, Columns and Cells – The Basic Unit of Data Storage in Excel
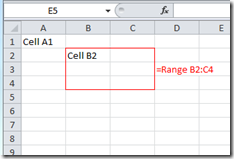
While nearly everyone is acquainted with the grid layout in a spreadsheet window, let’s stop and think about what that really is. The grid is composed of ROWS and COLUMNS.The intersection of a row and a column is known as a CELL. Each cell has a unique address within the spreadsheet represented by the intersection of the row and column. For example:
-
The address of the top right cell in the image to the left is A1 (Column A, Row 1).
-
The Address of the Cell in Column B row number 2 is, appropriately, B2 (Column B, Row 2).
-
The cells in the area bounded by the red square would be referred to by the address B2:C4. Note the use of the colon to separate the upper right cell address form the lower left cell address.
The cell is the basic unit of data storage within a spreadsheet. Each cell is assumed to contain some value (even if that value is nothing). Cells can also contain expressions (a mathematical expression is another name for a formula or a pre-defined function) which return the results of a calculation. In this case, the result of the formula is what is displayed in the cell. An expression within one cell can refer to the values from other cells as part of a calculation, even when those values are themselves the result of another expression.
If we think of the cells in a spreadsheet as little containers for the various bits of data we wish to work with, then expressions are the primary tool with which we calculate/analyze/manipulate/cajole/coerce or otherwise force our data bits to deliver enhanced and meaningful information.
Expression Essentials
We will take a quick look at using very simple expressions in Excel, mainly to get you oriented. We will take a more detailed look at expressions in a later post. Before we examine them in depth, we will need to cover some other important ground. Bear with me. It will be worth it, really.
Ordinarily, when you type expressions into a cell, the formula is visible in the cell until you exit the cell (by hitting the “Enter” key, the “Tab” key, or by selecting a different cell with the mouse pointer), at which point the result of 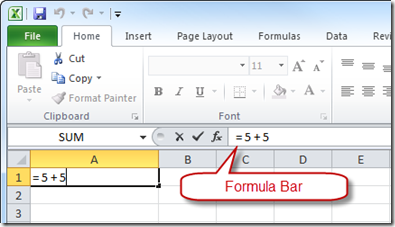 the expression is displayed instead. If you navigate back into the cell, the formula is not shown in the cell directly. However, you can either examine and edit the formula in the Formula Bar (between the main application menu area and the worksheet proper), or you can double-click within the cell, which will cause the formula to be displayed and edited directly (double-clicking within a cell places the cell content into an editable state, whether it contains data or an expression. Navigating into a cell and typing without double-clicking over-writes the existing cell content entirely).
A Really Trivial Example
You let Excel know you are entering a formula by beginning the entry with the “equals” sign, followed by your formula. All formulas must begin with the equals sign. Try a simple calculation first. Open Excel. You should be looking at an empty spreadsheet.
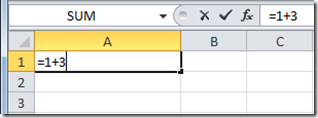
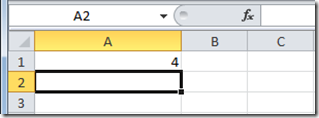
Select an empty cell (Excel will open with the top-right cell already selected. you can use this cell if you like). Type the expression between the quotes exactly (but don’t type the quotes themselves): “=1+3” then hit the “Enter” key.
| Before you hit Enter: | After you hit Enter: |
 |
Congratulations! You have now learned that 1 plus 3 equals 4!
More importantly, you have now learned how to use Excel to perform mathematical calculations, just like a calculator. There are some differences with respect to how you enter certain calculations, however. In Excel (and in most computer mathematical operations), we use the following symbols, or operators, to create familiar math expressions. Some are familiar, but a few look a little different:
|
Operation |
Symbol (Operator) |
Example of Use (as typed into cell) |
Output (displayed in cell) |
| Equality | = | =2 + 1 | 3 |
| Addition | + | =4 + 4 | 8 |
| Subtraction | – | =5 – 2 | 3 |
| Multiplication | * | =5 * 5 | 25 |
| Division | / | =10 / 2 | 5 |
| Exponent | ^ | =3 ^ 2 | 9 |
| Quantity | () | =(2 + 8) / 2 | 5 |
Reference Another Cell Value in an Expression
Now let’s look at something a little more interesting. As I mention above, expressions within cells can also use the values contained in other cells. Let’s start there. We refer to a value in another cell (reference the other cell) from within an expression by typing the address of the cell we wish to reference as part of the expression. In this case, we will store a number in cell A1. Then we will type an expression in cell B1 which refers to the value in cell A1, adds 5 to it, and displays the result.
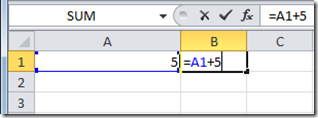
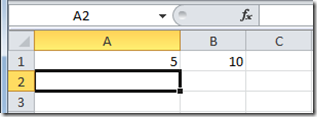
Select the cell from the previous example and hit the “Delete” or “Backspace” button. Now type the number 5 into the cell and hit the “Tab” key. Note how the cursor moves horizontally to the next cell to the right? OK. Now, in the current cell (cell B1), type the expression between the quotes (again, don’t type the quotes themselves): “=A1+5” . Notice how as you completed typing the cell address for cell A1, the referenced cell grew a thin colored outline with little boxes on the corners? This provides a visual cue as to the location of the referenced cell. Now hit the Enter key.
| Before you hit Enter: | After you hit Enter: |
 |
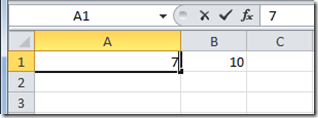
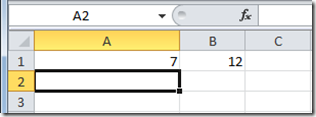
We now have a formula in cell B1 which adds five to the value in cell A1. What is cool here is that we can change the value stored in cell A1, and the formula in cell B1 still works. Click in cell A1 again, and type the number 7, then hit Enter.
The value displayed in cell B1 should now be 12. The expression in cell B1 displays the result of adding 5 to the value stored in cell A1:
| Before you hit Enter: | After you hit Enter: |
 |
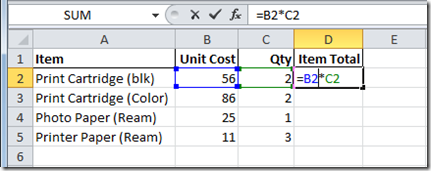
You can take this idea much further. You can, for example, use multiple cell references within a formula. In the next example, I have used the first row to type in some column header names, to give a little meaning to our data. We’re making a simple sales order. Next, I input some sample data, and created a simple formula in the far right column which multiplies the unit cost of a specific product by the number ordered. To this point, I have only done this for the first row:
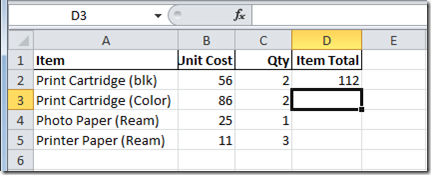
Then, when we hit the Enter key, the result:
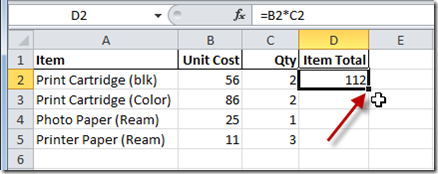
Now, instead of entering a similar formula manually for each row in order to complete the Item Totals Column, lets take a quick look at the auto-fill feature. Note the little square blob on the lower right corner of the Cell Selection Indicator (see below)? This is the selection handle:
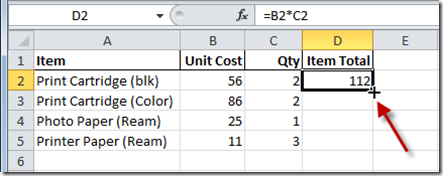
When you position your mouse cursor over the Selection Handle, note that the mouse cursor changes to a small cross:
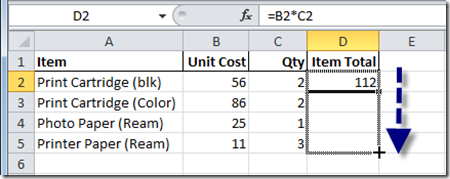
If you push and hold the left mouse button and then drag down, you will find that Excel copies the contents of the first cell into each of the cells you drag over:
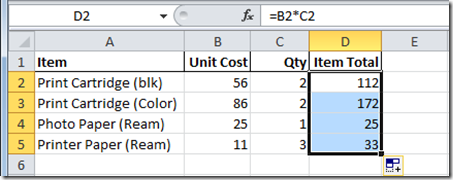
When the dragging action is complete and you release the mouse button, you will see that Excel has copied your first formula into the other cells but has adjusted the cell references, and is now displaying the results for each row:
We have now touched on a few (very) basic aspects of how Microsoft Excel is laid out, and how it regards the information contained within the cells of a spreadsheet. What we have covered so far doesn’t do much in and of itself, so I will understand if you are thinking “And? So what?” What we have done is laid the foundation for our next few discussions about incorporating USEFUL formulas into your spreadsheet, and getting Excel to do more of you work for you. In the next post we will look at some of the built-in functions Excel provides to make it easier for you to create useful expressions. After that we will take a closer look how Excel treats different types of data. You will find that recognizing how Microsoft Excel treats different data types can have a major impact on the performance of you spreadsheet. Also, understanding the differences between different data types will help YOU think more effectively about your data, which in turn will help you become much more efficient in using Excel for creating effective reports and analyses.
Summary
- An Excel Spreadsheet is composed of COLUMNS and ROWS
- The intersection of a column and a row defines a CELL. Cells are referred to by their ADDRESS, which is the combination of the cell’s column letter and the row number. The cell in the second row of column B would be referred to as cell B2.
- Cells are the basic unit of storage in a spreadsheet, and contain either data or expressions (formulas). In either case the cell represents a VALUE.
- An expression is either a formula or a pre-defined function. Formulas and functions return a value, which is represented as the value of the cell containing the formula or function.
- Formulas can incorporate references to other cells as part of the formula.
- When the value of a cell referenced by a formula changes, the output of the formula changes correspondingly.
Comments