Image by shinichi | Some Rights Reserved
When one is developing in .NET with Visual Studio and other Microsoft tools, it is easy to lose sight of alternative solutions to common problems. MS does a competent job of creating a tightly integrated development tool chain, where available MS products (both free and paid) offer reasonable default choices which generally get the job done.
Given this, .NET devs often fail to explore outside this arena, or try on alternate solutions which might acquit themselves equally as well, or better, to the problem at hand. Also, of course, there is always a learning curve to new choices, and we often choose the familiar out of simple expediency.
- Getting Started – Using SQLite on Windows
- Open a New Database and Create Some Tables from the SQLite3 Console
- Entering SQL in the SQLite Console
- Formatting the Console Output
- Change the Display Mode for the SQLite Console
- Executing Script Files from the SQLite Console Using the .Read Command
- Wrap Multiple Actions in Transactions for Instant Performance Boost
- GUI-Based Tools
- Additional Resources and Items of Interest
Some Background
SQLite is an awesome, open source, cross-platform, freely available file-based relational database. Database files created on Windows will move seamlessly to OSX or Linux OSes. The tools (in particular the SQLite3 Command Line CLI we examine here) work the same from one environment to the next.
It is also not new. If you have been around for a while, you doubtless know SQLite has been in active and open development for well over a decade, and is widely used in many different scenarios and operating environments. In fact, SQLite.org estimates that SQLite is in fact the most widely deployed SQL database solution in the world. Their most recent figures (albeit from 2006) would indicate that there are over 500 million deployments of SQLite (this number is no doubt higher by now).
SQLite documentation is also widely regarded as above average in completeness and usability, providing both new and experienced users a well-developed canonical resource for learning and troubleshooting.
SQLite was originally designed by D. Richard Hipp in 2000 for the U.S. Navy, with the goal of allowing SQLite-based programs to function without installing a database management system, and without requiring a system administrator (from Wikipedia). These design requirements result in, as the SQLite site describes it, “a software library that implements a self-contained, serverless, zero-configuration, transactional SQL database engine.”
Until recently, I had not spent much time with SQLite. However, in developing the Biggy project, we decided that the core supported database systems would be cross-platform and open source. We wanted both a full-on client/server option, as well as a file-based relational database option. For our file-based relational database we chose SQLite, after exploring other alternatives.
In fitting SQLite into the Biggy workflow, I got to the chance to familiarize myself with SQLite, it strengths, some weaknesses, some peculiarities to watch for, and some tips and tricks for getting the most out of the product.
In this post, we will get familiar with the basics of using the database in a Windows environment. Next post, we will explore integration with .NET development, and Visual Studio. But, learn the hard way first always say, so… let”s get our command line on.
Getting Started – Using SQLite on Windows
Before we look at using SQLite in Visual Studio, let’s walk through the basics of using SQLite in a Windows environment outside the IDE.
First, download the pre-compiled binaries from the SQLite Downloads page. At a minimum you will want the binaries for the Win32 x86 SQLite dll, and for the SQLite x86 Command Shell. Unzip the contents of the files in a folder named C:\SQLite3 (or whatever other location suits your needs). Then add C:\SQLite3 to your PATH variable so that you can invoke the SQLite Command Shell right from the Windows console.
In your new directory C:\SQLite3 you should now have the following items:
- sqlite3.def
- sqlite3.dll
- sqlite3.exe
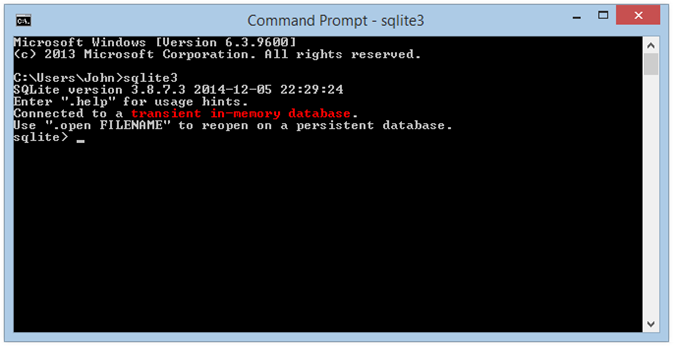
If we run the sqlite3.exe, we are greeted with a Console Application designed to allow us to work with SQLite databases:
The SQLite Console:
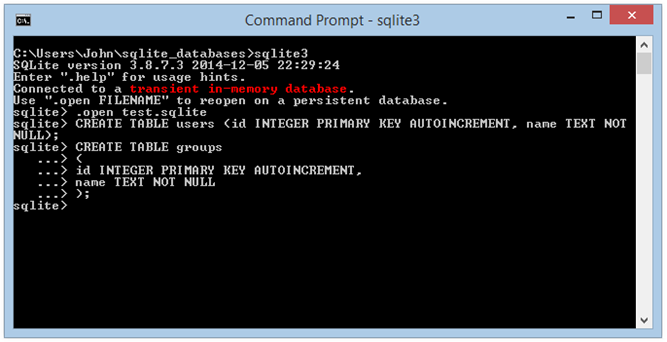
The command prompt is easy to use. Text entered without the “.” qualifier will be treated as SQL (and succeed or fail accordingly). There are a set of commands preceded with the “.” qualified which are application commands. An example is shown in the console window above, where we are instructed to use the .open command to open a database file.
The complete list of SQLite console commands is beyond the scope of this article, but we will walk through a list of the most useful here.
Open a New Database and Create Some Tables from the SQLite3 Console
The SQLite3 Console will open in the current directory (or in the directory in which the .exe is found, if you double-click in the GUI). Let’s start by opening a new Windows terminal (which should generally open in our home directory), create a new sub-directory named sqlite_data, and navigating into that folder:
Create a new Directory and Navigate Into the New Directory:
C:\Users\John> mkdir sqlite_databases
C:\Users\John> cd sqlite_databases
Next, let’s try on that .open command. Open sqlite3 and open a new database in the directory we just created:
Open SQlite3.exe and Open a New Database File:
C:\Users\John\sqlite_databases>sqlite3
sqlite> .open test.sqlite
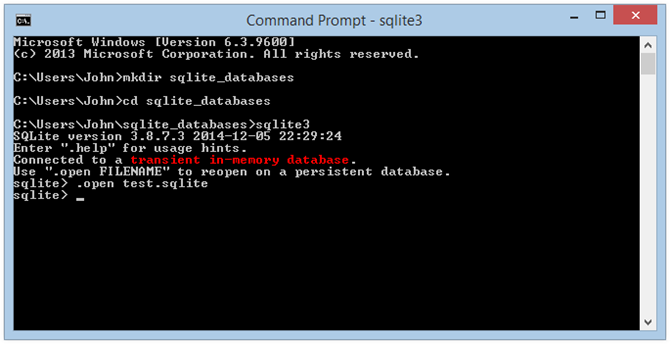
Your console output should now look like this:
Console Output after Opening SQLite3 and Creating a New Database File:
Next, let’s create a few tables to play with.
Entering SQL in the SQLite Console
Recall that plain text entered without the “.” qualifier will be interpreted by the SQLite console as SQL. There are a few additional things to bear in mind:
- SQL text may span multiple lines – the enter key will not cause the text following the prompt to execute until it is ended with a semi-colon.
- You can create multi-line SQL statements simply by hitting the Enter key without ending the statement with a semi-colon.
- SQLite uses either square brackets or double-quotes as delimiters for object names, in cases where the literal column name would not be allowed. For example, Last Name would NOT be a valid column name, but will work as [Last Name] . Likewise, the keyword Group is not allowed as a column name, but “Group” will work.
- SQLite is not case-sensitive. Unlike some other databases (most notably Postgresql), casing in both the SQL syntax, and in object names, is ignored.
So, with that said, let’s create a table or two.We will keep this really basic, since we are interested in how the console works, more so that a SQLite SQL syntax tutorial.
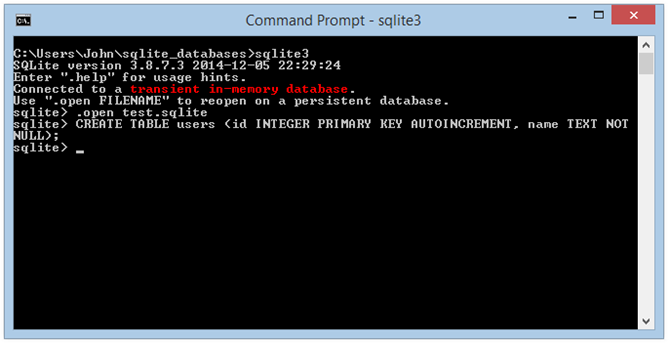
Create a Table in a Single-Line Statement:
Above, we just kept typing our whole SQL statement, and allowed the console to wrap the text when it needed to (that lovely Windows console, with its under-developed display characteristics…). Kinda ugly and hard to read. Let’s try a multi-line statement.
Create a Table Using a Multi-Line Statement:
Aside from the ugliness that is the Windows Console, that’s a little more readable.
Now let’s add a few records.
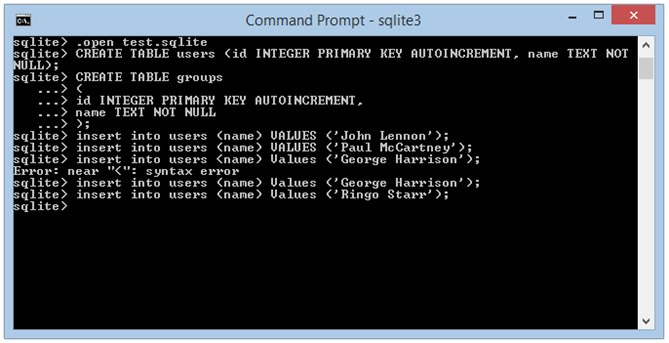
Insert Records into Test Database:
Notice how the case of my SQL doesn’t matter in the above? And, yes, as a matter of fact, that IS a syntax error in the midst of things there. I accidentally used an angle bracket instead of a paren…
So now, we have added a little data. Let’s read it back:
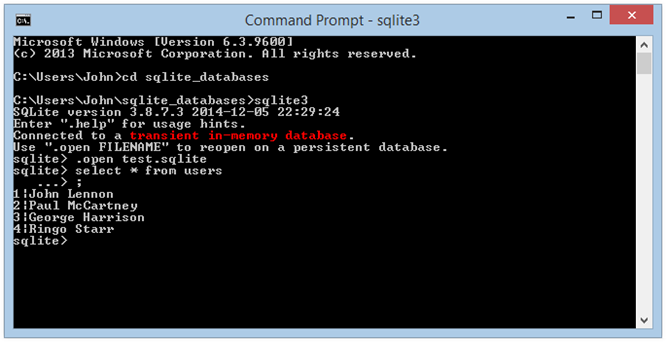
Select Data from Users Table:
Here we see that for unrelated reasons (ahem… I closed the wrong window…), I had to exit the application, and then go back in. However, once I opened our test.sqlite database, I was able to enter a standard SELECT statement, and return the data.
See that ...>;? That was the result of me forgetting to add the semi-colon at the end of my SELECT statement. If you do that (and you WILL…), simply add a semi-colon on the continued line, and the statement will execute (remember, until SQLite3 sees a semi-colon, it will continue to interpret text input as more SQL).
Formatting the Console Output
We can tell SQLite3 how we would like our data displayed. For example, we may prefer to see a more tabular display, with columns and headers. To accomplish this, we use a few of those application commands, prefixed with a period:
Change the Display Mode for the SQLite Console
We can use the following two commands to change the display mode and use columns and headers in our console output:
Use Column Display Mode with Headers in SQLite3
sqlite> .mode column
sqlite> .headers on
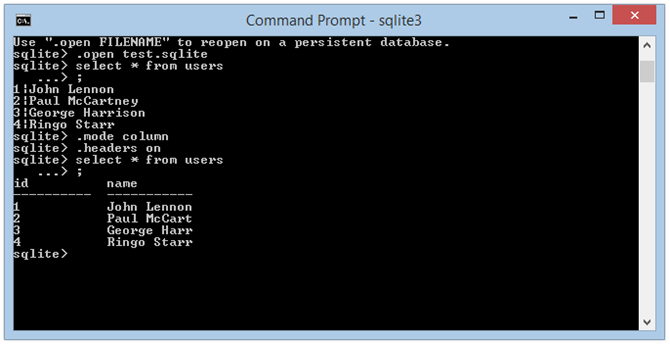
If we run our SELECT statement again, the output looks like this:
Console Output Using Columns and Headers:
Executing Script Files from the SQLite Console Using the .Read Command
Of course, typing in SQL in the console can become painful. While it is fine for quick-and-diry queries and maintenance tasks, doing a lot of work is better accomplished by scripting out what you need in a text file, and then executing that from the Console.
To see this in action, we will download my personal favorite test database, the Chinook database. Chinook has a database script for most of the popular database platforms, providing a handy way to use the same data set for evaluating multiple platforms (among other things). Download the Chinook Database, extract the .zip file, and locate the Chinook_Sqlite_AutoIncrementPKs.sql file. To keep things simple, drop a copy of it into your sqlite_databases folder, so it is in the current directory. Then, also to keep out typing down, rename the file you just moved to simply “Chinook.sql”.
We can execute SQL scripts using the SQLite .read command. To illustrate, we will read in the Chinook database.
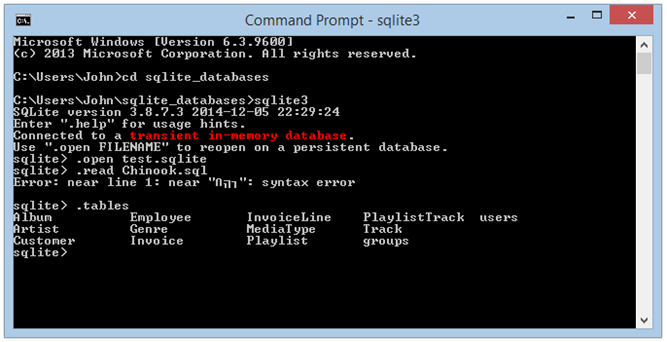
You will notice a couple things when we do this. First, the console may show an error (which you can see in the image below), but the script is still running – errors are logged out to the console.
Second, executing this script in its current form is SLOOOOWWWW. This is due to a peculiarity with SQLite we will address momentarily, but was not addressed by the creators of the Chinook Database script.
Execute SQL Script from the SQLite Console Using the .Read Command
sqlite> .read Chinook.sql
The script may run for a good number of minutes, so go grab a cup of coffee or something. your computer has not seized up. The Console will return when the script is finished (really, this took about 10 minutes on my machine, but we’re going to fix that…
<Coffeee Brake . . .>
Ok. Now that the script has finished running, let’s use the .tables command to see a list of the tables in our database. If everything worked as we expect, we should see our own users and groups tables, as well as a bunch of new ones populated with Chinook data:
List Tables Using the .Tables Command:
sqlite> .tables
We should see something like this:
Console Output from .Tables Command:
Now, why the hell did it take so long to run that script??!!
Wrap Multiple Actions in Transactions for Instant Performance Boost
SQLite is inherently transaction-based. Meaning, unless you specify otherwise, each statement will be treated as an individual transaction, which must succeed, or be rolled back.
Transactions are a key feature of relational databases, and critical in the big scheme of things. However, individually, transactions add significant performance overhead, and when we are inserting (or updating, or otherwise modifying) thousands of records in multiple tables, treating each insert as an individual transaction slows things WAAAAYYYY DOWWN.
If we go through the Chinook.sql script and place a BEGIN; statement before the inserts for each table, and a COMMIT; statement at the end of the INSERTs for each table, we will see several orders magnitude better performance from this script.
We can skip wrapping the DROP and CREATE table statements in transactions for our purposes here. As an example, open the file in your favorite text editor, go through and find the beginning of the INSERTs for the Genre table. Add a BEGIN and COMMIT clause like so:
Wrap Table Inserts in Transactions:
BEGIN;
INSERT INTO [Genre] ([Name]) VALUES ('Rock');
INSERT INTO [Genre] ([Name]) VALUES ('Jazz');
... Etc ...
INSERT INTO [Genre] ([Name]) VALUES ('Alternative');
INSERT INTO [Genre] ([Name]) VALUES ('Classical');
INSERT INTO [Genre] ([Name]) VALUES ('Opera');
COMMIT;
Now scroll on down, and do the same for each table. When you are done, let’s create a dedicated Chinook database to try it out.
Open the Windows Console, navigate back to sqlite_databases directory, run sqlite3, and open a new database named chinook.db. Then use .read to execute the chinook.sql script again:
Read Chinook Script into Chinook.db:
C:\Users\John>cd sqlite_databases
C:\Users\John\sqlite_databases>sqlite3
sqlite> .open chinook.db
sqlite> .read chinook.sql
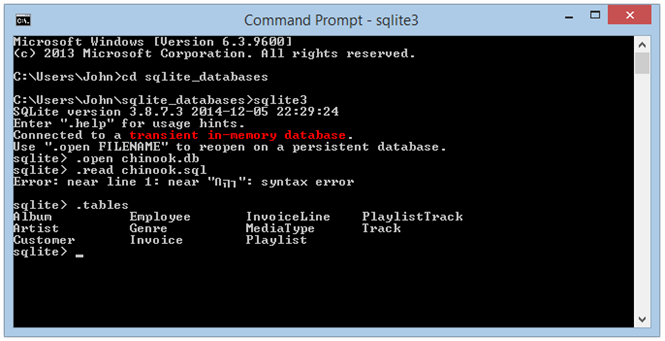
Next, use the .tables command again to see that all the tables were created. The console output should look like this:
Console Output from Execution after Wrapping Table Inserts in Transactions:
We see there is still a little error bugaboo at Line 1 (most likely due to some unicode issue at the beginning of the file – welcome to the world of scripts). However, we can see if our data imported fairly easily:
Select Artists from the Chinook Artists Table: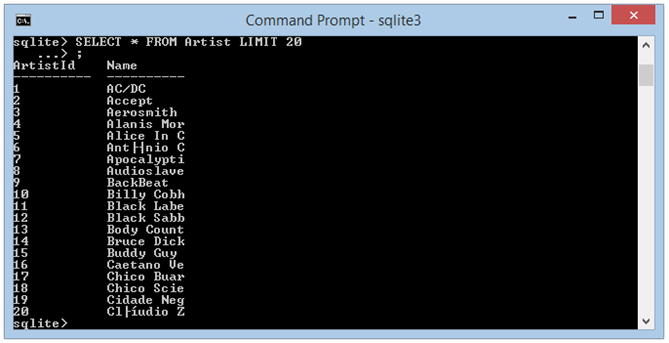
GUI-Based Tools
We’ve covered enough here that we can explore what SQLite has to offer from the Windows console, and become familiar with this fantastic little database. Of course, there are other tools available to work with SQLite databases, including a terrific multi-platform GUI-based interface, SQLiteBrowser, which is a very competent management interface for SQLite databases.
As mentioned previously, the documentation available at SQL.org is first-rate, and there are a host of other resources out there as well.
SQLite is a handy, mature, highly performant database which is easy to use, and works on all the major OS platforms. Database files created on a Windows machine can move seamlessly between OSX and *Nix OSes, as can most of the tools designed to work with them.
I like to start everything with the most fundamental tools available, and then once I have developed a solid understanding of the system, move on up to more advanced tools. Take some time and get to know SQLite from the basic CLI interface. You won’t regret it.
Additional Resources and Items of Interest
- Command Line Shell for SQLite – Reference at SQLite.org
- SQLite Syntax – Reference at SQLite.org
- Database Browser for SQLite
- Adding and Editing PATH Environment Variables in Windows
- C#: Using Reflection and Custom Attributes to Map Object Properties
Comments
 Tim Jensen
AuthorThis was super helpful to me. Thank you for creating this!!
 varun
varun
AuthorHello,
I am using mytempsql.SQLite file, which is showing an error of encrypted file or not in the database.
here are my commands in mytemp.sqlite
create table emp (EMPNO integer , ENAME varchar(32) , JOB varchar(32) , HIREDATE datetime , SAL float ,COMM real ,DEPTNO integer);
create table dept (DEPTNO integer, DNAME varchar(32), LOC varchar(32), DIVNO integer);
create table division (DIVNO integer, DIVISION varchar(32));
INSERT INTO emp (EMPNO, ENAME, JOB, HIREDATE, SAL, COMM, DEPTNO) VALUES(101, ‘NAME1’, ‘TITLE1’, ‘1990-02-02 02:02:02’, 100500.55, 2000.90, 1);
INSERT INTO DEPT (DEPTNO, DNAME, LOC, DIVNO) Values (1, ‘Software’, ‘San Jose’, 10);
INSERT INTO DIVISIOn (DIVNO, DIVISION) VALUES (1, ‘SJ’);